2014/06/02(月) [n年前の日記]
#1 [dxruby][ruby][cg_tools] DXRubyとcairoでswfのシェイプを描画してみる実験
_2014/05/29
に、DXRubyでswfのシェイプを描画する実験をしたのだけど。あまりにも処理が遅い上に、描画も汚くてしょんぼりだったわけですが。
_cairo
と組み合わせて使えば、もっと速く、もっと綺麗にできるんじゃないかと思えたので試してみたり。
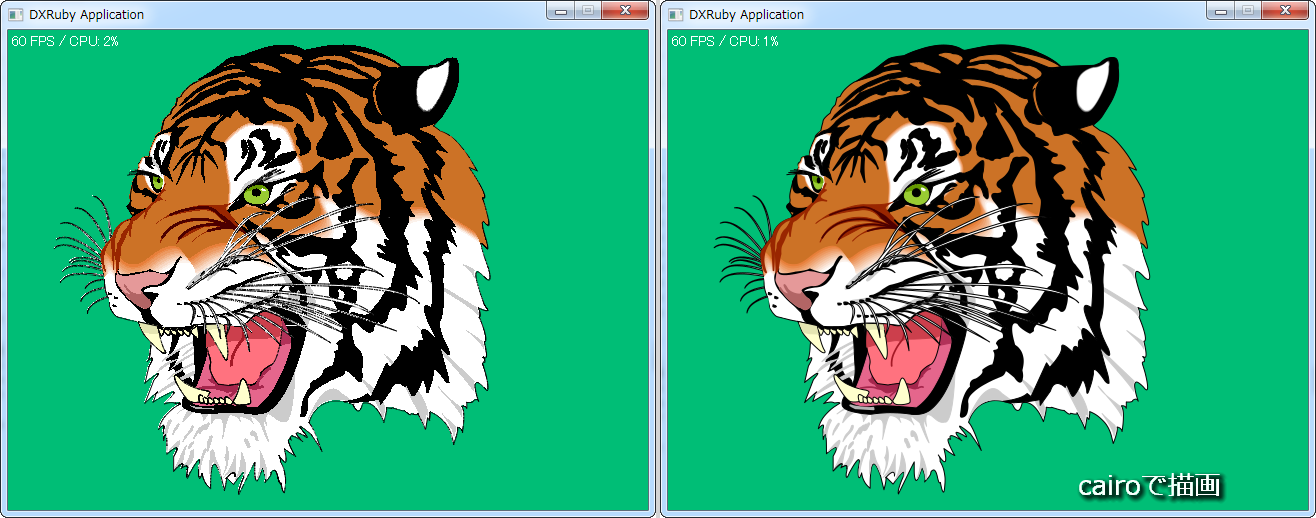
こんな感じになりました。右側が、cairoを使って描画した結果。 さすがに美しい…。cairo、凄いなあ。
ソースは以下。
_shapeparse_with_cairo.rb
データ一式も置いときます。
_swf_shape_parse_20140602.zip (434KB)
アンチエイリアスをかけながら描画してくれるライブラリなだけあって、さすがに綺麗。しかも、CPU負荷率を見る限りでは、自前で線描画や多角形塗りをするよりも、40倍ぐらい速くなりました。
それでもやっぱり、リアルタイムに描画するのは速度的に無理なので、実用にはならないのですけど。どう考えても、最初からレンダリング済みのビットマップ画像を用意しておくべきだなと。
更に、このやり方、現状ではかなりトホホな点があって。cairo で描画した後、結果を一旦 pngファイルでHDDに保存して、それを DXRuby の Image にロードし直していたりするわけで。
これがもし、cairo の Surface から、pngファイルとして書き出すべきバイナリデータを直接取得できれば…。あるいは、Surface内容をRGBAの配列で取得できれば、わざわざクソ遅いHDDにアクセスしなくても済むのですけど。残念ながら、そのようなメソッドは見つからなくて。
それにしても、swfのシェイプをこうして描画できるということは、svgも描画できたりするのかしら。たしか、svg を解析・描画する Rubyライブラリも存在していたはずなので、ちと試してみたいところ。
こんな感じになりました。右側が、cairoを使って描画した結果。 さすがに美しい…。cairo、凄いなあ。
ソースは以下。
_shapeparse_with_cairo.rb
require 'nokogiri'
require 'dxruby'
require 'cairo'
require 'tempfile'
require_relative 'bezierdraw'

# swfのシェイプを解析してImageに描画するクラス(cairo使用版)
#
class ShapeParse
  DBG = false
  DBG2 = true
  TWIP = 20.0
  attr_accessor :id
  attr_accessor :width
  attr_accessor :left
  attr_accessor :top
  attr_accessor :height
  attr_accessor :image
  attr_accessor :draw_data
  attr_accessor :clip_enable
  attr_accessor :surface
  attr_accessor :context

  def initialize(node, clip_enable = true)
    self.clip_enable = clip_enable
    self.id = node["objectID"].to_i
    puts "id[#{self.id}] #{node.name}" if DBG

    n = node.at(".//bounds/Rectangle")
    self.left = (n["left"].to_f / ShapeParse::TWIP).to_i
    self.top = (n["top"].to_f / ShapeParse::TWIP).to_i
    self.width = (n["right"].to_f / ShapeParse::TWIP).to_i
    self.height = (n["bottom"].to_f / ShapeParse::TWIP).to_i
    puts "size : (x,y)=#{self.left},#{self.top} (w,h)=#{self.width},#{self.height}" if DBG

    self.width = Window.width if self.width < Window.width
    self.height = Window.height if self.height < Window.height

    x0, y0 = 0, 0
    x1, y1 = 0, 0
    x2, y2 = 0, 0
    f0_enable = true
    f1_enable = true
    l_enable = true
    fc = [[0, 0, 0, 0], [0, 0, 0, 0]]
    lc = [0, 0, 0, 0]
    lwidth = ShapeParse::TWIP
    lines = []
    self.draw_data = []

    n = node.at(".//shapes/Shape/edges").child

    while n != nil
      case n.name
      when "ShapeSetup"
        unless lines.empty?
          save_draw_data(lines, f0_enable, f1_enable, l_enable,
                         lwidth, fc[0], fc[1], lc)
          lines = []
        end

        s = "#{n.name} "
        x0 = n["x"].to_f if n.key?("x")
        y0 = n["y"].to_f if n.key?("y")
        f0_enable = (n["fillStyle0"] == "1")? true : false
        f1_enable = (n["fillStyle1"] == "1")? true : false
        l_enable =  (n["lineStyle"] == "1")? true : false

        if false
          s += "(x,y)=#{x0/TWIP}, #{y0/TWIP} ("
          s += (f0_enable)? "f0 " : "   "
          s += (f1_enable)? "f1 " : "   "
          s += (l_enable)? "l" : " "
          s += ")"
          puts s
        end

        n.xpath(".//fillStyles").each do |nn|
          nn.xpath(".//Solid/color/Color").each_with_index do |m, i|
            fc[i] = get_color(m)
          end
        end

        n.xpath(".//lineStyles").each do |nn|
          nn.xpath(".//LineStyle").each do |m|
            lwidth = m["width"].to_i if m.key?("width")
            m.xpath(".//color//Color").each do |c|
              lc = get_color(c)
            end
          end
        end

        if n.key?("x") and n.key?("y")
          lines.push([x0, y0])
        end

      when "CurveTo"
        # 二次ベジェ曲線
        x1 = x0 + n["x1"].to_f
        y1 = y0 + n["y1"].to_f
        x2 = x1 + n["x2"].to_f
        y2 = y1 + n["y2"].to_f
        lst = BezierDraw.calc(x0, y0, x1, y1, x2, y2)
        lines.concat(lst.slice(1..-1))
        x0 = x2
        y0 = y2

      when "LineTo"
        # 直線
        x1 = x0 + n["x"].to_f
        y1 = y0 + n["y"].to_f
        lines.push([x1, y1])
        x0 = x1
        y0 = y1

      else
        puts "!! Unknown Tag : #{n.name}"
      end
      n = n.next
    end

    draw(false)
  end

  # 色配列を取得
  #
  # @param [Object] node 「Color」ノード
  # @return [Array] A,R,G,Bが入った配列
  #
  def get_color(node)
    col = [255, 0, 0, 0] # ARGB
    ["alpha", "red", "green", "blue"].each_with_index do |s,i|
      col[i] = node[s].to_f if node.key?(s)
    end
    return col
  end

  # 描画用の直線データを記録
  #
  # @param [Array] lines 直線データ配列
  # @param [Boolean] fe0 塗り潰し0をするか否か
  # @param [Boolean] fe1 塗り潰し1をするか否か
  # @param [Boolean] le 線を描くか否か
  # @param [Number] lw 線幅
  # @param [Array] fc0 塗り潰し0の色配列
  # @param [Array] fc1 塗り潰し1の色配列
  # @param [Array] lc1 線描画の色配列
  #
  def save_draw_data(lines, fe0, fe1, le, lw, fc0, fc1, lc)
    np = []
    ox, oy = nil, nil
    lines.each do |p|
      x, y = p
      x /= TWIP
      y /= TWIP
      np.push([x, y]) if x != ox or y != oy
      ox, oy = x, y
    end

    # 記録
    self.draw_data.push([np, fe0, fe1, le, lw, fc0.dup, fc1.dup, lc.dup])
  end

  # Imageオブジェクトに描画
  #
  # @param [Boolean] clear_enable trueならImageをクリアしてから描画
  #
  def draw(clear_enable = true, scale_x = 1.0, scale_y = 1.0)
    # self.image.clear if clear_enable

    # cairoのサーフェスを確保
    self.surface = Cairo::ImageSurface.new(Cairo::FORMAT_ARGB32,
                                           self.width, self.height)
    self.context = Cairo::Context.new(surface)

    self.draw_data.each do |d|
      p, fe0, fe1, le, lw, fc0, fc1, lc = d
      np = []
      p.each { |q| np.push([q[0] * scale_x, q[1] * scale_y]) }
      draw_line(self.context, np, fe0, fe1, le, lw, fc0, fc1, lc)
    end

    # 一時ファイル作成
    temp = Tempfile.new(['shapeparse', '.png'])
    temp.binmode
    temp.close

    # pngファイルに出力
    self.surface.write_to_png(temp.path)

    # DXRubyで読み込み
    self.image = Image.load(temp.path)
    temp.close(true)
  end

  # 色配列の数値を変換して返す
  #
  # @note 255までの値を持っていた色配列を、1.0までの値に変換する
  #
  # @param [Array] c 色配列ARGB
  # @return [Array] 色配列RGBA
  #
  def get_rgba(c)
    r = []
    c.each do |n|
      m = n / 255.0
      m = 0.0 if m < 0.0
      m = 1.0 if m > 1.0
      r.push(m)
    end
    return r[1], r[2], r[3], r[0]
  end

  # 多角形を描画
  #
  # @param [Object] ct cairoのcontext
  # @param [Array] p 頂点座標が入った配列。
  # @param [Boolean] f0_enable trueなら塗り潰し有、falseなら塗り潰し無
  # @param [Boolean] f1_enable trueなら塗り潰し有、falseなら塗り潰し無
  # @param [Boolean] l_enable trueなら線を描く、falseなら線を描かない
  # @param [Number] lwidth 線幅
  # @param [Array] fc0 色配列。A,R,G,B
  # @param [Array] fc1 色配列。A,R,G,B
  # @param [Array] lc 色配列。A,R,G,B
  #
  def draw_line(ct, p, f0_enable, f1_enable, l_enable,
                lwidth, fc0, fc1, lc)
    return if (!f0_enable and !l_enable)

    ct.set_line_join(Cairo::LineJoin::ROUND) # 結合点の種類を指定
    ct.set_line_cap(Cairo::LineCap::ROUND) # 線の終点の種類を指定

    lw = lwidth / TWIP
    lw = 1.0 if lw < 1.0 # swfは1.0より細い線幅も1.0の線幅で描画するらしい
    ct.set_line_width(lw) # 線幅を指定

    # 塗る色を指定
    if f0_enable
      ct.set_source_rgba(get_rgba(fc0))
    else
      ct.set_source_rgba(get_rgba(lc))
    end

    x0 , y0 = p[0]
    ct.move_to(x0, y0)
    1.step(p.size - 1, 1) do |i|
      ct.line_to(p[i][0], p[i][1])
    end

    if f0_enable
      # 塗り潰し
      ct.fill_preserve
    end

    # 線を描画
    ct.set_source_rgba(get_rgba(lc)) if l_enable

    ct.stroke
  end
end

if $0 == __FILE__
  # ----------------------------------------
  # 動作テスト

  font = Font.new(14)

  # swfmillで swf → xml変換したxmlを解析
  # infile = "swfdata/test_pdr1.xml"
  infile = "swfdata/test_pdr2.xml"
  doc = Nokogiri::XML(File.open(infile)) {|cfg| cfg.noblanks}

  objs = Hash.new
  doc.xpath("//DefineShape3").each do |node|
    pdr = ShapeParse.new(node, false) # ベクターデータを解析して画像化
    objs[pdr.id] = pdr
  end

  redraw_fg = false
  ang = 0
  scale = 1.0

  Window.bgcolor = [0, 190, 118]
  Window.fps = 60

  # メインループ
  Window.loop do
    break if Input.keyPush?(K_ESCAPE)

    # Rキー押しでスケールを変えて再描画
    redraw_fg = (Input.keyDown?(K_R))? true : false

    objs.each_value do |o|
      # ベクターデータを再描画できなくもないが、遅くて実用にならない
      o.draw(true, scale, scale) if redraw_fg
      Window.draw(0, 0, o.image)
    end

    s = "#{Window.real_fps} FPS / CPU: #{Window.getLoad.to_i}%"
    Window.drawFont(4, 4, s, font)

    ang += 10
    scale = Math.cos(ang * Math::PI / 180.0) + 1.5
  end
end
データ一式も置いときます。
_swf_shape_parse_20140602.zip (434KB)
アンチエイリアスをかけながら描画してくれるライブラリなだけあって、さすがに綺麗。しかも、CPU負荷率を見る限りでは、自前で線描画や多角形塗りをするよりも、40倍ぐらい速くなりました。
それでもやっぱり、リアルタイムに描画するのは速度的に無理なので、実用にはならないのですけど。どう考えても、最初からレンダリング済みのビットマップ画像を用意しておくべきだなと。
更に、このやり方、現状ではかなりトホホな点があって。cairo で描画した後、結果を一旦 pngファイルでHDDに保存して、それを DXRuby の Image にロードし直していたりするわけで。
これがもし、cairo の Surface から、pngファイルとして書き出すべきバイナリデータを直接取得できれば…。あるいは、Surface内容をRGBAの配列で取得できれば、わざわざクソ遅いHDDにアクセスしなくても済むのですけど。残念ながら、そのようなメソッドは見つからなくて。
それにしても、swfのシェイプをこうして描画できるということは、svgも描画できたりするのかしら。たしか、svg を解析・描画する Rubyライブラリも存在していたはずなので、ちと試してみたいところ。
◎ メモリマップドファイルは使えないかな。 :
メモリ上に仮想ファイルシステムの類でも作れたら、HDDにアクセスしなくても済むんじゃないかと思えてきたのだけど。そういうことができるライブラリってあるのかしら。
_メモリマップトファイル - Wikipedia には、
_Rubyist Magazine - Ruby Library Report 【第 4 回】 Win32Utils
_djberg96/win32-mmap - GitHub
もしかして、Windows + Ruby なら、win32-mmap てのが使える…?
_メモリマップトファイル - Wikipedia には、
Ruby : Mmap というgem(ライブラリ)があり、メモリマップトファイルを実装している。という記述があったのだけど。
_Rubyist Magazine - Ruby Library Report 【第 4 回】 Win32Utils
_djberg96/win32-mmap - GitHub
もしかして、Windows + Ruby なら、win32-mmap てのが使える…?
◎ DXRuby + cairo の組み合わせ。 :
cairo の使い方については、
_rcairo 事始め - takihiro日記
を参考にさせてもらって試していたのですけど。せっかくだから、DXRuby で結果表示をするサンプルも置いときます。
_test_cairo1.rb
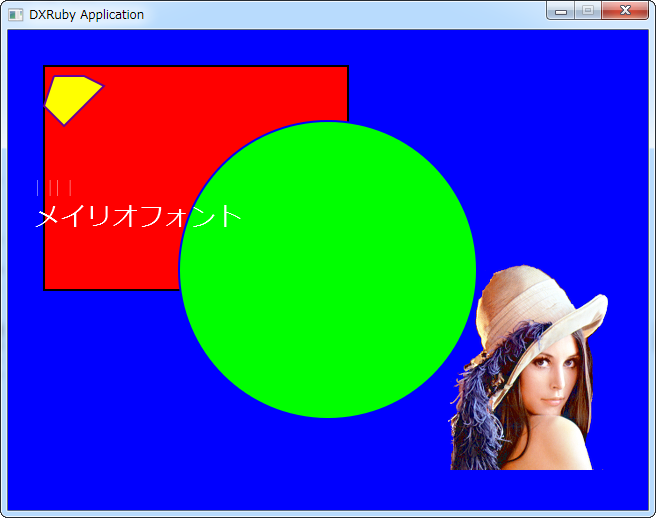
以下のような感じになります。
_test_cairo1.rb
# cairo のテスト
#
# 以下を参考にしました。
#
# rcairo 事始め - takihiro日記
# http://d.hatena.ne.jp/takihiro/20100331/1269992290

require 'cairo'
require 'dxruby'
require 'tempfile'

w, h = 640 - 32, 480 - 32
surface = Cairo::ImageSurface.new(w, h)
context = Cairo::Context.new(surface)

# 背景色を指定
context.set_source_rgba(0, 0, 0, 0) # 透明
context.rectangle(0, 0, w, h)
context.fill

# 四角を書く
context.set_source_color(Cairo::Color::RED)
x, y, rw, rh = 20, 20, w / 2, h / 2
context.rectangle(x, y, rw, rh)
context.fill_preserve
context.set_source_color(Cairo::Color::BLACK)
context.stroke

# 円を書く
context.set_source_color(Cairo::Color::GREEN)
r = h / 3
x, y, rw, rh = 100, 30, 50, 50
context.arc(w/2, h/2, r, 0, 2 * Math::PI)
context.fill_preserve
context.set_source_color(Cairo::Color::BLUE)
context.stroke

# 多角形
context.set_source_color(Cairo::Color::YELLOW)
context.move_to(30, 30)
context.line_to(20, 60)
context.line_to(40, 80)
context.line_to(80, 40)
context.line_to(60, 30)
context.line_to(30, 30)
context.fill_preserve
context.set_source_color(Cairo::Color::PURPLE)
context.stroke

# 重ねる画像を設定
surface2 = Cairo::ImageSurface.from_png('sample2.png')
context.set_source(surface2,
                   w - surface2.width - 24,
                   h - surface2.height - 24)
context.paint

# 文字配置
context.set_source_rgb(255, 255, 255)
context.font_size = 26
context.move_to(10, 150)
context.show_text('文字') # フォントを指定してないので文字化けする

context.move_to(10, 180)
context.select_font_face('メイリオ', 0, 0)
context.show_text('メイリオフォント')

# ----------------------------------------
# 一時ファイルを作成
temp = Tempfile.new(['test', '.png'])
temp.binmode
temp.close

# pngファイルに出力
surface.write_to_png(temp.path)

# DXRubyで読み込み
img = Image.load(temp.path)
temp.close(true)

# DXRubyで表示
Window.bgcolor = C_BLUE
Window.loop do
  break if Input.keyPush?(K_ESCAPE)
  Window.draw(16, 16, img)
end
以下のような感じになります。
[ ツッコむ ]
以上です。

