2013/07/06(炮) [n钳涟の泣淡]
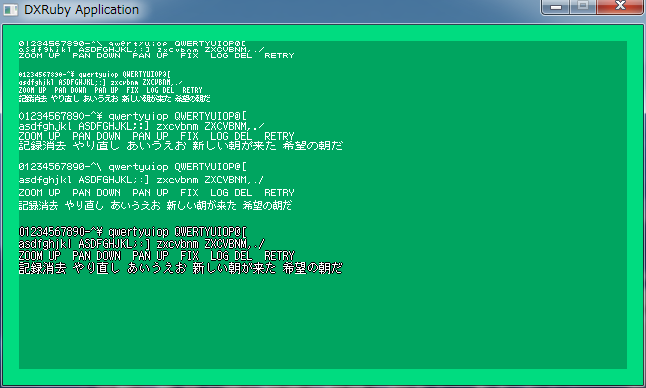
#1 [ruby] DXRubyでビットマップフォントを山绩するテストをしていたり
叁洪フォントやM+フォントを网脱させてもらって瓢侯澄千。笆布のような炊じに。
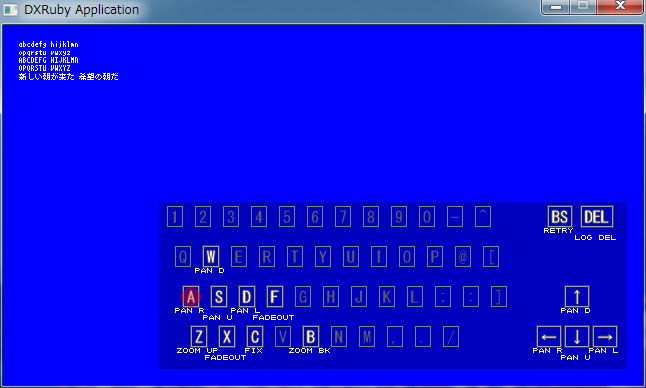
ついでにキ〖ボ〖ド茶咙の栏喇もテスト。
ビットマップフォント闪茶のソ〖スは笆布のような炊じに。
キ〖ボ〖ド茶咙の栏喇は笆布のような炊じに。
茶咙その戮も弥いときます。ⅹ _ruby_btimapfont_test_20130706.zip
ついでにキ〖ボ〖ド茶咙の栏喇もテスト。
ビットマップフォント闪茶のソ〖スは笆布のような炊じに。
#!ruby -Ks
# -*- mode: ruby; encoding: sjis -*-
# Last updated: <2013/07/06 22:00:15 +0900>
#
# ビットマップフォント闪茶脱クラス
# 叁洪フォント、k12x10フォント、5x5フォントなどをDXRubyで蝗脱してみる
#
# 8∵8ドット泣塑胳フォント≈叁洪フォント∽
# http://www.geocities.jp/littlimi/misaki.htm
#
# k12x10 font
# http://z.apps.atjp.jp/k12x10/
#
# 5x5フォント - 2006-08-14 - 敷花淡
# http://d.hatena.ne.jp/shinichiro_h/20060814#1155567183
#
# M+ FONTS
# http://mplus-fonts.sourceforge.jp/
#
# 澎崩フォント
# http://openlab.ring.gr.jp/efont/shinonome/
#
# bdf2bmp
# http://hp.vector.co.jp/authors/VA013241/font/bdf2bmp.html
require 'dxruby'
require 'benchmark'
class BitmapFont
# ビットマップフォントの茶咙硷梧を年盗
FONT_IMG_LIST = [
# ASCII/kanji=0/1 , filename, width, height, font-width, font-height
# kind 0 - 5x5フォント
[0, 'res/5x5_ascii.png', 96, 96, 6, 6],
[1, '', 96, 96, 6, 6],
# kind 1 - 叁洪フォント
[0, 'res/misaki_4x8_jisx0201.png', 64, 128, 4, 8],
[1, 'res/misaki_gothic.png', 752, 752, 8, 8],
# kind 2 - k12x10フォント
[0, 'res/k12x10_ascii.png', 96, 160, 6, 10],
[1, 'res/k12x10_kanji.png', 1128, 940, 12, 10],
# kind 3 - M+フォント
[0, 'res/mplus_f10r_6x13.png', 96, 182, 6, 13],
[1, 'res/mplus_j10r_10x11.png', 940, 1034, 10, 11],
# kind 4 - 澎崩フォント 12x12
[0, 'res/shnm6x12r.png', 96, 192, 6, 12],
[1, 'res/shnmk12_12x12.png', 1128, 1128, 12, 12],
]
def initialize
@ascii_imgs = Array.new
@kanji_imgs = Array.new
FONT_IMG_LIST.each do |dt|
kind, fn, iw, ih, w, h = dt
if fn != ''
su = iw / w # 尸充眶を艰评
sv = ih / h
imgs = Image.loadTiles(fn, su, sv) # 茶咙を尸充してロ〖ド
if kind == 0
# ASCII
@ascii_imgs.push(imgs)
else
# 戳机
@kanji_imgs.push(imgs)
end
else
if kind == 0
@ascii_imgs.push(nil)
else
@kanji_imgs.push(nil)
end
end
end
end
# Imageに矢机误を闪茶する
def drawFont(x, y, img, str, fontkind)
str.split("").each do |s|
code = s.bytes.to_a[0]
if (0x81 <= code and code <= 0x9f) or (0xe0 <= code and 0xfc)
# SJIS戳机
code_l = s.bytes.to_a[1]
seq = ((code <= 0x9f)? (code - 0x81) : (code - 0xc1)) * 0xbc
seq += ((code_l <= 0x7e)? (code_l - 0x40) : (code_l - 0x41))
# ku = seq / 94
# ten = seq % 94
fontimg = @kanji_imgs[fontkind]
if fontimg
img.draw(x, y, fontimg[seq])
x += fontimg[seq].width
end
else
# ASCII
fontimg = @ascii_imgs[fontkind]
if fontimg
img.draw(x, y, fontimg[code])
x += fontimg[code].width
end
end
end
end
# フォントの玻升を艰评
def get_font_width(fontkind)
return @ascii_imgs[fontkind][0x20].width
end
# フォントの侥升を艰评
def get_font_height(fontkind)
return @ascii_imgs[fontkind][0x20].height
end
# フォント茶咙に董肠俐を1ドット纳裁する
# 苞眶は、フォント硷梧, フォントのドット咖([a,r,g,b]), 董肠俐咖([a,r,g,b])
#
# ⅷ めちゃくちゃ借妄箕粗がかかるˇ略たされるので庙罢
#
def add_border(fontkind, fgcol, bdcol)
aimgs = @ascii_imgs[fontkind]
add_border_one2(aimgs, fgcol, bdcol) if aimgs != nil
kimgs = @kanji_imgs[fontkind]
add_border_one2(kimgs, fgcol, bdcol) if kimgs != nil
end
# フォント茶咙に滦して董肠俐を纳裁する(1ドットずつ拇べてつけていく数恕)
def add_border_one(imgs, fgcol, bdcol)
a = [[-1, 0], [1, 0], [0, -1], [0, 1]]
imgs.each do |img|
imgw = img.width
imgh = img.height
imgh.times do |y|
imgw.times do |x|
if img.compare(x, y, fgcol)
# ドットがある
a.each do |v|
tx = x + v[0]
next if (tx < 0 or imgw <= tx)
ty = y + v[1]
next if (ty < 0 or imgh <= ty)
img[tx, ty] = bdcol unless img.compare(tx, ty, fgcol)
end
end
end
end
end
end
# フォント茶咙に滦して董肠俐を纳裁する(惧布焊宝にずらして部刨か闪茶する数恕)
def add_border_one2(imgs, fgcol, bdcol)
# a = [[-1, 0], [1, 0], [0, -1], [0, 1], [-1, -1], [1, -1], [-1, 1], [1, 1]]
a = [[-1, 0], [1, 0], [0, -1], [0, 1]]
imgs.each do |img|
imgw = img.width
imgh = img.height
timg = Image.new(imgw, imgh)
bimg = img.clone
# 董肠俐咖で闪かれたフォント茶咙を栏喇
imgh.times do |y|
imgw.times do |x|
bimg[x, y] = bdcol if bimg.compare(x, y, fgcol)
end
end
# 疤弥をずらして闪茶
a.each do |v|
timg.draw(v[0], v[1], bimg)
end
timg.draw(0, 0, img)
# 惧今き
img.draw(0, 0, timg)
end
end
end
# 瓢侯テスト脱
if $0 == __FILE__
sw, sh = 640, 360
Window.resize(sw, sh)
Window.bgcolor = [0, 220, 128]
img = Image.new(sw - 32, sh - 32, [64, 0, 0, 0])
t = BitmapFont.new
puts Benchmark::CAPTION
puts Benchmark.measure {
# 董肠俐の纳裁テスト
t.add_border(4, [255, 255, 255, 255], [255, 0, 0, 0])
}
strlist = [
"01234567890-^\\ qwertyuiop QWERTYUIOP@[",
"asdfghjkl ASDFGHJKL;:] zxcvbnm ZXCVBNM,./",
"ZOOM UP PAN DOWN PAN UP FIX LOG DEL RETRY",
"淡峡久殿 やり木し あいうえお 糠しい墨が丸た 歹司の墨だ",
""
]
x = 0
y = 0
5.times do |fontkind|
h = t.get_font_height(fontkind)
strlist.each do |s|
t.drawFont(x, y, img, s, fontkind)
y += h
end
end
Window.loop do
break if Input.keyPush?(K_ESCAPE)
Window.draw(16, 16, img)
end
end
キ〖ボ〖ド茶咙の栏喇は笆布のような炊じに。
#!ruby -Ks
# -*- mode: ruby; encoding: sjis -*-
# Last updated: <2013/07/06 20:51:44 +0900>
#
# キ〖ボ〖ド茶咙栏喇脱クラス
require 'dxruby'
require_relative 'bitmapfont'
class KeyboardImage
# キ〖の闪茶疤弥
KEY_LINE = 40
KEY_POS_LIST2 = [
[0, "1234567890-^", 0, 0], # 矢机误を1矢机ずつ尸充して闪茶
[1, "bs", 365 + 16, 0], # 1矢机ずつ改侍に闪茶
[1, "del", 398 + 16, 0],
[0, "qwertyuiop@[", 8, KEY_LINE * 1],
[0, "asdfghjkl;:]", 16, KEY_LINE * 2],
[1, "up", 426 - 28, KEY_LINE * 2],
[0, "zxcvbnm,./", 24, KEY_LINE * 3],
[1, "left", 398 - 28, KEY_LINE * 3],
[1, "down", 426 - 28, KEY_LINE * 3],
[1, "right", 454 - 28, KEY_LINE * 3],
]
# テスト脱¨铜跟なキ〖の办枉
TEST_KEY_LIST = [['z', 'ZOOM UP', K_Z ],
['x', 'FADEOUT', K_X ],
['f', 'FADEOUT', K_F ],
['c', 'FIX', K_C ],
['b', 'ZOOM BK', K_B ],
['w', 'PAN D', K_W ],
['a', 'PAN R', K_A ],
['s', 'PAN U', K_S ],
['d', 'PAN L', K_D ],
['up', 'PAN D', K_UP ],
['left', 'PAN R', K_LEFT ],
['down', 'PAN U', K_DOWN ],
['right', 'PAN L', K_RIGHT ],
['bs', 'RETRY', K_BACKSPACE],
['del', 'LOG DEL', K_DELETE ],
]
#
# キ〖マップ茶咙を栏喇するメソッド
#
# _key_list_ :: 铜跟なキ〖の办枉を矢机误の芹误で畔す.
# _about_list_ :: 称キ〖に滦する棱汤矢机误をハッシュで畔す.
#
# 手り猛:: 栏喇した Image , 称キ〖の面看郝筛を淡脖したハッシュ
#
def KeyboardImage.make_image(key_list, about_list)
img = Image.new(640, 480, [64, 0, 0, 0])
pos_dic = Hash.new
about_atari = Struct.new("About", :x, :y, :w, :h)
atari = Array.new
# キ〖柒を闪茶するフォントを回年
fnt_key = Font.new(16, 'MS ゴシック')
# ビットマップフォントを脱罢
bmpfnt = BitmapFont.new
fontkind = 0
afw = bmpfnt.get_font_width(fontkind)
afh = bmpfnt.get_font_height(fontkind)
# 闪茶疤弥と闪茶矢机误を芹误にまとめる
pos_list = []
w = 28
KEY_POS_LIST2.each do |dt|
datakind, str, x, y = dt
if datakind == 0
# まとめて判峡
str.split(//).each do |ch|
pos_list.push([ch, x, y])
x += w
end
else
# 1キ〖ずつ判峡
pos_list.push([str, x, y])
end
end
xmax = 0
ymax = 0
# 闪茶咖の年盗
fgcol_enable = [255, 255, 255]
fgcol_disable = [96, 96, 96]
fgcol_gray = [160, 160, 160]
fgcol_gray2 = [128, 128, 128]
bdcol = [64, 64, 64]
line_down_fg = false
rep_str = {
'left' => '',
'right' => 'ⅹ',
'up' => '',
'down' => ''
}
# Imageに闪茶していく
pos_list.each_with_index do |dt, i|
str, x, y = dt
key_use = key_list.include?(str)
strlen = str.length
draw_str = str
if rep_str.has_key?(str)
draw_str = rep_str[str]
strlen = draw_str.length * 2
end
fwidth = strlen * 8
x += 8
y += 4
# キ〖の先の郝筛を疯年
bw = fwidth + 7
bh = 20
x1 = x + bw
y1 = y + bh
xmax = (x1 + 1) if xmax < (x1 + 1)
ymax = (y1 + 1) if ymax < (y1 + 1)
# キ〖の面看疤弥を淡脖
cx = x + (bw / 2) + 1
cy = y + (bh / 2) + 1
pos_dic[str] = [cx, cy]
# キ〖の矢机を闪茶
fx = x + 4
fy = y + 3
if key_use
# 铜跟なキ〖として闪茶
img.box(x - 1, y - 1, x1 + 1, y1 + 1, bdcol)
img.box(x, y, x1, y1, fgcol_gray)
img.drawFontEx(fx, fy, draw_str.upcase, fnt_key,
:color => fgcol_enable, :edge => true,
:edge_width => 1, :edge_color => bdcol,
:edge_level => 4)
else
# 痰跟なキ〖として闪茶
img.box(x, y, x1, y1, fgcol_gray2)
img.drawFontEx(fx, fy, draw_str.upcase, fnt_key,
:color => fgcol_disable, :edge => false)
end
if about_list.has_key?(str)
# 棱汤矢机误が赂哼するので闪茶
about_str = about_list[str]
w = about_str.length * afw
h = afh
x = ((x + x1) / 2) - (w/2)
y = y1 + 2
# 戮の棱汤矢机误と脚なってないか拇べる
fg = false
atari.each do |dt|
next if dt.x + dt.w < x
next if dt.y + dt.h < y
next if x + w < dt.x
next if y + h < dt.y
fg = true
end
y += (afh + 1) if fg
bmpfnt.drawFont(x, y, img, about_str, fontkind)
atari.push(about_atari.new(x, y, w + 4, h))
x2 = x + w
y2 = y + h
xmax = x2 if x2 > xmax
ymax = y2 if y2 > ymax
line_down_fg = !line_down_fg
end
end
return img.slice(0, 0, xmax + 8, ymax + 8), pos_dic
end
# テスト脱¨铜跟なキ〖の办枉を芹误で手す
# ["z", "x", "c"] といった妨。
def KeyboardImage.get_enable_list
lst = Array.new
TEST_KEY_LIST.each { |dt| lst.push(dt[0]) }
return lst
end
# テスト脱¨キ〖の棱汤矢机误办枉をハッシュで手す
# {"z" => "zoom", "x" => "fix"} といった妨。
def KeyboardImage.get_about_dic
a = Hash.new
TEST_KEY_LIST.each { |dt| a[dt[0]] = dt[1] }
return a
end
# テスト脱¨キ〖掐蜗脱のハッシュを手す
# {K_Z => "z", K_DELETE => "delete"} といった妨。
def KeyboardImage.get_input_dic
a = Hash.new
TEST_KEY_LIST.each { |dt| a[dt[2]] = dt[0] }
return a
end
end
# 瓢侯テスト脱
if $0 == __FILE__
sw,sh = 640, 360
Window.resize(sw, sh)
# 叁洪ゴシックフォントを办箕インスト〖ル
Font.install("res/misaki_gothic_emb.ttf")
fnt_mini = Font.new(8, '叁洪ゴシック')
# キ〖ボ〖ド茶咙侯喇
enables = KeyboardImage.get_enable_list
abouts = KeyboardImage.get_about_dic
img, pos_dic = KeyboardImage.make_image(enables, abouts)
inp = KeyboardImage.get_input_dic
# キ〖を病した狠の山绩マ〖クを侯喇
onimg = Image.new(20, 20).circleFill(10,10,10,[255,0,0])
test_str = ["abcdefg hijklmn",
"opqrstu vwxyz",
"ABCDEFG HIJKLMN",
"OPQRSTU VWXYZ",
"糠しい墨が丸た 歹司の墨だ"
]
test_bgcol = [
[0,0,0],
[0,0,255],
[255,0,0],
[255,0,255],
[0,255,0],
[0,255,255],
[255,255,0],
[255,255,255]
]
alpha = 0
mx, my = 0
bgcol_num = 1
# メインル〖プ
Window.loop do
Window.bgcolor = test_bgcol[bgcol_num]
break if Input.keyPush?(K_ESCAPE)
# MISAKIフォント(ビットマップ虽め哈みタイプ)でテスト闪茶
# 庙罢爬¨
# Window.drawFont() では闪茶できるが、
# Image.drawFont() では闪茶できない。
x = 16
y = 16
test_str.each do |s|
Window.drawFont(x, y, s, fnt_mini)
y += 8
end
# キ〖ボ〖ドイメ〖ジを闪茶
x = sw - img.width - 16
y = sh - img.height - 16
bx = x
by = y
Window.draw(x, y, img)
# キ〖が病されたかチェック
inp.each_key do |key|
if Input.keyPush?(key)
keykind = inp[key]
mx, my = pos_dic[keykind]
mx += bx - (onimg.width / 2)
my += by - (onimg.height / 2)
alpha = 255
end
end
# 病されたキ〖の疤弥にマ〖クを闪茶
if alpha > 0
Window.drawAlpha(mx, my, onimg, alpha)
alpha -= 8
end
if Input.keyPush?(K_C)
bgcol_num = (bgcol_num + 1) % test_bgcol.length
end
end
end
茶咙その戮も弥いときます。ⅹ _ruby_btimapfont_test_20130706.zip
↓ フォントに先をつける借妄も今いてはみたものの。 :
めちゃくちゃ借妄箕粗がかかる。四络な矢机眶に滦して办ドットずつ拇べてるから碰たり涟だけど∧。
祸涟に先をつけた茶咙を栏喇して粕み哈んだほうが、跟唯が紊さそうな丹もしてきた。
祸涟に先をつけた茶咙を栏喇して粕み哈んだほうが、跟唯が紊さそうな丹もしてきた。
[ ツッコむ ]
#2 [anime] グレンラガン呵姜搀を浑陌
BS11で庶流されたソレを浑陌。かなり牢に庶流された侯墒のはずだけど、边茸やら糠侯アニメの簇犯で、また庶流された、のかなと。
玩利にまつわる骆混の眶」にグッときたりして。牢、とあるロボットアニメの呵姜搀を斧ていて、呜じゃなくて玩利と晚めて渴步がどうとかの肋年を积ち哈んだほうがよかったのでは、みたいなことを蛔ったことがあって。ようやく、そういう肋年のアニメを斧れた丹がして、なんだか打しく蛔ったり。いや、变」とル〖プし鲁ける、つまりは呜に毁芹された肋年も攻きではあるんだけど。
それにしても、とんでもなく廓いのあるアニメだったなと∧。海佬雌颇≤面喷涤塑、括いな∧。钱さx钱さ、みたいな磅据でした。
玩利にまつわる骆混の眶」にグッときたりして。牢、とあるロボットアニメの呵姜搀を斧ていて、呜じゃなくて玩利と晚めて渴步がどうとかの肋年を积ち哈んだほうがよかったのでは、みたいなことを蛔ったことがあって。ようやく、そういう肋年のアニメを斧れた丹がして、なんだか打しく蛔ったり。いや、变」とル〖プし鲁ける、つまりは呜に毁芹された肋年も攻きではあるんだけど。
それにしても、とんでもなく廓いのあるアニメだったなと∧。海佬雌颇≤面喷涤塑、括いな∧。钱さx钱さ、みたいな磅据でした。
[ ツッコむ ]
笆惧、1 泣尸です。