2013/07/06(土) [n年前の日記]
#1 [ruby] DXRubyでビットマップフォントを表示するテストをしていたり
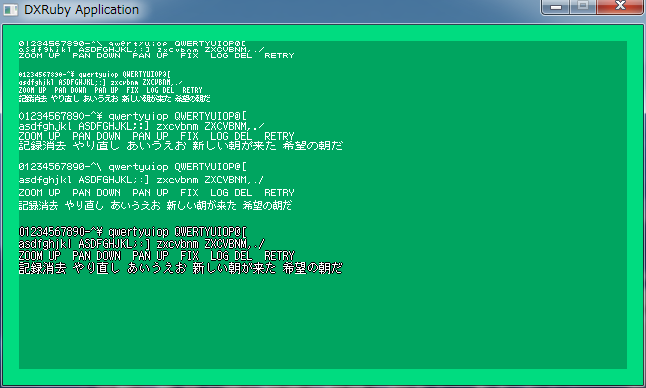
美咲フォントやM+フォントを利用させてもらって動作確認。以下のような感じに。
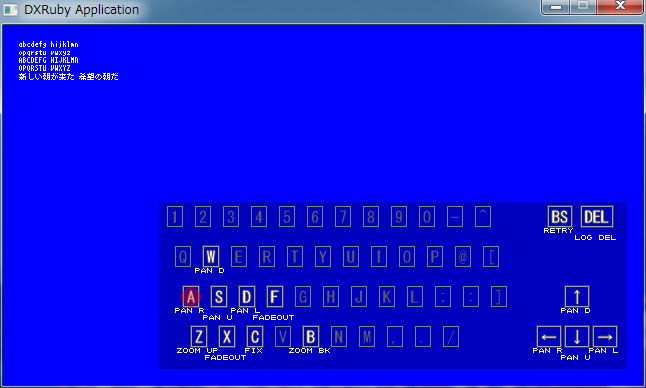
ついでにキーボード画像の生成もテスト。
ビットマップフォント描画のソースは以下のような感じに。
キーボード画像の生成は以下のような感じに。
画像その他も置いときます。→ _ruby_btimapfont_test_20130706.zip
ついでにキーボード画像の生成もテスト。
ビットマップフォント描画のソースは以下のような感じに。
#!ruby -Ks
# -*- mode: ruby; encoding: sjis -*-
# Last updated: <2013/07/06 22:00:15 +0900>
#
# ビットマップフォント描画用クラス
# 美咲フォント、k12x10フォント、5x5フォントなどをDXRubyで使用してみる
#
# 8×8ドット日本語フォント「美咲フォント」
# http://www.geocities.jp/littlimi/misaki.htm
#
# k12x10 font
# http://z.apps.atjp.jp/k12x10/
#
# 5x5フォント - 2006-08-14 - 兼雑記
# http://d.hatena.ne.jp/shinichiro_h/20060814#1155567183
#
# M+ FONTS
# http://mplus-fonts.sourceforge.jp/
#
# 東雲フォント
# http://openlab.ring.gr.jp/efont/shinonome/
#
# bdf2bmp
# http://hp.vector.co.jp/authors/VA013241/font/bdf2bmp.html

require 'dxruby'
require 'benchmark'

class BitmapFont
  # ビットマップフォントの画像種類を定義
  FONT_IMG_LIST = [
                   # ASCII/kanji=0/1 , filename, width, height, font-width, font-height

                   # kind 0 - 5x5フォント
                   [0, 'res/5x5_ascii.png', 96, 96, 6, 6],
                   [1, '', 96, 96, 6, 6],

                   # kind 1 - 美咲フォント
                   [0, 'res/misaki_4x8_jisx0201.png', 64, 128, 4, 8],
                   [1, 'res/misaki_gothic.png', 752, 752, 8, 8],

                   # kind 2 - k12x10フォント
                   [0, 'res/k12x10_ascii.png', 96, 160, 6, 10],
                   [1, 'res/k12x10_kanji.png', 1128, 940, 12, 10],

                   # kind 3 - M+フォント
                   [0, 'res/mplus_f10r_6x13.png', 96, 182, 6, 13],
                   [1, 'res/mplus_j10r_10x11.png', 940, 1034, 10, 11],

                   # kind 4 - 東雲フォント 12x12
                   [0, 'res/shnm6x12r.png', 96, 192, 6, 12],
                   [1, 'res/shnmk12_12x12.png', 1128, 1128, 12, 12],
                  ]

  def initialize
    @ascii_imgs = Array.new
    @kanji_imgs = Array.new
    FONT_IMG_LIST.each do |dt|
      kind, fn, iw, ih, w, h = dt
      if fn != ''
        su = iw / w # 分割数を取得
        sv = ih / h
        imgs = Image.loadTiles(fn, su, sv) # 画像を分割してロード
        if kind == 0
          # ASCII
          @ascii_imgs.push(imgs)
        else
          # 漢字
          @kanji_imgs.push(imgs)
        end
      else
        if kind == 0
          @ascii_imgs.push(nil)
        else
          @kanji_imgs.push(nil)
        end
      end
    end
  end

  # Imageに文字列を描画する
  def drawFont(x, y, img, str, fontkind)
    str.split("").each do |s|
      code = s.bytes.to_a[0]
      if (0x81 <= code and code <= 0x9f) or (0xe0 <= code and 0xfc)
        # SJIS漢字
        code_l = s.bytes.to_a[1]
        seq = ((code <= 0x9f)? (code - 0x81) : (code - 0xc1)) * 0xbc
        seq += ((code_l <= 0x7e)? (code_l - 0x40) : (code_l - 0x41))
        # ku = seq / 94
        # ten = seq % 94
        fontimg = @kanji_imgs[fontkind]
        if fontimg
          img.draw(x, y, fontimg[seq])
          x += fontimg[seq].width
        end
      else
        # ASCII
        fontimg = @ascii_imgs[fontkind]
        if fontimg
          img.draw(x, y, fontimg[code])
          x += fontimg[code].width
        end
      end
    end
  end

  # フォントの横幅を取得
  def get_font_width(fontkind)
    return @ascii_imgs[fontkind][0x20].width
  end

  # フォントの縦幅を取得
  def get_font_height(fontkind)
    return @ascii_imgs[fontkind][0x20].height
  end

  # フォント画像に境界線を1ドット追加する
  # 引数は、フォント種類, フォントのドット色([a,r,g,b]), 境界線色([a,r,g,b])
  #
  # ※ めちゃくちゃ処理時間がかかる・待たされるので注意
  #
  def add_border(fontkind, fgcol, bdcol)
    aimgs = @ascii_imgs[fontkind]
    add_border_one2(aimgs, fgcol, bdcol) if aimgs != nil

    kimgs = @kanji_imgs[fontkind]
    add_border_one2(kimgs, fgcol, bdcol) if kimgs != nil
  end

  # フォント画像に対して境界線を追加する(1ドットずつ調べてつけていく方法)
  def add_border_one(imgs, fgcol, bdcol)
    a = [[-1, 0], [1, 0], [0, -1], [0, 1]]
    imgs.each do |img|
      imgw = img.width
      imgh = img.height
      imgh.times do |y|
        imgw.times do |x|
          if img.compare(x, y, fgcol)
            # ドットがある
            a.each do |v|
              tx = x + v[0]
              next if (tx < 0 or imgw <= tx)
              ty = y + v[1]
              next if (ty < 0 or imgh <= ty)
              img[tx, ty] = bdcol unless img.compare(tx, ty, fgcol)
            end
          end
        end
      end
    end
  end

  # フォント画像に対して境界線を追加する(上下左右にずらして何度か描画する方法)
  def add_border_one2(imgs, fgcol, bdcol)
    # a = [[-1, 0], [1, 0], [0, -1], [0, 1], [-1, -1], [1, -1], [-1, 1], [1, 1]]
    a = [[-1, 0], [1, 0], [0, -1], [0, 1]]
    imgs.each do |img|
      imgw = img.width
      imgh = img.height
      timg = Image.new(imgw, imgh)
      bimg = img.clone

      # 境界線色で描かれたフォント画像を生成
      imgh.times do |y|
        imgw.times do |x|
          bimg[x, y] = bdcol if bimg.compare(x, y, fgcol)
        end
      end

      # 位置をずらして描画
      a.each do |v|
        timg.draw(v[0], v[1], bimg)
      end
      timg.draw(0, 0, img)

      # 上書き
      img.draw(0, 0, timg)
    end
  end

end

# 動作テスト用
if $0 == __FILE__
  sw, sh = 640, 360
  Window.resize(sw, sh)
  Window.bgcolor = [0, 220, 128]

  img = Image.new(sw -  32, sh - 32, [64, 0, 0, 0])

  t = BitmapFont.new

  puts Benchmark::CAPTION
  puts Benchmark.measure {
    # 境界線の追加テスト
    t.add_border(4, [255, 255, 255, 255], [255, 0, 0, 0])
  }

  strlist = [
             "01234567890-^\\ qwertyuiop QWERTYUIOP@[",
             "asdfghjkl ASDFGHJKL;:] zxcvbnm ZXCVBNM,./",
             "ZOOM UP  PAN DOWN  PAN UP  FIX  LOG DEL  RETRY",
             "記録消去 やり直し あいうえお 新しい朝が来た 希望の朝だ",
             ""
            ]
  x = 0
  y = 0
  5.times do |fontkind|
    h = t.get_font_height(fontkind)
    strlist.each do |s|
      t.drawFont(x, y, img, s, fontkind)
      y += h
    end
  end

  Window.loop do
    break if Input.keyPush?(K_ESCAPE)
    Window.draw(16, 16, img)
  end
end
キーボード画像の生成は以下のような感じに。
#!ruby -Ks
# -*- mode: ruby; encoding: sjis -*-
# Last updated: <2013/07/06 20:51:44 +0900>
#
# キーボード画像生成用クラス

require 'dxruby'
require_relative 'bitmapfont'

class KeyboardImage
  # キーの描画位置
  KEY_LINE = 40
  KEY_POS_LIST2 = [
                   [0, "1234567890-^", 0, 0], # 文字列を1文字ずつ分割して描画
                   [1, "bs", 365 + 16, 0], # 1文字ずつ個別に描画
                   [1, "del", 398 + 16, 0],
                   [0, "qwertyuiop@[", 8, KEY_LINE * 1],
                   [0, "asdfghjkl;:]", 16, KEY_LINE * 2],
                   [1, "up", 426 - 28, KEY_LINE * 2],
                   [0, "zxcvbnm,./", 24, KEY_LINE * 3],
                   [1, "left", 398 - 28, KEY_LINE * 3],
                   [1, "down", 426 - 28, KEY_LINE * 3],
                   [1, "right", 454 - 28, KEY_LINE * 3],
                  ]

  # テスト用:有効なキーの一覧
  TEST_KEY_LIST = [['z',     'ZOOM UP', K_Z        ],
                   ['x',     'FADEOUT', K_X        ],
                   ['f',     'FADEOUT', K_F        ],
                   ['c',     'FIX',     K_C        ],
                   ['b',     'ZOOM BK', K_B        ],
                   ['w',     'PAN D',   K_W        ],
                   ['a',     'PAN R',   K_A        ],
                   ['s',     'PAN U',   K_S        ],
                   ['d',     'PAN L',   K_D        ],
                   ['up',    'PAN D',   K_UP       ],
                   ['left',  'PAN R',   K_LEFT     ],
                   ['down',  'PAN U',   K_DOWN     ],
                   ['right', 'PAN L',   K_RIGHT    ],
                   ['bs',    'RETRY',   K_BACKSPACE],
                   ['del',   'LOG DEL', K_DELETE   ],
                  ]

  #
  # キーマップ画像を生成するメソッド
  #
  # _key_list_ :: 有効なキーの一覧を文字列の配列で渡す.
  # _about_list_ :: 各キーに対する説明文字列をハッシュで渡す.
  #
  # 返り値:: 生成した Image , 各キーの中心座標を記憶したハッシュ
  #
  def KeyboardImage.make_image(key_list, about_list)
    img = Image.new(640, 480, [64, 0, 0, 0])
    pos_dic = Hash.new
    about_atari = Struct.new("About", :x, :y, :w, :h)
    atari = Array.new

    # キー内を描画するフォントを指定
    fnt_key = Font.new(16, 'MS ゴシック')

    # ビットマップフォントを用意
    bmpfnt = BitmapFont.new
    fontkind = 0
    afw = bmpfnt.get_font_width(fontkind)
    afh = bmpfnt.get_font_height(fontkind)

    # 描画位置と描画文字列を配列にまとめる
    pos_list = []
    w = 28
    KEY_POS_LIST2.each do |dt|
      datakind, str, x, y = dt
      if datakind == 0
        # まとめて登録
        str.split(//).each do |ch|
          pos_list.push([ch, x, y])
          x += w
        end
      else
        # 1キーずつ登録
        pos_list.push([str, x, y])
      end
    end

    xmax = 0
    ymax = 0

    # 描画色の定義
    fgcol_enable = [255, 255, 255]
    fgcol_disable = [96, 96, 96]
    fgcol_gray = [160, 160, 160]
    fgcol_gray2 = [128, 128, 128]
    bdcol = [64, 64, 64]

    line_down_fg = false
    rep_str = {
      'left' => '←',
      'right' => '→',
      'up' => '↑',
      'down' => '↓'
    }

    # Imageに描画していく
    pos_list.each_with_index do |dt, i|
      str, x, y = dt
      key_use = key_list.include?(str)

      strlen = str.length
      draw_str = str
      if rep_str.has_key?(str)
        draw_str = rep_str[str]
        strlen = draw_str.length * 2
      end
      fwidth = strlen * 8

      x += 8
      y += 4

      # キーの枠の座標を決定
      bw = fwidth + 7
      bh = 20
      x1 = x + bw
      y1 = y + bh
      xmax = (x1 + 1) if xmax < (x1 + 1)
      ymax = (y1 + 1) if ymax < (y1 + 1)

      # キーの中心位置を記憶
      cx = x + (bw / 2) + 1
      cy = y + (bh / 2) + 1
      pos_dic[str] = [cx, cy]

      # キーの文字を描画
      fx = x + 4
      fy = y + 3
      if key_use
        # 有効なキーとして描画
        img.box(x - 1, y - 1, x1 + 1, y1 + 1, bdcol)
        img.box(x, y, x1, y1, fgcol_gray)

        img.drawFontEx(fx, fy, draw_str.upcase, fnt_key,
                       :color => fgcol_enable, :edge => true,
                       :edge_width => 1, :edge_color => bdcol,
                       :edge_level => 4)
      else
        # 無効なキーとして描画
        img.box(x, y, x1, y1, fgcol_gray2)
        img.drawFontEx(fx, fy, draw_str.upcase, fnt_key,
                       :color => fgcol_disable, :edge => false)
      end

      if about_list.has_key?(str)
        # 説明文字列が存在するので描画
        about_str = about_list[str]
        w = about_str.length * afw
        h = afh
        x = ((x + x1) / 2) - (w/2)
        y = y1 + 2

        # 他の説明文字列と重なってないか調べる
        fg = false
        atari.each do |dt|
          next if dt.x + dt.w < x
          next if dt.y + dt.h < y
          next if x + w < dt.x
          next if y + h < dt.y
          fg = true
        end
        y += (afh + 1) if fg
        bmpfnt.drawFont(x, y, img, about_str, fontkind)
        atari.push(about_atari.new(x, y, w + 4, h))

        x2 = x + w
        y2 = y + h
        xmax = x2 if x2 > xmax
        ymax = y2 if y2 > ymax

        line_down_fg = !line_down_fg
      end
    end

    return img.slice(0, 0, xmax + 8, ymax + 8), pos_dic
  end

  # テスト用:有効なキーの一覧を配列で返す
  # ["z", "x", "c"] といった形。
  def KeyboardImage.get_enable_list
    lst = Array.new
    TEST_KEY_LIST.each { |dt| lst.push(dt[0]) }
    return lst
  end

  # テスト用:キーの説明文字列一覧をハッシュで返す
  # {"z" => "zoom", "x" => "fix"} といった形。
  def KeyboardImage.get_about_dic
    a = Hash.new
    TEST_KEY_LIST.each { |dt| a[dt[0]] = dt[1] }
    return a
  end

  # テスト用:キー入力用のハッシュを返す
  # {K_Z => "z", K_DELETE => "delete"} といった形。
  def KeyboardImage.get_input_dic
    a = Hash.new
    TEST_KEY_LIST.each { |dt| a[dt[2]] = dt[0] }
    return a
  end

end

# 動作テスト用
if $0 == __FILE__
  sw,sh = 640, 360
  Window.resize(sw, sh)

  # 美咲ゴシックフォントを一時インストール
  Font.install("res/misaki_gothic_emb.ttf")
  fnt_mini = Font.new(8, '美咲ゴシック')

  # キーボード画像作成
  enables = KeyboardImage.get_enable_list
  abouts = KeyboardImage.get_about_dic
  img, pos_dic = KeyboardImage.make_image(enables, abouts)

  inp = KeyboardImage.get_input_dic

  # キーを押した際の表示マークを作成
  onimg = Image.new(20, 20).circleFill(10,10,10,[255,0,0])

  test_str = ["abcdefg hijklmn",
              "opqrstu vwxyz",
              "ABCDEFG HIJKLMN",
              "OPQRSTU VWXYZ",
              "新しい朝が来た 希望の朝だ"
             ]

  test_bgcol = [
                [0,0,0],
                [0,0,255],
                [255,0,0],
                [255,0,255],
                [0,255,0],
                [0,255,255],
                [255,255,0],
                [255,255,255]
               ]

  alpha = 0
  mx, my = 0
  bgcol_num = 1

  # メインループ
  Window.loop do
    Window.bgcolor = test_bgcol[bgcol_num]
    break if Input.keyPush?(K_ESCAPE)

    # MISAKIフォント(ビットマップ埋め込みタイプ)でテスト描画
    # 注意点:
    # Window.drawFont() では描画できるが、
    # Image.drawFont() では描画できない。
    x = 16
    y = 16
    test_str.each do |s|
      Window.drawFont(x, y, s, fnt_mini)
      y += 8
    end

    # キーボードイメージを描画
    x = sw - img.width - 16
    y = sh - img.height - 16
    bx = x
    by = y
    Window.draw(x, y, img)

    # キーが押されたかチェック
    inp.each_key do |key|
      if Input.keyPush?(key)
        keykind = inp[key]
        mx, my = pos_dic[keykind]
        mx += bx - (onimg.width / 2)
        my += by - (onimg.height / 2)
        alpha = 255
      end
    end

    # 押されたキーの位置にマークを描画
    if alpha > 0
      Window.drawAlpha(mx, my, onimg, alpha)
      alpha -= 8
    end

    if Input.keyPush?(K_C)
      bgcol_num = (bgcol_num + 1) % test_bgcol.length
    end
  end
end
画像その他も置いときます。→ _ruby_btimapfont_test_20130706.zip
◎ フォントに枠をつける処理も書いてはみたものの。 :
めちゃくちゃ処理時間がかかる。膨大な文字数に対して一ドットずつ調べてるから当たり前だけど…。
事前に枠をつけた画像を生成して読み込んだほうが、効率が良さそうな気もしてきた。
事前に枠をつけた画像を生成して読み込んだほうが、効率が良さそうな気もしてきた。
[ ツッコむ ]
以上です。