2023/05/22(月) [n年前の日記]
#1 [cg_tools] FILMでフレーム補間ができそうか試してみた
FILM (Frame Interpolation for Large Motion) という、AIでフレーム補間をしてくれるプログラムがあるらしい。Googleが開発したそうで、2枚の画像を与えると中間画像を生成してくれるのだとか。
_GitHub - google-research/frame-interpolation: FILM: Frame Interpolation for Large Motion, In ECCV 2022.
_【フレーム補間】2枚の画像から動画を生成できるFILMのインストール | ジコログ
_StableDiffusionとFILM( Frame Interpolation for Large Motion)を使ってアニメーション生成プログラムを作ってみた - Qiita
_[FILM] 動かしながらざっくり理解するフレーム間の中間画像生成 - TeDokology
_【フレーム補間】FILMを使ってフレーム補間を実装する - つくもちブログ ?Python&AIまとめ?
_画像をぬるぬる動かすFrame Interpolation for Large Motion【FILM】 | FarmL
気になったので、ローカルで動かせないか試してみた。環境は以下。
- Windows10 x64 22H2
- Python 3.9.13 64bit, Python 3.10.6 64bit
- CPU : AMD Ryzen 5 5600X
- GPU : NVIDIA GeForce GTX1060 6GB
- RAM : 16GB
◎ 必要なもの :
解説ページによると、FILM を動かすためには、ffmpeg に加えて、Python のモジュール、TensorFlow が必要になるらしい。
そして、その TensorFlow は、CUDA と cuDNN が必要になるそうで…。tensorflow 2.6.0 - 2.11.0 を動かす際は、CUDA 11.2、cuDNN 8.1 のバージョンで決め打ちされてるらしい。
_【フレーム補間】2枚の画像から動画を生成できるFILMのインストール | ジコログ
つまり、以下が必要になる。
ffmpeg は以下から入手できる。自分の環境には ffmpeg 6.0 をインストール済み。
_Download FFmpeg
そして、その TensorFlow は、CUDA と cuDNN が必要になるそうで…。tensorflow 2.6.0 - 2.11.0 を動かす際は、CUDA 11.2、cuDNN 8.1 のバージョンで決め打ちされてるらしい。
_【フレーム補間】2枚の画像から動画を生成できるFILMのインストール | ジコログ
つまり、以下が必要になる。
- ffmpeg
- Python 3.x
- TensorFlow
- CUDA 11.2
- cuDNN 8.1
ffmpeg は以下から入手できる。自分の環境には ffmpeg 6.0 をインストール済み。
_Download FFmpeg
◎ CUDAの異なるバージョンの共存 :
自分の手元の環境では、画像生成AI Stable Diffusion web UI を動かすために、CUDA 11.8 がインストール済み。TensorFlow を動かすための CUDA 11.2 とはバージョンが一致してない。ここはバージョンが異なる CUDA を共存させないといけない。
ただ、CUDAは環境変数を変更するだけで共存させて利用できる、という話を見かけた。
_異なるバージョンのCUDAを使い分ける単純な方法 - Qiita
_CUDA複数バージョンインストール後のシステム環境変数の変更 | きんたろうのIT日記
であればと、CUDA 11.2 と cuDNN 8.1 を追加でインストールしてみた。
CUDA と cuDNN は以下から入手できる。入手にはNVIDIAのアカウントが必要。
_CUDA Toolkit Archive | NVIDIA Developer
_cuDNN Archive | NVIDIA Developer
以下の2つのファイルを入手。
CUDA 11.2.2 のセットアップファイルを実行してインストール。今回は、D:\Program Files\NVIDIA GPU Computing Toolkit\CUDA\v11.2\ にインストールした。
cuDNNのzipファイルを解凍。中に入ってた cuda というフォルダを、CUDA 11.2.2 のインストール場所にコピーしてインストールする。
CUDA、cuDNN関係の環境変数としては、以下が作成されていた。
更に、環境変数PATHの最初のほうに、以下のようなパスが追加された。
また、以下のページによると、環境変数PATHに、もう少しパスを追加しないといけないらしい。
_frame-interpolation/WINDOWS_INSTALLATION.md at main - google-research/frame-interpolation - GitHub
こういった環境変数については、今回、setenv.bat というBATファイルを作成して対応することにした。
今後、FILM関係の実験をする時は、DOS窓の中で setenv.bat を実行して、必要な環境変数を上書き設定してから実験することにした。尚、DOS窓を終了すれば上書き設定した環境変数は消えて、いつもの状態に戻る。
setenv.bat
ただ、CUDAは環境変数を変更するだけで共存させて利用できる、という話を見かけた。
_異なるバージョンのCUDAを使い分ける単純な方法 - Qiita
_CUDA複数バージョンインストール後のシステム環境変数の変更 | きんたろうのIT日記
であればと、CUDA 11.2 と cuDNN 8.1 を追加でインストールしてみた。
CUDA と cuDNN は以下から入手できる。入手にはNVIDIAのアカウントが必要。
_CUDA Toolkit Archive | NVIDIA Developer
_cuDNN Archive | NVIDIA Developer
以下の2つのファイルを入手。
- cuda_11.2.2_461.33_win10.exe
- cudnn-11.2-windows-x64-v8.1.1.33.zip
CUDA 11.2.2 のセットアップファイルを実行してインストール。今回は、D:\Program Files\NVIDIA GPU Computing Toolkit\CUDA\v11.2\ にインストールした。
cuDNNのzipファイルを解凍。中に入ってた cuda というフォルダを、CUDA 11.2.2 のインストール場所にコピーしてインストールする。
CUDA、cuDNN関係の環境変数としては、以下が作成されていた。
CUDA_PATH=D:\Program Files\NVIDIA GPU Computing Toolkit\CUDA\v11.8
CUDA_PATH_V11_2=D:\Program Files\NVIDIA GPU Computing Toolkit\CUDA\v11.2
CUDA_PATH_V11_8=D:\Program Files\NVIDIA GPU Computing Toolkit\CUDA\v11.8
CUDNN_PATH=D:\Program Files\NVIDIA GPU Computing Toolkit\CUDA\v11.8
更に、環境変数PATHの最初のほうに、以下のようなパスが追加された。
D:\Program Files\NVIDIA GPU Computing Toolkit\CUDA\v11.2\bin
D:\Program Files\NVIDIA GPU Computing Toolkit\CUDA\v11.2\libnvvp
D:\Program Files\NVIDIA GPU Computing Toolkit\CUDA\v11.8\bin
D:\Program Files\NVIDIA GPU Computing Toolkit\CUDA\v11.8\libnvvp
また、以下のページによると、環境変数PATHに、もう少しパスを追加しないといけないらしい。
_frame-interpolation/WINDOWS_INSTALLATION.md at main - google-research/frame-interpolation - GitHub
Add the following paths to your 'Advanced System Settings' > 'Environment Variables ...' > Edit 'Path', and add:
<INSTALL_PATH>\NVIDIA GPU Computing Toolkit\CUDA\v11.2\bin
<INSTALL_PATH>\NVIDIA GPU Computing Toolkit\CUDA\v11.2\libnvvp
<INSTALL_PATH>\NVIDIA GPU Computing Toolkit\CUDA\v11.2\include
<INSTALL_PATH>\NVIDIA GPU Computing Toolkit\CUDA\v11.2\extras\CUPTI\lib64
<INSTALL_PATH>\NVIDIA GPU Computing Toolkit\CUDA\v11.2\cuda\bin
こういった環境変数については、今回、setenv.bat というBATファイルを作成して対応することにした。
今後、FILM関係の実験をする時は、DOS窓の中で setenv.bat を実行して、必要な環境変数を上書き設定してから実験することにした。尚、DOS窓を終了すれば上書き設定した環境変数は消えて、いつもの状態に戻る。
setenv.bat
set CUDA_PATH=%CUDA_PATH_V11_2%
set CUDNN_PATH=%CUDA_PATH_V11_2%
set ADDPATH=%CUDA_PATH%\bin;%CUDA_PATH%\libnvvp;%CUDA_PATH%\include;%CUDA_PATH%\extras\CUPTI\lib64;%CUDA_PATH%\cuda\bin
set PATH=%ADDPATH%;%PATH%
◎ FILMをgitで取得 :
FILM のプロジェクトファイル群を、github からクローンしてくる。今回は、D:\aiwork\film\ というディレクトリを作成して、その中にクローンしてみた。
_GitHub - google-research/frame-interpolation: FILM: Frame Interpolation for Large Motion, In ECCV 2022.
D:\aiwork\film\ の中に、frame-interpolation というディレクトリが作られて、その中にファイル群が入っている状態になった。
_GitHub - google-research/frame-interpolation: FILM: Frame Interpolation for Large Motion, In ECCV 2022.
git clone https://github.com/google-research/frame-interpolation.git
D:\aiwork\film\ の中に、frame-interpolation というディレクトリが作られて、その中にファイル群が入っている状態になった。
◎ Pythonの仮想環境を作成 :
さて、ここからPythonのモジュールをインストールしていくのだけど…。膨大な数のモジュールが必要になるらしいので、そのまま作業をしていくと、普段使ってるPython環境がグチャグチャになるだろうなと…。
また、自分が普段使ってる Python 3.10 で FILM を利用しようとすると色々なエラーが出てしまう。そもそも、FILM が使う、TensorFlow 2.6.2 がインストールできない。FILM が推奨している Python 3.9 なら、TensorFlow 2.6.2 もインストールできたし、エラーの数がかなり少なくなった。
そんなわけで、Python 3.9 の仮想環境を venv で作成して、その中に各モジュールをインストールしていくことにする。
ちなみに、Windows上で Python 3.9 の仮想環境を作るためには、おそらく事前に Python 3.9 のインストールが必要。また、異なるバージョンの Python を使い分ける際は、py -3.9 や py -3.10 と打てばいい。
今回は、D:\aiwork\film\frame-interpolation\ 以下に pyvenv39 というディレクトリを作成して、その中にPythonの仮想環境を入れることにした。
仮想環境に切り替える時は以下を打つ。
抜ける時は、以下を打つ。
また、自分が普段使ってる Python 3.10 で FILM を利用しようとすると色々なエラーが出てしまう。そもそも、FILM が使う、TensorFlow 2.6.2 がインストールできない。FILM が推奨している Python 3.9 なら、TensorFlow 2.6.2 もインストールできたし、エラーの数がかなり少なくなった。
そんなわけで、Python 3.9 の仮想環境を venv で作成して、その中に各モジュールをインストールしていくことにする。
ちなみに、Windows上で Python 3.9 の仮想環境を作るためには、おそらく事前に Python 3.9 のインストールが必要。また、異なるバージョンの Python を使い分ける際は、py -3.9 や py -3.10 と打てばいい。
> py -3.9 -V
Python 3.9.13

> py -3.10 -V
Python 3.10.6
今回は、D:\aiwork\film\frame-interpolation\ 以下に pyvenv39 というディレクトリを作成して、その中にPythonの仮想環境を入れることにした。
cd /d D:\aiwork\film\frame-interpolation
mkdir pyvenv39
py -3.9 -m venv pyvenv39
仮想環境に切り替える時は以下を打つ。
pyvenv39\Scripts\activate.bat
抜ける時は、以下を打つ。
pyvenv39\Scripts\deactivate.bat
◎ Pythonモジュールをインストール :
仮想環境に入った状態で、pip を使ってモジュールをインストールしていく。
git で clone してきた FILM のファイル群の中に、必要なPythonモジュールが列挙された requirements.txt というファイルがあるので、本来であれば、コレを指定するだけでインストールできるはずなのだけど…。
ところが、このファイル、各モジュールのバージョンが指定されていて…。
ちなみに、ググってたら、以下のような話も…。
_pipを使用してTensorFlowをインストールします
つまり、TensorFlow を Python 3.10 + GPU で使いたいなら、TensorFlow 2.10以前で使えそうなバージョンを探さないといけない。最新版の TensorFlow 2.12.0 をインストールしたらGPUが使えなかったので、おかしいと思った…。ちなみに、2.10以前をインストールしたい場合は、以下のように打つらしい。
今回は、Python 3.9 を使うことで、以下のバージョンでモジュールをインストールすることができた。absl-py と、apache-beam が、元々のバージョンとは違ってしまっている。
pyvenv39\Scripts\activate.bat
pip list
git で clone してきた FILM のファイル群の中に、必要なPythonモジュールが列挙された requirements.txt というファイルがあるので、本来であれば、コレを指定するだけでインストールできるはずなのだけど…。
pip install -r requirements.txt
ところが、このファイル、各モジュールのバージョンが指定されていて…。
- Python 3.10 で利用すると、そもそも最初に記述されている TensorFlow 2.6.2 がインストールできなくて詰む。
- Python 3.9 で利用すれば多少はマシになるけれど、それでも一部でエラーが出る。
ちなみに、ググってたら、以下のような話も…。
_pipを使用してTensorFlowをインストールします
注意: TensorFlow 2.10ネイティブ Windows で GPU をサポートした最後のTensorFlow リリースです。
TensorFlow 2.11以降では、 WSL2 に TensorFlow をインストールするか、
tensorflowまたはtensorflow-cpuをインストールして、必要に応じてTensorFlow-DirectML-Pluginを試す必要があります。
つまり、TensorFlow を Python 3.10 + GPU で使いたいなら、TensorFlow 2.10以前で使えそうなバージョンを探さないといけない。最新版の TensorFlow 2.12.0 をインストールしたらGPUが使えなかったので、おかしいと思った…。ちなみに、2.10以前をインストールしたい場合は、以下のように打つらしい。
pip install "tensorflow<2.11"
今回は、Python 3.9 を使うことで、以下のバージョンでモジュールをインストールすることができた。absl-py と、apache-beam が、元々のバージョンとは違ってしまっている。
tensorflow==2.6.2
tensorflow-datasets==4.4.0
tensorflow-addons==0.15.0
absl-py==0.15.0
gin-config==0.5.0
parameterized==0.8.1
mediapy==1.0.3
scikit-image==0.19.1
apache-beam==2.47.0
google-cloud-bigquery-storage==1.1.0
natsort==8.1.0
gdown==4.5.4
tqdm==4.64.1
◎ 学習モデルデータを入手 :
FILM用の学習モデルデータを入手。
_pretrained_models - Google ドライブ
film_net と vgg というフォルダがあるので、2つともダウンロードする。
frame-interpolation\ 内に、pretrained_models という名前のフォルダを作成して、その中に入れる。フォルダ構成は以下のようになる。
_pretrained_models - Google ドライブ
film_net と vgg というフォルダがあるので、2つともダウンロードする。
frame-interpolation\ 内に、pretrained_models という名前のフォルダを作成して、その中に入れる。フォルダ構成は以下のようになる。
D:\AIWORK\FILM\FRAME-INTERPOLATION\PRETRAINED_MODELS
├─ film_net
│  ├─ L1
│  │  └─ saved_model
│  │      │  keras_metadata.pb
│  │      │  saved_model.pb
│  │      │
│  │      ├─ assets
│  │      └─ variables
│  │              variables.data-00000-of-00001
│  │              variables.index
│  │
│  ├─ Style
│  │  └─ saved_model
│  │      │  keras_metadata.pb
│  │      │  saved_model.pb
│  │      │
│  │      ├─ assets
│  │      └─ variables
│  │              variables.data-00000-of-00001
│  │              variables.index
│  │
│  └─ VGG
│      └─ saved_model
│          │  keras_metadata.pb
│          │  saved_model.pb
│          │
│          ├─ assets
│          └─ variables
│                  variables.data-00000-of-00001
│                  variables.index
│
└─ vgg
        imagenet-vgg-verydeep-19.mat
◎ GPUが使えそうか調べる :
TensorFlow が GPUを使える状態になっているのか確認しておく。
まず、バージョンを確認。
TensorFlow 2.6.2 がインストールされていることが分かった。
GPUが使えそうか確認。
出力された結果の中に、GPU関連の情報が出てきたら、たぶん大丈夫。GPUが使えない状態の時は、CPUの情報しか出てこない…。Python 3.10.6 + TensorFlow 2.12.0 の時は、CPUの情報しか出てこなかった…。
まず、バージョンを確認。
python -c "import tensorflow as tf;print(tf.__version__)"
(pyvenv39) D:\aiwork\film\frame-interpolation>python -c "import tensorflow as tf;print(tf.__version__)"
2.6.2
TensorFlow 2.6.2 がインストールされていることが分かった。
GPUが使えそうか確認。
python -c "from tensorflow.python.client import device_lib;print(device_lib.list_local_devices())"
>python -c "from tensorflow.python.client import device_lib;print(device_lib.list_local_devices())"
2023-05-22 04:55:19.841520: I tensorflow/core/platform/cpu_feature_guard.cc:142] This TensorFlow binary is optimized with oneAPI Deep Neural Network Library (oneDNN) to use the following CPU instructions in performance-critical operations:  AVX AVX2
To enable them in other operations, rebuild TensorFlow with the appropriate compiler flags.
2023-05-22 04:55:20.188459: I tensorflow/core/common_runtime/gpu/gpu_device.cc:1510] Created device /device:GPU:0 with 4622 MB memory:  -> device: 0, name: NVIDIA GeForce GTX 1060 6GB, pci bus id: 0000:09:00.0, compute capability: 6.1
[name: "/device:CPU:0"
device_type: "CPU"
memory_limit: 268435456
locality {
}
incarnation: 1099761069420990849
, name: "/device:GPU:0"
device_type: "GPU"
memory_limit: 4846518272
locality {
  bus_id: 1
  links {
  }
}
incarnation: 14526750838141541425
physical_device_desc: "device: 0, name: NVIDIA GeForce GTX 1060 6GB, pci bus id: 0000:09:00.0, compute capability: 6.1"
]
出力された結果の中に、GPU関連の情報が出てきたら、たぶん大丈夫。GPUが使えない状態の時は、CPUの情報しか出てこない…。Python 3.10.6 + TensorFlow 2.12.0 の時は、CPUの情報しか出てこなかった…。
◎ FILMを使ってみる :
これで環境設定はできたはず。長かった…。実際に FILM を使ってみる。
photosディレクトリの中に、one.png、two.png という2つの画像ファイルがあるので、この2つの画像の中間画像を生成させて、photos/output_middle.png として保存してみる。
妙なメッセージがたくさん出てきた。どうやら、「メモリ不足になった」と言われてる気がする…。VRAM 6GB では足りませんか…。ただ、「失敗してるわけではないよ」「メモリがもっとあればパフォーマンスが上がるんだけどなあ」と言われてるようにも見える。
とりあえず、こんな状態でも、output_middle.png は得られた。
次は動画を作ってみる。画像が入ってるフォルダ(photos)を指定して、動画で出力してみる。
これもまた、大量にエラーメッセージらしきものが出てきた…。メモリ不足はもちろんのこと、なんだかよく分からないアドレス値まで…。
それでも一応、photosディレクトリの中に、動画と連番画像が作成された。
ちなみに、Python 3.9 ではなく、Python 3.10 で動かした際には、動画生成終了時に謎のエラーメッセージが大量に出てきたのだけど、Python 3.9 で動かした場合は、そういったエラーメッセージは表示されなかった。
しかし、何かサンプル画像を出してみないと、どんな感じの成果物が得られるのか分らんよな…。Stable Diffusion web UI を使って、何かそれっぽい画像を生成して試してみよう…。
photosディレクトリの中に、one.png、two.png という2つの画像ファイルがあるので、この2つの画像の中間画像を生成させて、photos/output_middle.png として保存してみる。
python -m eval.interpolator_test --frame1 photos/one.png --frame2 photos/two.png --model_path pretrained_models/film_net/Style/saved_model --output_frame photos/output_middle.png
>python -m eval.interpolator_test --frame1 photos/one.png --frame2 photos/two.png --model_path pretrained_models/film_net/Style/saved_model --output_frame photos/output_middle.png
2023-05-22 04:57:51.982771: W tensorflow/core/common_runtime/bfc_allocator.cc:272] Allocator (GPU_0_bfc) ran out of memory trying to allocate 2.55GiB with freed_by_count=0. The caller indicates that this is not a failure, but may mean that there could be performance gains if more memory were available.
2023-05-22 04:57:52.312263: W tensorflow/core/common_runtime/bfc_allocator.cc:272] Allocator (GPU_0_bfc) ran out of memory trying to allocate 3.40GiB with freed_by_count=0. The caller indicates that this is not a failure, but may mean that there could be performance gains if more memory were available.
2023-05-22 04:57:52.471599: W tensorflow/core/common_runtime/bfc_allocator.cc:272] Allocator (GPU_0_bfc) ran out of memory trying to allocate 2.09GiB with freed_by_count=0. The caller indicates that this is not a failure, but may mean that there could be performance gains if more memory were available.
2023-05-22 04:57:53.004908: W tensorflow/core/common_runtime/bfc_allocator.cc:272] Allocator (GPU_0_bfc) ran out of memory trying to allocate 1.74GiB with freed_by_count=0. The caller indicates that this is not a failure, but may mean that there could be performance gains if more memory were available.
2023-05-22 04:57:53.177009: W tensorflow/core/common_runtime/bfc_allocator.cc:272] Allocator (GPU_0_bfc) ran out of memory trying to allocate 2.15GiB with freed_by_count=0. The caller indicates that this is not a failure, but may mean that there could be performance gains if more memory were available.
2023-05-22 04:57:53.218532: W tensorflow/core/common_runtime/bfc_allocator.cc:272] Allocator (GPU_0_bfc) ran out of memory trying to allocate 2.02GiB with freed_by_count=0. The caller indicates that this is not a failure, but may mean that there could be performance gains if more memory were available.
2023-05-22 04:57:53.279325: W tensorflow/core/common_runtime/bfc_allocator.cc:272] Allocator (GPU_0_bfc) ran out of memory trying to allocate 2.03GiB with freed_by_count=0. The caller indicates that this is not a failure, but may mean that there could be performance gains if more memory were available.
2023-05-22 04:57:53.289617: W tensorflow/core/common_runtime/bfc_allocator.cc:272] Allocator (GPU_0_bfc) ran out of memory trying to allocate 2.03GiB with freed_by_count=0. The caller indicates that this is not a failure, but may mean that there could be performance gains if more memory were available.
2023-05-22 04:57:53.425091: W tensorflow/core/common_runtime/bfc_allocator.cc:272] Allocator (GPU_0_bfc) ran out of memory trying to allocate 2.03GiB with freed_by_count=0. The caller indicates that this is not a failure, but may mean that there could be performance gains if more memory were available.
2023-05-22 04:57:53.474574: W tensorflow/core/common_runtime/bfc_allocator.cc:272] Allocator (GPU_0_bfc) ran out of memory trying to allocate 2.03GiB with freed_by_count=0. The caller indicates that this is not a failure, but may mean that there could be performance gains if more memory were available.
妙なメッセージがたくさん出てきた。どうやら、「メモリ不足になった」と言われてる気がする…。VRAM 6GB では足りませんか…。ただ、「失敗してるわけではないよ」「メモリがもっとあればパフォーマンスが上がるんだけどなあ」と言われてるようにも見える。
とりあえず、こんな状態でも、output_middle.png は得られた。
次は動画を作ってみる。画像が入ってるフォルダ(photos)を指定して、動画で出力してみる。
python -m eval.interpolator_cli --pattern "photos" --model_path pretrained_models/film_net/Style/saved_model --times_to_interpolate 6 --output_video
これもまた、大量にエラーメッセージらしきものが出てきた…。メモリ不足はもちろんのこと、なんだかよく分からないアドレス値まで…。
それでも一応、photosディレクトリの中に、動画と連番画像が作成された。
ちなみに、Python 3.9 ではなく、Python 3.10 で動かした際には、動画生成終了時に謎のエラーメッセージが大量に出てきたのだけど、Python 3.9 で動かした場合は、そういったエラーメッセージは表示されなかった。
しかし、何かサンプル画像を出してみないと、どんな感じの成果物が得られるのか分らんよな…。Stable Diffusion web UI を使って、何かそれっぽい画像を生成して試してみよう…。
◎ 2023/05/23追記 :
画像生成AI Stable Diffusion web UIで生成した画像を元にして、FILMでフレーム補間して動画を作ってみた。
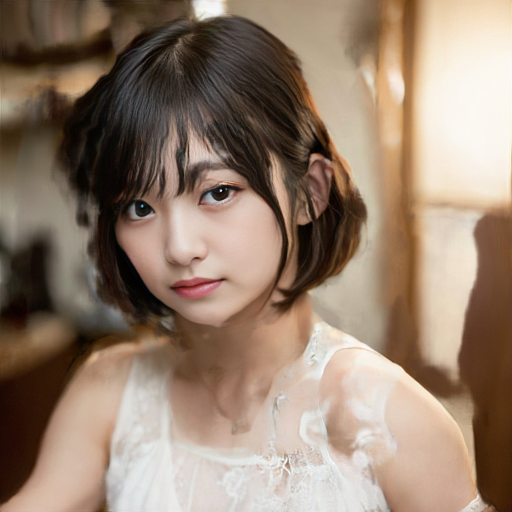
元画像は以下の2枚。


これをFILMに渡して、63枚の中間画像を作成。途中のフレームを何枚か削除して、動きがリニア(線形、直線的)ではない感じに調整。AviUtl + 拡張編集プラグインで、連番画像として読み込んで、ループ再生するように配置。512x512、24fpsのmp4として出力。
画像生成AIが出力した画像なので、背景が違ってしまっていて、見た目がちょっとアレだけど…。こういった紛い物の画像ではなく、実世界の本当の写真画像を元にして処理すれば、おそらく奇麗な生成結果が得られそうではあるなと…。
中間画像の生成時にt値を指定できたら、もうちょっと使い道がありそうな気もする。リニアな動きでしか出力できないのはちょっと…。まあ、出力された連番画像からテキトーに画像を削除することで対応できなくはないけれど、最初から イージング(?)が使えたらなあ…。
_イージング関数チートシート
待てよ? AviUtlでイージング使って再生速度を変化させればいいのかな…?
ところで、全然違う画像を渡して処理させたら、なかなか悲しい結果になった。


この結果からすると、手描きアニメの原画をいきなり渡して中割りしろ、なんて処理はまだまだ無理だよなあ、と…。
ただ、人間が中割りを描いて動画にして、その動画を中割り、というかフレーム補間して単純に枚数を増やす、といった感じなら使えなくもない…? でも、そういう処理なら After Effects でも可能だったりしそう。使ったことないから知らんけど。
元画像は以下の2枚。
これをFILMに渡して、63枚の中間画像を作成。途中のフレームを何枚か削除して、動きがリニア(線形、直線的)ではない感じに調整。AviUtl + 拡張編集プラグインで、連番画像として読み込んで、ループ再生するように配置。512x512、24fpsのmp4として出力。
画像生成AIが出力した画像なので、背景が違ってしまっていて、見た目がちょっとアレだけど…。こういった紛い物の画像ではなく、実世界の本当の写真画像を元にして処理すれば、おそらく奇麗な生成結果が得られそうではあるなと…。
中間画像の生成時にt値を指定できたら、もうちょっと使い道がありそうな気もする。リニアな動きでしか出力できないのはちょっと…。まあ、出力された連番画像からテキトーに画像を削除することで対応できなくはないけれど、最初から イージング(?)が使えたらなあ…。
_イージング関数チートシート
待てよ? AviUtlでイージング使って再生速度を変化させればいいのかな…?
ところで、全然違う画像を渡して処理させたら、なかなか悲しい結果になった。
この結果からすると、手描きアニメの原画をいきなり渡して中割りしろ、なんて処理はまだまだ無理だよなあ、と…。
ただ、人間が中割りを描いて動画にして、その動画を中割り、というかフレーム補間して単純に枚数を増やす、といった感じなら使えなくもない…? でも、そういう処理なら After Effects でも可能だったりしそう。使ったことないから知らんけど。
[ ツッコむ ]
以上です。