2017/12/23(土) [n年前の日記]
#1 [love2d] love2d + stiライブラリでTiledで作ったタイルマップのオブジェクトレイヤー情報を取得
レトロ風の2Dゲームを作る際、えてして背景(BG、Background)は、タイル状の画像を並べたマップ(タイルマップ)で表現したりするわけだけど。
そういったタイルマップの作成ツールとして、 _Tiledマップエディタ があり。例えば love2d も、 _sti (Simple Tiled Implementation) というライブラリを使わせてもらうことで、Tiled で作ったタイルマップを簡単に表示できたりするわけで。
で。単に表示するだけなら話はこれで終わりなのだけど。せっかくだから、Tiled で作ったタイルマップに敵発生用の情報も含めておいて、それを読み取って使いたいものだよなと。でも、どうすればそんなことができるのだろう。
Tiled は、色々な種類のレイヤーを作ることができるけど…。「この位置に、この種類の敵を置きたい」なんて時は、オブジェクトレイヤー(Object Layer)を使えば目的を果たすことができるかもしれないなと。love2d + sti で、オブジェクトレイヤーの情報を読み取ることができれば…。
てなわけで、そのあたりを調べて実験したり。
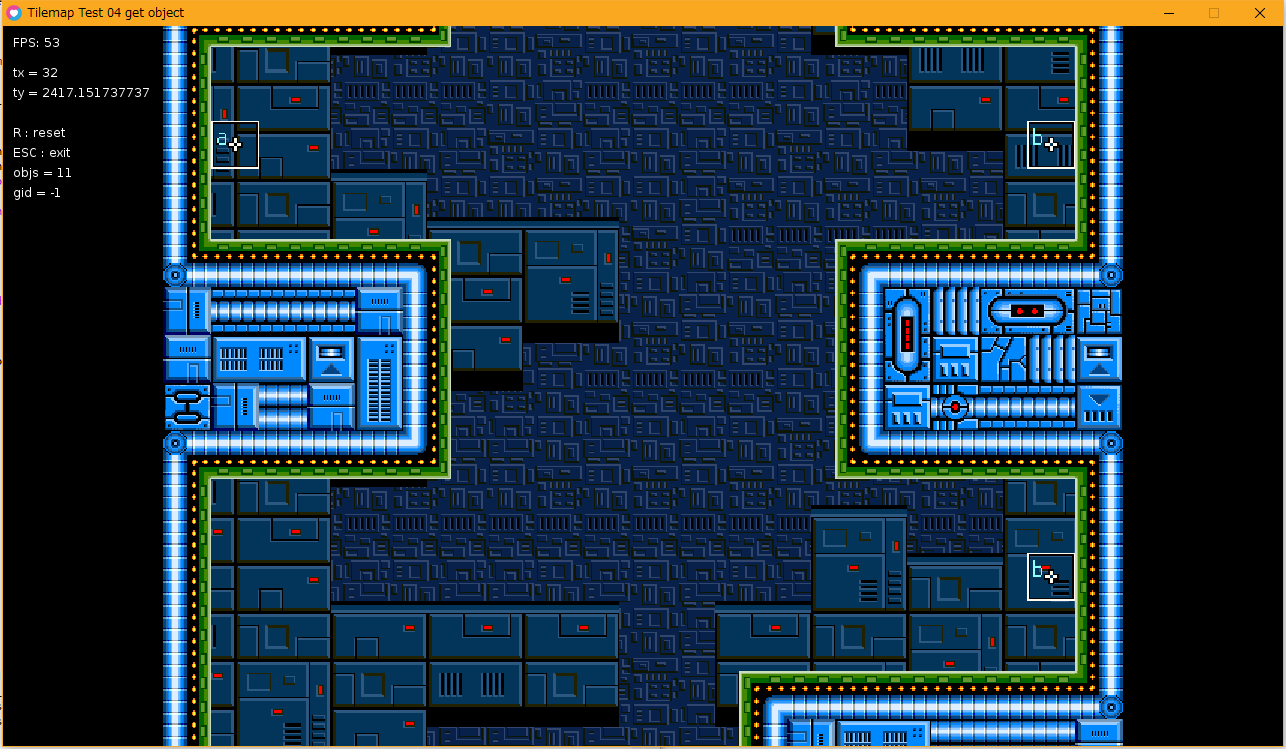
こんな感じになった。「a」「b」と表示されてる白い四角があるけれど、これがオブジェクトレイヤーの情報を読み取って、その位置に表示してみたソレ。
◎ Tiledで作業する際の前提条件。 :
- 敵発生位置は、オブジェクトレイヤー(Object layer)を作って指定する。
- オブジェクトレイヤーには、複数のオブジェクトを置くことができる。
- 今回は、32x32ドットの四角形(rectangle)を置いて、位置を指定した。
- 敵種類の判別は、各オブジェクトの名前を利用する。「a」「b」等を指定した。
◎ 画像とソース。 :
使った画像・タイルマップデータは以下。
_enemy_mark.png
_tile01_b.png
_mecha_bg2_map_with_enemy.lua
_mecha_bg2_map_with_enemy.tmx
ソースは以下。 _conf.lua
_main.lua
動作には、 _stiライブラリ が必要。 _karai17/Simple-Tiled-Implementation: Tiled library for LOVE の右上の「Clone or download」から、zip をダウンロードして解凍してもいいし、git がインストールしてある環境なら、
画像、タイルマップデータ(.tmx)、main.lua は License: CC0 / Public Domain ってことで。
stiライブラリは MIT/X11 Open Source License なので注意。
_enemy_mark.png
_tile01_b.png
_mecha_bg2_map_with_enemy.lua
_mecha_bg2_map_with_enemy.tmx
ソースは以下。 _conf.lua
function love.conf(t)
  t.window.title = "Tilemap Test 04 get object"
  t.window.width = 1280
  t.window.height = 720
  t.window.vsync = true
  t.console = true
  -- t.window.fullscreen = true
  -- t.window.fullscreentype = "exclusive"
end
_main.lua
-- tilemap test 04 get object
--
-- use sti library
-- https://github.com/karai17/Simple-Tiled-Implementation

local sti = require "sti"

function love.load()
  love.graphics.setDefaultFilter("nearest", "nearest")
  scr_w, scr_h = 640, 480
  canvas = love.graphics.newCanvas(scr_w, scr_h)

  -- load image
  mark_img = love.graphics.newImage("enemy_mark.png")
  mark_quads = {}
  for i, k in ipairs({"a", "b", "c", "d"}) do
    local x, y = (i - 1) * 32, 0
    local w, h = 32, 32
    mark_quads[k] = love.graphics.newQuad(x, y, w, h, mark_img:getDimensions())
  end

  -- load tilemap
  map = sti("mecha_bg2_map_with_enemy.lua")

  map.getGidByPixel = function(self, x, y, layer_name)
    local tilex, tiley = self:convertPixelToTile(math.floor(x), math.floor(y))
    tilex = math.floor(tilex)
    tiley = math.floor(tiley)
    local layer = map.layers[layer_name]
    local tilew, tileh = layer.width, layer.height
    if tilex < 0 or tilex >= tilew or tiley < 0 or tiley >= tileh then return -2 end
    local tile = layer.data[tiley + 1][tilex + 1]
    if tile == nil then return -1 end
    return tile.gid
  end

  -- get map objects
  enemy_objs = {}
  for k, obj in pairs(map.objects) do
    local x, y, w, h = obj.x, obj.y, obj.width, obj.height
    x = x + w / 2
    y = y + h / 2
    table.insert(enemy_objs, {kind=obj.name, x=x, y=y})
  end

  -- sort objects by y
  table.sort(enemy_objs, function(a, b) return (a.y > b.y) end)

  map.layers["enemy_tbl"].visible = false

  tx_start = 32
  ty_start = 480 * 7
  tx = tx_start
  ty = ty_start
  gid = 0

  -- framerate steady
  min_dt = 1 / 60
  next_time = love.timer.getTime()
end

function love.update(dt)
  next_time = next_time + min_dt
  wdw_w, wdw_h = love.graphics.getDimensions()
  scr_scale = math.min((wdw_w / scr_w), (wdw_h / scr_h))
  scr_ofsx = (wdw_w - (scr_w * scr_scale)) / 2
  scr_ofsy = (wdw_h - (scr_h * scr_scale)) / 2

  map:update(dt)

  -- keyboard check
  local speed = 160 * dt
  local kd = love.keyboard.isDown
  if kd("left") or kd("a") then tx = tx - speed end
  if kd("right") or kd("d") then tx = tx + speed end
  if kd("up") or kd("w") then ty = ty - speed end
  if kd("down") or kd("s") then ty = ty + speed end

  map.layers["enemy_tbl"].x = -tx
  map.layers["enemy_tbl"].y = -ty
  map.layers["bg_a"].x = -tx
  map.layers["bg_a"].y = -ty
  map.layers["bg_b"].x = -tx / 2
  map.layers["bg_b"].y = -ty / 2
  map.layers["bg_c"].x = -tx / 4
  map.layers["bg_c"].y = -ty / 4

  -- get mouse position
  local mx, my = love.mouse.getPosition()
  mx = (mx - scr_ofsx) / scr_scale
  my = (my - scr_ofsy) / scr_scale

  -- get tile gid
  mx = mx + tx
  my = my + ty
  gid = map:getGidByPixel(mx, my, "bg_a")
end

function love.draw()
  love.graphics.setCanvas(canvas)
  love.graphics.clear(0, 0, 0, 255)

  -- draw tilemap BG
  love.graphics.setColor(255, 255, 255, 255)
  map:draw()

  -- draw objects
  love.graphics.setColor(255, 255, 255, 255)
  for i, obj in ipairs(enemy_objs) do
    local x = obj.x - tx
    local y = obj.y - ty
    love.graphics.draw(mark_img, mark_quads[obj.kind], x, y, 0, 1, 1, 16, 16)
  end

  love.graphics.setCanvas()

  -- draw canvas to window
  love.graphics.setColor(255, 255, 255)
  love.graphics.draw(canvas, scr_ofsx, scr_ofsy, 0, scr_scale, scr_scale)

  love.graphics.print("FPS: "..tostring(love.timer.getFPS()), 10, 10)
  love.graphics.print("tx = "..tostring(tx), 10, 40)
  love.graphics.print("ty = "..tostring(ty), 10, 60)
  love.graphics.print("R : reset", 10, 100)
  love.graphics.print("ESC : exit", 10, 120)
  love.graphics.print("objs = "..tostring(#enemy_objs), 10, 140)
  love.graphics.print("gid = "..tostring(gid), 10, 160)

  if love.system.getOS() == "Windows" then
    -- wait
    local cur_time = love.timer.getTime()
    if next_time <= cur_time then
      next_time = cur_time
    else
      love.timer.sleep(next_time - cur_time)
    end
  end
end

function love.keypressed(key, isrepeat)
  if key == "escape" then
    -- ESC to exit
    love.event.quit()
  elseif key == "r" then
    -- reset scroll position
    tx = tx_start
    ty = ty_start
  end
end
動作には、 _stiライブラリ が必要。 _karai17/Simple-Tiled-Implementation: Tiled library for LOVE の右上の「Clone or download」から、zip をダウンロードして解凍してもいいし、git がインストールしてある環境なら、
git clone https://github.com/karai17/Simple-Tiled-Implementation.gitと打って入手してもいい。main.lua と同じ階層に、stiフォルダが置いてあるようなファイル・フォルダ配置にして使う。
画像、タイルマップデータ(.tmx)、main.lua は License: CC0 / Public Domain ってことで。
stiライブラリは MIT/X11 Open Source License なので注意。
◎ 少し解説。 :
stiライブラリは、最低限の使い方であれば、以下で済む。
オブジェクトレイヤーに乗ってるオブジェクトの情報を取得するなら、map.objects にアクセスすればいい。
local sti = require "sti"

function love.load()
  map = sti("hoge_tilemap.lua")
end

function love.update(dt)
  map:update(dt)
end

function love.draw()
  love.graphics.clear(0, 0, 0, 255)

  love.graphics.setColor(255, 255, 255, 255)
  map:draw()
end
- 最初に、local sti = require "sti" と書くことで「stiライブラリを使うよ」と指定して。
- 初期化処理を行う love.load() の中で、Tiled からエクスポートした .lua を読み込んで。
- 更新処理を行う love.update(dt) の中で、map:update(dt) を呼んで。
- 描画処理を行う love.draw() の中で、map:draw() を呼んで描画する。
オブジェクトレイヤーに乗ってるオブジェクトの情報を取得するなら、map.objects にアクセスすればいい。
  enemy_objs = {}
  for k, obj in pairs(map.objects) do
    local x, y, w, h = obj.x, obj.y, obj.width, obj.height
    x = x + w / 2
    y = y + h / 2
    table.insert(enemy_objs, {kind=obj.name, x=x, y=y})
  end
各オブジェクトは、以下の情報を持ってる。
{
  id = 16,              -- ID
  name = "a",           -- 名前
  type = "",            -- 種類
  shape = "rectangle",  -- 形状
  x = 96,               -- x
  y = 3360,             -- y
  width = 32,           -- 幅
  height = 32,          -- 高さ
  rotation = 0,         -- 角度
  visible = true,       -- 表示/非表示
  properties = {}       -- カスタムプロパティ
},
[ ツッコむ ]
以上です。
