2014/06/09(月) [n年前の日記]
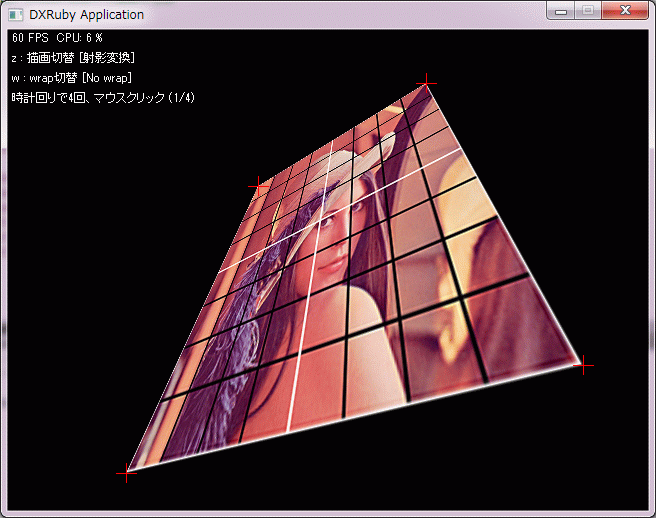
#1 [dxruby] DXRubyのShaderで射影変換
_先日書いた射影変換スクリプト
をShaderで実現できないか実験中。
一応できた、ような気がする。どうしてこういう式になるのかちゃんと分かってないけど…。
ソースは以下。
_projtransshader.rb
他のスクリプトから呼び出して使う場合は以下のような感じ。
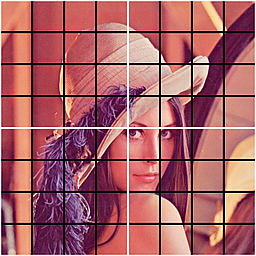
実験用のlena様画像も置いときます。
_lena.png (125KB)
参考ページは、 _mieki256のブックマーク - "射影変換" を見ていただければと。
変換式のための8つの係数を求める際、Ruby の Matrix ライブラリを使っているけど。Ruby の Matrix ライブラリは pure Ruby なので処理が遅いという話も見かけたわけで。もし、大量にこの手のポリゴンを描画したい場合は、もしかすると高速なMatrixライブラリを探すか、バーテックスシェーダとやらを使ってどうにかするとか考えないといかんのかな、という気もしたのですけど実際どうなのかはよく分かりません。
一応できた、ような気がする。どうしてこういう式になるのかちゃんと分かってないけど…。
ソースは以下。
_projtransshader.rb
require 'dxruby'
require 'matrix'

# 4点を指定して射影変換描画。Shaderを使って描画する版
#
class ProjTransShader

  # wrapする版
  @@HLSL1 = <<EOS
  float2 size, uvadd;
  float4 g_a, g_e;
  texture tex0;

  sampler Samp = sampler_state {
   Texture =<tex0>;
   // MipFilter = LINEAR;
   // MinFilter = LINEAR;
   // MagFilter = LINEAR;
   // MipFilter = POINT;
   // MinFilter = POINT;
   // MagFilter = POINT;
   AddressU = WRAP;
   AddressV = WRAP;
  };

  float4 PS(float2 input : TEXCOORD0) : COLOR0 {
    float2 p;
    p.x = input.x * size.x;
    p.y = input.y * size.y;
    input.x = ((p.x * g_a[0] + p.y * g_a[1] + g_a[2]) / (p.x * g_e[2] + p.y * g_e[3] + 1.0) + uvadd.x) / size.x;
    input.y = ((p.x * g_a[3] + p.y * g_e[0] + g_e[1]) / (p.x * g_e[2] + p.y * g_e[3] + 1.0) + uvadd.y) / size.y;
    return tex2D( Samp, input );
  }

  technique {
    pass {
      PixelShader = compile ps_2_0 PS();
    }
  }
EOS

  # wrapしない版
  @@HLSL2 = <<EOS
  float2 size, uvadd;
  float4 g_a, g_e;
  texture tex0;

  sampler Samp = sampler_state {
   Texture =<tex0>;
   AddressU = BORDER;
   AddressV = BORDER;
  };

  float4 PS(float2 input : TEXCOORD0) : COLOR0 {
    float2 p;
    p.x = input.x * size.x;
    p.y = input.y * size.y;
    input.x = ((p.x * g_a[0] + p.y * g_a[1] + g_a[2]) / (p.x * g_e[2] + p.y * g_e[3] + 1.0) + uvadd.x) / size.x;
    input.y = ((p.x * g_a[3] + p.y * g_e[0] + g_e[1]) / (p.x * g_e[2] + p.y * g_e[3] + 1.0) + uvadd.y) / size.y;
    return tex2D( Samp, input );
  }

  technique {
    pass {
      PixelShader = compile ps_2_0 PS();
    }
  }
EOS

  attr_accessor :image
  attr_accessor :shader_wrap
  attr_accessor :shader_no_wrap
  attr_accessor :tilew, :tileh
  attr_accessor :rt
  attr_accessor :cof
  attr_accessor :wrap_enable

  # コンストラクタ
  #
  # @param [Object] img Imageオブジェクト
  # @param [Boolean] wrap_enable trueならwrap、falseならwrapしない
  #
  def initialize(img, wrap_enable = false)
    self.wrap_enable = wrap_enable
    self.image = img

    self.shader_wrap = Shader.new(Shader::Core.new( @@HLSL1, {
                                                      :size=>:float,
                                                      :uvadd=>:float,
                                                      :g_a=>:float,
                                                      :g_e=>:float
                                                    }))
    self.shader_no_wrap = Shader.new(Shader::Core.new(@@HLSL2, {
                                                        :size=>:float,
                                                        :uvadd=>:float,
                                                        :g_a=>:float,
                                                        :g_e=>:float
                                                      }))

    # 画面を覆い隠すタイル数を求める
    self.tilew = Window.width.quo(self.image.width).ceil
    self.tileh = Window.height.quo(self.image.height).ceil

    # RenderTargetを生成
    rw = self.image.width * self.tilew
    rh = self.image.height * self.tileh
    self.rt = RenderTarget.new(rw, rh)

    self.shader_wrap.size = [rw, rh]
    self.shader_wrap.uvadd = [0, 0]
    self.shader_no_wrap.size = [rw, rh]
    self.shader_no_wrap.uvadd = [0, 0]
    update(0, 0, 640, 0, 640, 480, 0, 480)
  end

  # 射影変換の式に与える8つの係数を求めてShaderに渡す
  #
  # @param [Number] x1 点1のx座標
  # @param [Number] y1 点1のy座標
  # @param [Number] x2 点2のx座標
  # @param [Number] y2 点2のy座標
  # @param [Number] x3 点3のx座標
  # @param [Number] y3 点3のy座標
  # @param [Number] x4 点4のx座標
  # @param [Number] y4 点4のy座標
  #
  def update(x1, y1, x2, y2, x3, y3, x4, y4)

    # self.cof = get_system(x1.to_f, y1.to_f, x2.to_f, y2.to_f,
    #                       x3.to_f, y3.to_f, x4.to_f, y4.to_f)

    src = [
      [0.0, 0.0],
      [self.image.width.to_f, 0.0],
      [self.image.width.to_f, self.image.height.to_f],
      [0.0, self.image.height.to_f]
    ]

    dst = [
      [ x1.to_f, y1.to_f ],
      [ x2.to_f, y2.to_f ],
      [ x3.to_f, y3.to_f ],
      [ x4.to_f, y4.to_f ]
    ]

    self.cof = get_proj_param(dst, src)

    self.shader_wrap.g_a = self.cof[0..3]
    self.shader_wrap.g_e = self.cof[4..7]
    self.shader_no_wrap.g_a = self.cof[0..3]
    self.shader_no_wrap.g_e = self.cof[4..7]
  end

  # uvスクロール値を設定
  #
  # @param [Number] u u値
  # @param [Number] v v値
  #
  def set_scroll_uv(u, v)
    self.shader_wrap.uvadd[0] = u
    self.shader_wrap.uvadd[1] = v
    self.shader_no_wrap.uvadd[0] = u
    self.shader_no_wrap.uvadd[1] = v
  end

  # uvスクロール値を加算
  #
  # @param [Number] u u加算値
  # @param [Number] v v加算値
  #
  def add_scroll_uv(u, v)
    self.shader_wrap.uvadd[0] += u
    self.shader_wrap.uvadd[1] += v
    self.shader_no_wrap.uvadd[0] += u
    self.shader_no_wrap.uvadd[1] += v
  end

  # 描画
  #
  # @param [Number] x0 描画x座標
  # @param [Number] y0 描画x座標
  # @param [Number] alpha アルファ値 0-255
  # @param [Number] z 描画深度
  # @param [Number] blend 合成種類
  #
  def draw(x0, y0, alpha = 255, z = 0, blend = :alpha)
    tw, th = 1, 1
    shader = self.shader_no_wrap
    if self.wrap_enable
      tw, th = self.tilew, self.tileh
      shader = self.shader_wrap
    end

    # Shader が参照する画像を RenderTarget に作成
    self.rt.drawTile(0, 0, [[0]], [self.image], 0, 0, tw, th).update

    # Shader を使って描画
    Window.drawEx(x0, y0, self.rt, :shader=>shader,
                  :alpha=>alpha, :z=>z, :blend=>blend)
  end

  # wrapの切り替え
  #
  # @param [Boolean] wrap_enable trueならwrap有効、falseならwrap無効
  #
  def set_wrap(wrap_enable)
    self.wrap_enable = wrap_enable
  end

  # 変換式用の8つの係数を取得
  #
  # @note 変換式に与える座標値を元画像のサイズで割らないとこの係数は使えない
  #
  # @param [Number] x0 点1のx座標
  # @param [Number] y0 点1のy座標
  # @param [Number] x1 点2のx座標
  # @param [Number] y1 点2のy座標
  # @param [Number] x2 点3のx座標
  # @param [Number] y2 点3のy座標
  # @param [Number] x3 点4のx座標
  # @param [Number] y3 点4のy座標
  # @return [Array] 8つの係数を配列で返す
  #
  def get_system(x0, y0, x1, y1, x2, y2, x3, y3)
    sx = (x0 - x1) + (x2 - x3)
    sy = (y0 - y1) + (y2 - y3)
    dx1 = x1 - x2
    dx2 = x3 - x2
    dy1 = y1 - y2
    dy2 = y3 - y2
    z = (dx1 * dy2) - (dy1 * dx2)
    g = ((sx * dy2) - (sy * dx2)) / z
    h = ((sy * dx1) - (sx * dy1)) / z

    return [
            x1 - x0 + g * x1,
            x3 - x0 + h * x3,
            x0,
            y1 - y0 + g * y1,
            y3 - y0 + h * y3,
            y0,
            g,
            h
            ]
  end

  # 変換式用の8つの係数を取得
  #
  # @note 参考ページ
  #       月の杜工房 - 射影変換のパラメータを求める
  #       http://mf-atelier.sakura.ne.jp/mf-atelier/modules/tips/program/algorithm/a6.html
  #
  # @param [Array] s 変換前の4点座標配列([[x1,y1],[x2,y2],...)
  # @param [Array] d 変換後の4点座標配列([[x1,y1],[x2,y2],...)
  # @return [Array] 8つの係数を配列で返す
  #
  def get_proj_param(s, d)
    x0, y0 = d[0]
    x1, y1 = d[1]
    x2, y2 = d[2]
    x3, y3 = d[3]

    m = Matrix[
               [ s[0][0], s[0][1], 1.0, 0.0, 0.0, 0.0, -x0 * s[0][0], -x0 * s[0][1] ],
               [ s[1][0], s[1][1], 1.0, 0.0, 0.0, 0.0, -x1 * s[1][0], -x1 * s[1][1] ],
               [ s[2][0], s[2][1], 1.0, 0.0, 0.0, 0.0, -x2 * s[2][0], -x2 * s[2][1] ],
               [ s[3][0], s[3][1], 1.0, 0.0, 0.0, 0.0, -x3 * s[3][0], -x3 * s[3][1] ],
               [ 0.0, 0.0, 0.0, s[0][0], s[0][1], 1.0, -y0 * s[0][0], -y0 * s[0][1] ],
               [ 0.0, 0.0, 0.0, s[1][0], s[1][1], 1.0, -y1 * s[1][0], -y1 * s[1][1] ],
               [ 0.0, 0.0, 0.0, s[2][0], s[2][1], 1.0, -y2 * s[2][0], -y2 * s[2][1] ],
               [ 0.0, 0.0, 0.0, s[3][0], s[3][1], 1.0, -y3 * s[3][0], -y3 * s[3][1] ]
              ]

    n = m.inv # 逆行列を取得

    g_a = n[0,0] * x0 + n[0,1] * x1 + n[0,2] * x2 + n[0,3] * x3 + n[0,4] * y0 + n[0,5] * y1 + n[0,6] * y2 + n[0,7] * y3
    g_b = n[1,0] * x0 + n[1,1] * x1 + n[1,2] * x2 + n[1,3] * x3 + n[1,4] * y0 + n[1,5] * y1 + n[1,6] * y2 + n[1,7] * y3
    g_c = n[2,0] * x0 + n[2,1] * x1 + n[2,2] * x2 + n[2,3] * x3 + n[2,4] * y0 + n[2,5] * y1 + n[2,6] * y2 + n[2,7] * y3
    g_d = n[3,0] * x0 + n[3,1] * x1 + n[3,2] * x2 + n[3,3] * x3 + n[3,4] * y0 + n[3,5] * y1 + n[3,6] * y2 + n[3,7] * y3
    g_e = n[4,0] * x0 + n[4,1] * x1 + n[4,2] * x2 + n[4,3] * x3 + n[4,4] * y0 + n[4,5] * y1 + n[4,6] * y2 + n[4,7] * y3
    g_f = n[5,0] * x0 + n[5,1] * x1 + n[5,2] * x2 + n[5,3] * x3 + n[5,4] * y0 + n[5,5] * y1 + n[5,6] * y2 + n[5,7] * y3
    g_g = n[6,0] * x0 + n[6,1] * x1 + n[6,2] * x2 + n[6,3] * x3 + n[6,4] * y0 + n[6,5] * y1 + n[6,6] * y2 + n[6,7] * y3
    g_h = n[7,0] * x0 + n[7,1] * x1 + n[7,2] * x2 + n[7,3] * x3 + n[7,4] * y0 + n[7,5] * y1 + n[7,6] * y2 + n[7,7] * y3

    return [g_a, g_b, g_c, g_d, g_e, g_f, g_g, g_h]
  end

  # 1点を射影変換する
  #
  # @param [Number] x x座標
  # @param [Number] y y座標
  # @param [Array] cof 8つの係数配列
  # @return [Array] 射影変換後のx,y座標を配列で返す
  #
  def Projection(x, y, cof)
    mm = (x.to_f * cof[6] + y.to_f * cof[7] + 1.0)
    u = (x.to_f * cof[0] + y.to_f * cof[1] + cof[2]) / mm
    v = (x.to_f * cof[3] + y/to_f * cof[4] + cof[5]) / mm
    return u, v
  end
end

if $0 == __FILE__
  # ----------------------------------------
  # 動作確認

  if false
    # ----------------------------------------
    # 簡単な使い方の例

    img = Image.load("lena.png")
    prt = ProjTransShader.new(img)

    Window.loop do
      break if Input.keyPush?(K_ESCAPE)

      # 左上の点から時計回りに4点を指定
      prt.update(160, 100, 320, 20, 600, 460, 100, 300)
      prt.draw(0, 0) # 描画
    end

  else
    # ----------------------------------------
    # 動作確認

    morph_enable = false
    wrap_enable = false

    img = Image.load("lena.png")
    prt = ProjTransShader.new(img, wrap_enable)

    alpha = 255
    z = 0
    blend = :alpha

    font = Font.new(12)
    step = 0
    pos = []
    poly_pos = []

    Window.loop do
      break if Input.keyPush?(K_ESCAPE)

      if Input.mousePush?(M_LBUTTON)
        # マウスの左ボタンが押されたので座標を記録
        pos = [] if step == 0
        pos.push([Input.mousePosX, Input.mousePosY])
        step += 1
        if step >= 4
          # 4点が入力された
          step = 0
          poly_pos = pos.dup
        end
      end

      # zキーが押されたら drawMorph で描画するかどうかを切替
      morph_enable = !morph_enable if Input.keyPush?(K_Z)

      # wキーが押されたら wrap 切り替え
      wrap_enable = !wrap_enable if Input.keyPush?(K_W)

      if poly_pos.size == 4
        # 4点が決まってるので、画像を変形して描画
        x1, y1 = poly_pos[0]
        x2, y2 = poly_pos[1]
        x3, y3 = poly_pos[2]
        x4, y4 = poly_pos[3]

        unless morph_enable
          # 射影変換で描画する場合
          prt.set_wrap(wrap_enable)
          #prt.set_scroll_uv(2, 2)
          prt.update(x1, y1, x2, y2, x3, y3, x4, y4)
          prt.draw(0, 0, alpha, z, blend)
        else
          # drawMorphで描画する場合
          Window.drawMorph(x1, y1, x2, y2, x3, y3, x4, y4, img,
                           :dividex => 4, :dividey => 4)
        end
      end

      # 指定済みの頂点位置を描画
      d = 10
      pos.each do |p|
        x, y = p
        Window.drawLine(x - d, y, x + d, y, C_RED)
        Window.drawLine(x, y - d, x, y + d, C_RED)
      end

      i = step + 1
      y = 2
      msg = [
        "#{Window.real_fps.to_i} FPS  CPU: #{Window.getLoad.to_i} %",
        "z : 描画切替 [#{(morph_enable)? "drawMorph" : "射影変換"}]",
        "w : wrap切替 [#{(wrap_enable)? "Wrap" : "No wrap"}]",
        "時計回りで4回、マウスクリック (#{step+1}/4)"
      ].each_with_index do |s, iy|
        Window.drawFont(4, 2 + iy * (font.size + 8), s, font)
      end
    end
  end

end
他のスクリプトから呼び出して使う場合は以下のような感じ。
# ProjTransShaderの使用例

require 'dxruby'
require_relative 'projtransshader'

img = Image.load("lena.png")
prt = ProjTransShader.new(img)

Window.loop do
  break if Input.keyPush?(K_ESCAPE)

  alpha = 255
  z = 0
  blend = :alpha

  # 左上の点から時計回りに4点を指定
  prt.update(160, 100, 320, 20, 600, 460, 100, 300)
  prt.draw(0, 0, alpha, z, blend)
end
実験用のlena様画像も置いときます。
_lena.png (125KB)
参考ページは、 _mieki256のブックマーク - "射影変換" を見ていただければと。
変換式のための8つの係数を求める際、Ruby の Matrix ライブラリを使っているけど。Ruby の Matrix ライブラリは pure Ruby なので処理が遅いという話も見かけたわけで。もし、大量にこの手のポリゴンを描画したい場合は、もしかすると高速なMatrixライブラリを探すか、バーテックスシェーダとやらを使ってどうにかするとか考えないといかんのかな、という気もしたのですけど実際どうなのかはよく分かりません。
[ ツッコむ ]
以上です。