2022/03/22(火) [n年前の日記]
#1 [python] pycairoの描画結果をtkinterで表示
Python + pycairo + tkinter を再勉強中。pycairo で描画した結果を、tkinter を使ってデスクトップ画面上に表示したい。
実験環境は、Windows10 x64 21H2。
実験環境は、Windows10 x64 21H2。
- Python 2.7.18 32bit + Pillow 6.2.2 + pycairo 1.8.10
- Python 3.9.11 64bit + Pillow 9.0.1 + pycairo 1.21.0
◎ 各モジュールについて。 :
一応簡単に説明。pycairo は、Python から cairo という描画ライブラリを呼び出して図形を描くためのモジュール。
_cairo - Wikipedia
_Overview - Pycairo documentation
tkinter は、Python から Tk というGUIツールキットを呼び出してGUIアプリを作れるモジュール。
_Tcl/Tk - Wikipedia
_tkinter --- Tcl/Tk の Python インターフェース - Python 3.10.0b2 ドキュメント
加えて、Pillow (PIL) という画像処理モジュールも必要。pycairo で描画した結果を tkinter で表示できるデータに変換する際に利用する。
_Pillow - Pillow (PIL Fork) 9.0.1 documentation
◎ 必要なモジュールのインストール。 :
Windows版Pythonの場合、tkinter (Tkinter) は標準で同梱されているので、別途インストールしないで済む。
Python 3.x の場合、Pillow と pycairo は pip でインストールできる。
最後につけている「-U」は、更新も許可するオプション。今現在インストールされている版より新しい版がインターネットで公開されている場合は最新版に差し替えてくれる。
Python 2.7 の場合、Pillow は pip でインストールできるけど、pycairo は pip でインストールしようとするとエラーが出る。以下のページから、pygtk-all-in-one-2.24.2.win32-py2.7.msi を入手してインストールすれば、PyGTK、PyGObject、pycairo がインストールされる。
_Index of /binaries/win32/pygtk/2.24/
ちなみに、この PyGTK、PyGObject、pycairo は、昔のGIMP (2.6.x時代) で Python-Fu (GIMP-Python) を動かす際に必要になるモジュールだった。今の GIMP (Windows版、2.8.x以降) には最初から同梱されてると思う。
Python 3.x の場合、Pillow と pycairo は pip でインストールできる。
pip install Pillow -U
pip install pycairo -U
最後につけている「-U」は、更新も許可するオプション。今現在インストールされている版より新しい版がインターネットで公開されている場合は最新版に差し替えてくれる。
Python 2.7 の場合、Pillow は pip でインストールできるけど、pycairo は pip でインストールしようとするとエラーが出る。以下のページから、pygtk-all-in-one-2.24.2.win32-py2.7.msi を入手してインストールすれば、PyGTK、PyGObject、pycairo がインストールされる。
_Index of /binaries/win32/pygtk/2.24/
ちなみに、この PyGTK、PyGObject、pycairo は、昔のGIMP (2.6.x時代) で Python-Fu (GIMP-Python) を動かす際に必要になるモジュールだった。今の GIMP (Windows版、2.8.x以降) には最初から同梱されてると思う。
◎ サンプルソース。 :
pycairo で描画して、Pillow で Tk 用に変換して、Tk でGUI表示をする動作サンプルを書いてみる。以下のサンプルを参考にした。
_python - Cairo with tkinter? - Stack Overflow
以下のような感じになった。
_01_pycairo_in_tkinter.py
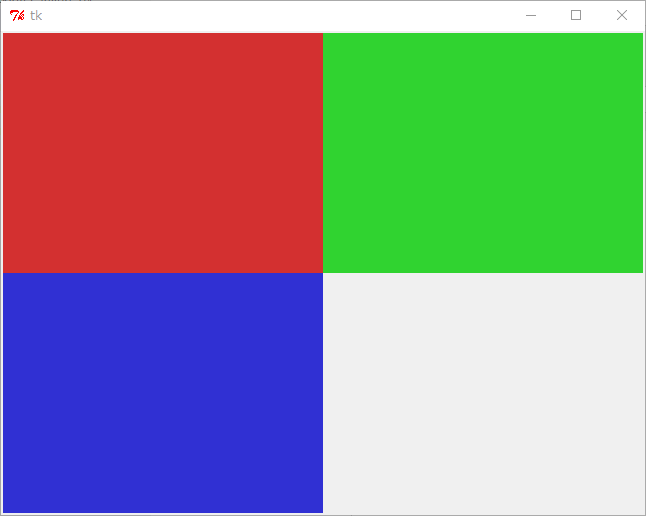
実行すると、こんな感じのウインドウが表示される。
左上に赤、右上に緑、左下に青の四角を pycairo で描画して、結果を tkinter で表示してる。
_python - Cairo with tkinter? - Stack Overflow
以下のような感じになった。
_01_pycairo_in_tkinter.py
"""
pycairo in tkinter.

* Windows10 x64 21H2 + Python 2.7.18 32bit + Pillow 6.2.2 + pycairo 1.8.10
* Windows10 x64 21H2 + Python 3.9.11 64bit + Pillow 9.0.1 + pycairo 1.21.0
"""

import sys

if sys.version_info.major == 2:
    # Python 2.7
    import Tkinter as tk
else:
    # Python 3.x
    import tkinter as tk

from PIL import Image
from PIL import ImageTk
import cairo


def conv_surface_to_photo(surface):
    """Convert pycairo surface to Tk PhotoImage."""
    w, h = surface.get_width(), surface.get_height()
    m = surface.get_data()

    if sys.version_info.major == 2:
        # Python 2.7
        im = Image.frombuffer("RGBA", (w, h), m, "raw", "BGRA", 0, 1)
    else:
        # Python 3.x
        im = Image.frombuffer("RGBA", (w, h), m, "raw", "RGBA", 0, 1)

        # BGRA -> RGBA
        r, g, b, a = im.split()
        im = Image.merge("RGBA", (b, g, r, a))

        # data = im.tobytes("raw", "BGRA", 0, 1)
        # im = Image.frombytes("RGBA", (w, h), data)

    return ImageTk.PhotoImage(im)


def main():
    print(sys.version)

    w, h = 640, 480
    root = tk.Tk()
    # root.geometry("{}x{}".format(w, h))

    root.surface = cairo.ImageSurface(cairo.FORMAT_ARGB32, w, h)
    w = root.surface.get_width()
    h = root.surface.get_height()

    # draw something with pycairo
    ctx = cairo.Context(root.surface)

    ctx.scale(w, h)

    ctx.rectangle(0, 0, 0.5, 0.5)
    ctx.set_source_rgba(1, 0, 0, 0.8)
    ctx.fill()

    ctx.rectangle(0.5, 0, 0.5, 0.5)
    ctx.set_source_rgba(0, 1, 0, 0.8)
    ctx.fill()

    ctx.rectangle(0, 0.5, 0.5, 0.5)
    ctx.set_source_rgba(0, 0, 1, 0.8)
    ctx.fill()

    # convert cairo image surface to tk.PhotoImage
    root._image_ref = conv_surface_to_photo(root.surface)

    label = tk.Label(root, image=root._image_ref)
    label.pack(expand=True, fill="both")

    root.mainloop()


if __name__ == "__main__":
    main()
実行すると、こんな感じのウインドウが表示される。
左上に赤、右上に緑、左下に青の四角を pycairo で描画して、結果を tkinter で表示してる。
◎ 少し解説。 :
Python 2.7 と 3.x に対応させるあたりでちょっと面倒だったのでメモ。
Python 2.7 では import Tkinter と記述するけど、Python 3.x では import tkinter と記述するように変わってた。
とりあえず、Python 2.7、3.x、どちらでも動かせるように、Python のメジャーバージョンを取得して、if文で処理を分けることにしてみた。
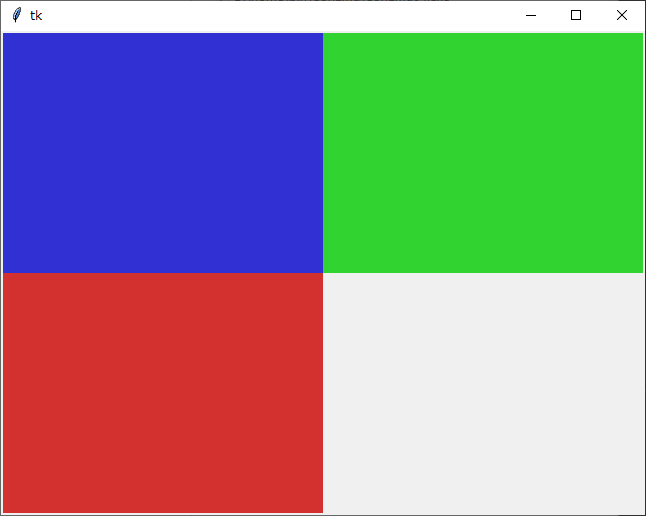
それと、pycairo の surface と Tk の PhotoImage は、RGBA と BGRA の違いがあるようで…。そのまま表示してしまうと、以下のように、R と B が入れ替わってしまう。
故に、pycairo で何かしらを描画した後、BGRA を RGBA に変換しないといけない。そのあたりは、conv_surface_to_photo(surface) の中で処理している。
ただ、Python 2.7 時代は Pillow 関係で「"BGRA"」という指定が使えたのだけど、Python 3.x では「"BGRA"」という指定はエラーになってしまった。今回は Pillow の .split() を使って R,G,B,Aの各チャンネルに分解してから、.merge() で並びを変更してみた。
あるいは、Pillow の .tobytes() と .frombytes() を使って BGRA と RGBA を変換することもできる。上記のソースではコメントアウトしているけれど、手元で試した感じでは動いてくれた。
Python 2.7 では import Tkinter と記述するけど、Python 3.x では import tkinter と記述するように変わってた。
とりあえず、Python 2.7、3.x、どちらでも動かせるように、Python のメジャーバージョンを取得して、if文で処理を分けることにしてみた。
import sys

if sys.version_info.major == 2:
    # Python 2.7
    import Tkinter as tk
else:
    # Python 3.x
    import tkinter as tk
それと、pycairo の surface と Tk の PhotoImage は、RGBA と BGRA の違いがあるようで…。そのまま表示してしまうと、以下のように、R と B が入れ替わってしまう。
故に、pycairo で何かしらを描画した後、BGRA を RGBA に変換しないといけない。そのあたりは、conv_surface_to_photo(surface) の中で処理している。
def conv_surface_to_photo(surface):
    """Convert pycairo surface to Tk PhotoImage."""
    w, h = surface.get_width(), surface.get_height()
    m = surface.get_data()

    if sys.version_info.major == 2:
        # Python 2.7
        im = Image.frombuffer("RGBA", (w, h), m, "raw", "BGRA", 0, 1)
    else:
        # Python 3.x
        im = Image.frombuffer("RGBA", (w, h), m, "raw", "RGBA", 0, 1)

        # BGRA -> RGBA
        r, g, b, a = im.split()
        im = Image.merge("RGBA", (b, g, r, a))

        # data = im.tobytes("raw", "BGRA", 0, 1)
        # im = Image.frombytes("RGBA", (w, h), data)

    return ImageTk.PhotoImage(im)
ただ、Python 2.7 時代は Pillow 関係で「"BGRA"」という指定が使えたのだけど、Python 3.x では「"BGRA"」という指定はエラーになってしまった。今回は Pillow の .split() を使って R,G,B,Aの各チャンネルに分解してから、.merge() で並びを変更してみた。
あるいは、Pillow の .tobytes() と .frombytes() を使って BGRA と RGBA を変換することもできる。上記のソースではコメントアウトしているけれど、手元で試した感じでは動いてくれた。
◎ 2022/03/24追記。 :
試していたら、Python 2.7.18 32bit Windows版 + tkinter も、import tkinter で動作することに気づいた…。import Tkinter じゃなくても良かったのか…。どこかの時点で変更されたのだろうか。それとも何かのモジュールをインストールすると使えるようになるのだろうか。ググってみたけれど、このあたりについて記述しているページが見つからない…。
「Python 2 は Tkinter だけど、Python 3 で tkinter にリネームされたから気をつけろ」と書かれたページなら見つかるのだけど…。
_tkinter Tutorial -> Getting started with tkinter
_24.1. Tkinter - Tcl/Tk への Python インタフェース - Python 2.7.18 ドキュメント
_TkInter - Python Wiki
「Python 2 は Tkinter だけど、Python 3 で tkinter にリネームされたから気をつけろ」と書かれたページなら見つかるのだけど…。
_tkinter Tutorial -> Getting started with tkinter
_24.1. Tkinter - Tcl/Tk への Python インタフェース - Python 2.7.18 ドキュメント
_TkInter - Python Wiki
[ ツッコむ ]
#2 [python] Python 2.7 と wxPython についてメモ
Windows版の Python 2.7.18 32bit に wxPython をインストールしようとして少し悩んだのでメモ。
pip install wxPython と打ったら wxPython 4.1.1 のインストール処理が始まったけど、しかしエラーが出てインストールできなかった。
ググってみたら、Python 2.7 で利用できる wxPython は 4.1.0 が最終版だった。それ以後は Python 2.7 に対応しないとの記述があった。
_wxPython Changelog | wxPython
wxPython 4.1.0 の .whl は以下から入手できる。
_wxPython - PyPI
ちなみに、以下で公開されている版は、wxPython 3.0.2.0 が最終版だった。
_Python Extension Packages for Windows - Christoph Gohlke
Python 3.9.11 64bit なら、2022/03/22現在、pip install wxPython -U とするだけで wxPython 4.1.1 がインストールできた。
pip install wxPython と打ったら wxPython 4.1.1 のインストール処理が始まったけど、しかしエラーが出てインストールできなかった。
ググってみたら、Python 2.7 で利用できる wxPython は 4.1.0 が最終版だった。それ以後は Python 2.7 に対応しないとの記述があった。
_wxPython Changelog | wxPython
wxPython Changelog
4.1.0 "Escaping the Quarantine"
24-April-2020
... This will be the last release to include binaries for Python 2.7. The code will likely still compile and be compatible with Python 2.7 for some time, but no effort will be put into keeping it that way.
wxPython 4.1.0 の .whl は以下から入手できる。
_wxPython - PyPI
- 32bit版 Python 2.7 なら、wxPython-4.1.0-cp27-cp27m-win32.whl を入手。pip install wxPython-4.1.0-cp27-cp27m-win32.whl でインストール。
- 64bit版 Python 2.7 なら、wxPython-4.1.0-cp27-cp27m-win_amd64.whl を入手。pip install wxPython-4.1.0-cp27-cp27m-win_amd64.whl でインストール。
ちなみに、以下で公開されている版は、wxPython 3.0.2.0 が最終版だった。
_Python Extension Packages for Windows - Christoph Gohlke
Python 3.9.11 64bit なら、2022/03/22現在、pip install wxPython -U とするだけで wxPython 4.1.1 がインストールできた。
[ ツッコむ ]
#3 [prog] Visual Studio Code に拡張をいくつかインストール
エディタ Microsoft Visual Studio Code (vscode)に、拡張をいくつかインストールした。
◎ Code Runner をインストール。 :
Ctrl + Alt + N で開いてるソースを実行できる拡張機能らしい。
_Code Runner - Visual Studio Marketplace
_Code Runnerを使いこなす - Qiita
_Code Runner - Visual Studio Marketplace
_Code Runnerを使いこなす - Qiita
◎ ConEmu Launcher をインストール。 :
ConEmu を各場面で右クリックメニューから開けるようにする。
_ConEmu - Handy Windows Terminal
_ConEmu Launcher - Visual Studio Marketplace
ConEmu.path に ConEmu のパスを指定しておくこと。ただ、vscodeを再起動しないと設定項目が出てこないかもしれない。また、ConEmu.showTitlebarIcon が true なら、vscode のタイトルバーにアイコンが表示される。
_ConEmu - Handy Windows Terminal
_ConEmu Launcher - Visual Studio Marketplace
ConEmu.path に ConEmu のパスを指定しておくこと。ただ、vscodeを再起動しないと設定項目が出てこないかもしれない。また、ConEmu.showTitlebarIcon が true なら、vscode のタイトルバーにアイコンが表示される。
[ ツッコむ ]
以上、1 日分です。

