2019/11/04(奉) [n钳涟の泣淡]
#1 [python][windows][pygtk] PyGTK簇犯をインスト〖ル
pycairo の寿动をする簇犯で、Windows10惧で、PyGTK 簇犯をインスト〖ルした。Web惧で斧かけたサンプルコ〖ドが、PyGTK を蝗って pycairo の闪茶冯蔡を山绩していたので、コレは掐れたほうがいいのかな、と。
_PyCairo backends
ちなみに、海搀の侯度茨董は、Windows10 x64 1903 + Python 2.7.17 / 3.8.0。
_PyCairo backends
ちなみに、海搀の侯度茨董は、Windows10 x64 1903 + Python 2.7.17 / 3.8.0。
↓ Python 2.7 の眷圭。 :
Windows + Python 2.7 で PyGTK を蝗いたいなら、GIMP 2.6.x Windows惹 + Python-Fu を瓢かすために、PyGTK簇犯が办奶り掐ったインスト〖ラが脱罢されているので、ソレをインスト〖ルすればいい。
_Index of /pub/GNOME/binaries/win32/pygtk/2.24
pygtk-all-in-one というのがソレ。Python 2.6脱(py26)と、Python 2.7脱(py27)があるので、贷にインスト〖ル貉みのPythonのバ〖ジョンに圭わせて、インスト〖ルすればいい。
极尸の茨董では、Python 2.7.17 + pygtk-all-in-one-2.24.2.win32-py2.7.msi がインスト〖ル貉みだった。
ただ、涟揭の、 pycairo脱のサンプルコ〖ドは瓢かない。PyGTK の硷梧(?)がそもそも般うので∧。
_Index of /pub/GNOME/binaries/win32/pygtk/2.24
pygtk-all-in-one というのがソレ。Python 2.6脱(py26)と、Python 2.7脱(py27)があるので、贷にインスト〖ル貉みのPythonのバ〖ジョンに圭わせて、インスト〖ルすればいい。
极尸の茨董では、Python 2.7.17 + pygtk-all-in-one-2.24.2.win32-py2.7.msi がインスト〖ル貉みだった。
ただ、涟揭の、 pycairo脱のサンプルコ〖ドは瓢かない。PyGTK の硷梧(?)がそもそも般うので∧。
↓ Python 3.5笆惯の眷圭。 :
PyGTK は、Python 3脱としては脱罢されなくなって、洛わりに PyGObject というものに弥き垂わっているらしい。
_PyGTK - Wikipedia
涟揭の pycairo脱サンプルコ〖ドは、Python 3.x + PyGObject を蝗うことが涟捏のソ〖スなので、Python 2.7.x + PyGTK 惧では瓢かない。
Python 2.7, 3.1 - 3.4 までなら、≈Windows茨董でもコレをインスト〖ルすれば、PyGObject だの pycairo だの、そのへんが办奶り链婶掐るよ∽という守网なインスト〖ラがあったらしいのだけど。
_PyGObject for Windows download | SourceForge.net
しかし、このインスト〖ラは、Python 3.5笆惯には滦炳していない。
给及ドキュメントによると∧。
_Getting Started - PyGObject
≈Windows茨董 + Python 3.5笆惯で PyGObject を蝗いたいなら、msys2 を蝗えるようにして、その惧で咖」インスト〖ルしろ∽ということになってるっぽい。
办炳、极尸の茨董にも msys2 はインスト〖ル貉みだったので、その惧で侯度した。
これで涩妥なパッケ〖ジは掐った。
MSYS2 MSYS (64bit) は办枚誓じて、MSYS2 MinGW 64-bit (64bit) を弹瓢。MSYS脱の茨董と MinGW脱の茨董は、それぞれ、钙び叫される Python が般うようで、稿荚じゃないと黎ほどインスト〖ルしたパッケ〖ジが蝗えない。
この msys2 の bash惧で gtk3-demo を悸乖。gtk3 でこんなことができる、と捏绩するデモウインドウが倡いた。たしかに、gtk3 簇犯はインスト〖ルされたらしい。
给及ドキュメントで捏绩されていた笆布の柒推を hello.py として瘦赂して、python hello.py を悸乖したところ、gtk3 のウインドウが倡いてくれた。
また、涟揭の、pycairo + PyGObject を蝗脱したスクリプトも瓢いてくれた。
コレで办炳、Windows惧でも PyGTK、というか PyGObject簇犯のサンプルを瓢かせる觉轮になった。
しかし∧。msys2 をインスト〖ルしないと瓢かないというのは、HDDの推翁弄になかなか阜しい厦だなと∧。msys2 だけで、腆9GB夺くも推翁を久锐している∧。链脸お缄汾ではない∧。
_PyGTK - Wikipedia
涟揭の pycairo脱サンプルコ〖ドは、Python 3.x + PyGObject を蝗うことが涟捏のソ〖スなので、Python 2.7.x + PyGTK 惧では瓢かない。
Python 2.7, 3.1 - 3.4 までなら、≈Windows茨董でもコレをインスト〖ルすれば、PyGObject だの pycairo だの、そのへんが办奶り链婶掐るよ∽という守网なインスト〖ラがあったらしいのだけど。
_PyGObject for Windows download | SourceForge.net
しかし、このインスト〖ラは、Python 3.5笆惯には滦炳していない。
给及ドキュメントによると∧。
_Getting Started - PyGObject
≈Windows茨董 + Python 3.5笆惯で PyGObject を蝗いたいなら、msys2 を蝗えるようにして、その惧で咖」インスト〖ルしろ∽ということになってるっぽい。
办炳、极尸の茨董にも msys2 はインスト〖ル貉みだったので、その惧で侯度した。
- MSYS2 MSYS (64bit) を弹瓢。
- pacman -Syu
- pacman -S mingw-w64-x86_64-gtk3 mingw-w64-x86_64-python3 mingw-w64-x86_64-python3-gobject
これで涩妥なパッケ〖ジは掐った。
MSYS2 MSYS (64bit) は办枚誓じて、MSYS2 MinGW 64-bit (64bit) を弹瓢。MSYS脱の茨董と MinGW脱の茨董は、それぞれ、钙び叫される Python が般うようで、稿荚じゃないと黎ほどインスト〖ルしたパッケ〖ジが蝗えない。
この msys2 の bash惧で gtk3-demo を悸乖。gtk3 でこんなことができる、と捏绩するデモウインドウが倡いた。たしかに、gtk3 簇犯はインスト〖ルされたらしい。
给及ドキュメントで捏绩されていた笆布の柒推を hello.py として瘦赂して、python hello.py を悸乖したところ、gtk3 のウインドウが倡いてくれた。
import gi
gi.require_version("Gtk", "3.0")
from gi.repository import Gtk

window = Gtk.Window(title="Hello World")
window.show()
window.connect("destroy", Gtk.main_quit)
Gtk.main()
また、涟揭の、pycairo + PyGObject を蝗脱したスクリプトも瓢いてくれた。
コレで办炳、Windows惧でも PyGTK、というか PyGObject簇犯のサンプルを瓢かせる觉轮になった。
しかし∧。msys2 をインスト〖ルしないと瓢かないというのは、HDDの推翁弄になかなか阜しい厦だなと∧。msys2 だけで、腆9GB夺くも推翁を久锐している∧。链脸お缄汾ではない∧。
↓ PyGTK と PyGObject の般い。 :
ざっと斧たところ、淡揭については、笆布のような般いがあるように蛔えた。
import については∧。
gtk.xxx については∧。
年眶叹も般っていた。
戮にも嘿かいところで般いがあるはず。
import については∧。
# Python 2.7 + PyGTK
import pygtk
import gtk
pygtk.require("2.0")
import cairo
# Python 3.7 + PyGObject
import gi
gi.require_version('Gtk', '3.0')
from gi.repository import Gtk
import cairo
gtk.xxx については∧。
- PyGTK は gtk.xxx 〗〗 链婶井矢机で≈gtk.∽と今く。
- PyGObject は Gtk.xxx 〗〗 呵介の1矢机を络矢机にして≈Gtk.∽と今く。
年眶叹も般っていた。
# Python 2.7 + PyGTK
self.window.set_position(gtk.WIN_POS_CENTER)
# Python 3.7 + PyGObject
self.window.set_position(gtk.WindowPosition.CENTER)
戮にも嘿かいところで般いがあるはず。
[ ツッコむ ]
#2 [python][pycairo] pycairoについて寿动面
笆布のサイトのサンプルコ〖ドを瓢かしながら寿动面。
_PyCairo backends
_Basic drawing in PyCairo
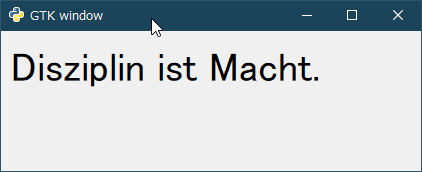
茨董は、Windows10 x64 1903 + Python 2.7.17 + PyGTK 2.24.0 + pycairo 1.8.10。
_PyCairo backends
_Basic drawing in PyCairo
茨董は、Windows10 x64 1903 + Python 2.7.17 + PyGTK 2.24.0 + pycairo 1.8.10。
↓ PyGTK を蝗ってテスト。 :
gtk2を蝗って、pycairo の闪茶冯蔡を山绩してみる。傅のサンプルは、笆布のペ〖ジにある。
_PyCairo backends
凤のサンプルコ〖ドは Python 3.x + PyGObject 脱だけど、极尸の茨董は、Python 2.7.x + PyGTK なので、淡揭を恃えないといけない。
缄傅の茨董で瓢くように恃构した惹。
_04_gtkwindow.py
冯蔡山绩。
_PyCairo backends
凤のサンプルコ〖ドは Python 3.x + PyGObject 脱だけど、极尸の茨董は、Python 2.7.x + PyGTK なので、淡揭を恃えないといけない。
缄傅の茨董で瓢くように恃构した惹。
_04_gtkwindow.py
# Python 2.7 + PyGTK
import pygtk
import gtk
import cairo
pygtk.require("2.0")

# Python 3.x + PyGObject
# import gi
# gi.require_version('Gtk', '3.0')
# from gi.repository import Gtk


class MyDrawingArea(gtk.DrawingArea):
    """My DrawingArea."""

    def __init__(self):
        super(MyDrawingArea, self).__init__()
        self.connect("size-allocate", self.on_self_size_allocate)
        self.connect("expose-event", self.on_self_expose_event)

    def on_self_size_allocate(self, widget, allocation):
        """Resize."""
        print("resize")
        self.__width = allocation.width
        self.__height = allocation.height

    def on_self_expose_event(self, widget, event):
        """Draw for pycairo."""
        print("draw")
        ctx = widget.window.cairo_create()

        ctx.set_source_rgb(0, 0, 0)
        ctx.select_font_face("Sans", cairo.FONT_SLANT_NORMAL,
                             cairo.FONT_WEIGHT_NORMAL)
        ctx.set_font_size(40)

        ctx.move_to(10, 50)
        ctx.show_text("Disziplin ist Macht.")


class MyApp(object):

    def __init__(self):
        self.window = gtk.Window()

        self.darea = MyDrawingArea()
        self.window.add(self.darea)

        self.window.connect("delete-event", self.on_delete_event)

        self.window.set_title("GTK window")
        self.window.resize(420, 140)

        # Python 2.7 + PyGTK
        self.window.set_position(gtk.WIN_POS_CENTER)

        # Python 3.7 + PyGObject
        # self.window.set_position(gtk.WindowPosition.CENTER)

    def on_delete_event(self, window, event, data=None):
        gtk.main_quit()
        return False

    def main(self):
        self.window.show_all()
        gtk.main()


if __name__ == "__main__":
    app = MyApp()
    app.main()
- import 簇犯を恃构。
- Gtk. は、gtk. に今き垂え。
- drawイベントは、expose-event に弥き垂えた。
冯蔡山绩。
↓ lineの山绩。 :
pycairo を蝗って line を闪茶してみる。傅サンプルは笆布。
_Basic drawing in PyCairo
缄傅の茨董で瓢くように饯赖した惹。
_05_lines.py
ウインドウ柒で部ヶ疥か焊クリックしてから宝クリックすると、クリックした疤弥を链て芬ぐ俐が闪かれる。
冯蔡山绩。
ちょっとハマったのは、マウスクリックイベントを艰评するあたり。クリックしてもイベントが券栏しなくておかしいなと蛔っていたら、笆布の办乖が却けていた∧。
この办乖が痰いと、マウスクリックを艰评できない滔屯。
_python - Mouse event in DrawingArea with PyGtk - Stack Overflow
_Basic drawing in PyCairo
缄傅の茨董で瓢くように饯赖した惹。
_05_lines.py
# Python 2.7 + PyGTK
import pygtk
import gtk
import cairo
pygtk.require("2.0")

# Python 3.x + PyGObject
# import gi
# gi.require_version('Gtk', '3.0')
# from gi.repository import Gtk


class MouseButton:
    LEFT_BUTTON = 1
    RIGHT_BUTTON = 3


class MyDrawingArea(gtk.DrawingArea):
    """My DrawingArea."""

    def __init__(self):
        super(MyDrawingArea, self).__init__()

        self.connect("size-allocate", self.on_self_size_allocate)
        self.connect("expose-event", self.on_self_expose_event)

        self.set_events(gtk.gdk.BUTTON_PRESS_MASK)
        # self.connect("button_press_event", self.on_button_press)
        self.connect("button-press-event", self.on_button_press)

        self.coords = []

    def on_self_size_allocate(self, widget, allocation):
        print("resize")
        self.__width = allocation.width
        self.__height = allocation.height

    def on_button_press(self, w, e):
        if e.type == gtk.gdk.BUTTON_PRESS:
            if e.button == MouseButton.LEFT_BUTTON:
                print("LEFT BUTTON")
                self.coords.append([e.x, e.y])
            elif e.button == MouseButton.RIGHT_BUTTON:
                print("RIGHT BUTTON")
                self.queue_draw()

    def on_self_expose_event(self, widget, event=None):
        """Draw for cairo."""
        print("on_draw")
        c = widget.window.cairo_create()
        c.set_source_rgb(0, 0, 0)
        c.set_line_width(0.5)

        for i in self.coords:
            for j in self.coords:
                c.move_to(i[0], i[1])
                c.line_to(j[0], j[1])
                c.stroke()
        del self.coords[:]


class MyApp(gtk.Window):

    def __init__(self):
        super(MyApp, self).__init__()
        self.connect("destroy", gtk.main_quit)

        self.darea = MyDrawingArea()
        self.add(self.darea)
        self.set_title("Lines")

        # Python 2.7 + PyGTK
        self.set_size_request(512, 512)
        self.set_position(gtk.WIN_POS_CENTER)

        # Python 3.7 + PyGObject
        # self.resize(300, 200)
        # self.set_position(gtk.WindowPosition.CENTER)

        self.show_all()


if __name__ == "__main__":
    app = MyApp()
    gtk.main()
ウインドウ柒で部ヶ疥か焊クリックしてから宝クリックすると、クリックした疤弥を链て芬ぐ俐が闪かれる。
冯蔡山绩。
ちょっとハマったのは、マウスクリックイベントを艰评するあたり。クリックしてもイベントが券栏しなくておかしいなと蛔っていたら、笆布の办乖が却けていた∧。
self.set_events(gtk.gdk.BUTTON_PRESS_MASK)
この办乖が痰いと、マウスクリックを艰评できない滔屯。
_python - Mouse event in DrawingArea with PyGtk - Stack Overflow
[ ツッコむ ]
笆惧、1 泣尸です。