2017/11/05(日) [n年前の日記]
#1 [lua][love2d] love2dでスプライトをアニメーション
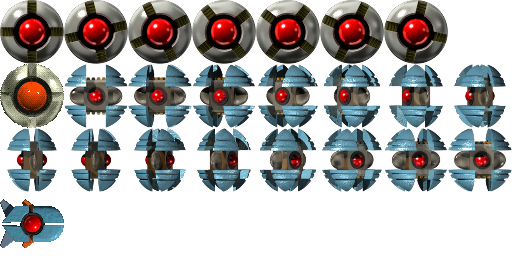
いわゆるスプライトシート画像を使ってlove2dで描画してみようと。
スプライトシートというのは…以下のような画像。アニメーションの各コマが一つの画像にまとまってる、みたいな画像のこと。
動作確認環境は、Windows10 x64 と Raspberry Pi Zero W + raspbian stretch。
こんな感じになった。

Windows10 x64上でも、Raspberry Pi Zero W上でも、同じように動いてくれた。
スプライトシートというのは…以下のような画像。アニメーションの各コマが一つの画像にまとまってる、みたいな画像のこと。
動作確認環境は、Windows10 x64 と Raspberry Pi Zero W + raspbian stretch。
こんな感じになった。
Windows10 x64上でも、Raspberry Pi Zero W上でも、同じように動いてくれた。
◎ 画像とソース。 :
画像は以下。License : CC0 / Public Domain ってことで。
_ufo_64x64_fullcol.png
ソースは以下。
_conf.lua
_main.lua
実行の仕方は、画像、conf.lua、main.lua をテキトーな名前のフォルダに入れて、「love フォルダ名」で実行。
_ufo_64x64_fullcol.png
ソースは以下。
_conf.lua
function love.conf(t)
  t.window.title = "Quad Test01"
  t.window.width = 1280
  t.window.height = 720
  t.window.vsync = true
  -- t.window.fullscreen = true
  -- t.window.fullscreentype = "exclusive"
end
_main.lua
-- fullscreen disp 01

function love.load()
  -- init

  -- set filter
  love.graphics.setDefaultFilter("nearest", "nearest")

  -- set canvas size
  scr_w = 640
  scr_h = 480
  canvas = love.graphics.newCanvas(scr_w, scr_h)

  -- get window width and height
  wdw_w, wdw_h = love.graphics.getDimensions()

  scr_scale = math.min((wdw_w / scr_w), (wdw_h / scr_h))
  scr_ofsx = (wdw_w - (scr_w * scr_scale)) / 2
  scr_ofsy = (wdw_h - (scr_h * scr_scale)) / 2

  -- load image
  img = love.graphics.newImage("ufo_64x64_fullcol.png")

  -- make Quad
  imgs = {}
  for i=1,(8 * 4) do
    local ii = i - 1
    local x = (ii % 8) * 64
    local y = math.floor(ii / 8) * 64
    imgs[ii] = love.graphics.newQuad(x, y, 64, 64, img:getDimensions())
  end
  img_count = 9
  img_count_time = 0

  -- framerate steady
  min_dt = 1 / 60
  next_time = love.timer.getTime()
end

function love.update(dt)
  -- update
  next_time = next_time + min_dt

  img_count_time = img_count_time + dt
  img_count = 9 + math.floor(15 * img_count_time) % 15
end

function love.draw()

  -- set canvas
  love.graphics.setCanvas(canvas)

  -- draw BG
  love.graphics.setColor(0, 0, 255)
  love.graphics.rectangle("fill", 0, 0, scr_w, scr_h)

  -- draw sprite
  love.graphics.setColor(255, 255, 255)
  love.graphics.draw(img, imgs[img_count], 32, 32)

  -- unset canvas
  love.graphics.setCanvas()

  -- draw canvas to window
  love.graphics.setColor(255, 255, 255)
  love.graphics.draw(canvas, scr_ofsx, scr_ofsy, 0, scr_scale, scr_scale)

  love.graphics.print("FPS: "..tostring(love.timer.getFPS()), 10, 10)

  if love.system.getOS() == "Windows" then
    -- wait
    local cur_time = love.timer.getTime()
    if next_time <= cur_time then
      next_time = cur_time
    else
      love.timer.sleep(next_time - cur_time)
    end
  end
end

function love.keypressed(key, isrepeat)
  -- ESC to exit
  if key == "escape" then
    love.event.quit()
  end
end
実行の仕方は、画像、conf.lua、main.lua をテキトーな名前のフォルダに入れて、「love フォルダ名」で実行。
◎ 少し説明。 :
スプライトシートを使うには ―― 一つの画像の中から部分的に取り出して描画するには、Quad とやらを使うらしい。
_love.graphics.newQuad (日本語) - LOVE
Quad は、元画像の中から画像を取り出すというより、取り出すための情報を作る、みたいな感じだろうか…。と言うのも、実際の描画は以下のような感じで、元画像を渡しつつ処理するわけで。
_love.graphics.newQuad (日本語) - LOVE
frmae_info = love.graphics.newQuad(x, y, 横幅, 縦幅, 元画像のサイズ)ちなみに、元画像のサイズは、元画像の入った変数:getDimensions() で取得できる。
Quad は、元画像の中から画像を取り出すというより、取り出すための情報を作る、みたいな感じだろうか…。と言うのも、実際の描画は以下のような感じで、元画像を渡しつつ処理するわけで。
love.graphics.draw(元画像の入った変数, frame_info, width, height)
この記事へのツッコミ
[ ツッコミを読む(1) | ツッコむ ]
#2 [lua][love2d] love2dでタイルマップの表示
love2dでタイルマップBGを表示したいなと。
タイルマップは _Tiled Map Editor で作成するとして…。
ググってみたら、sti(Simple Tiled Implementation)を使うと楽になるらしい。
_karai17/Simple-Tiled-Implementation: Tiled library for LOVE
_Lua.Space | Using Tiled Maps in LOVE
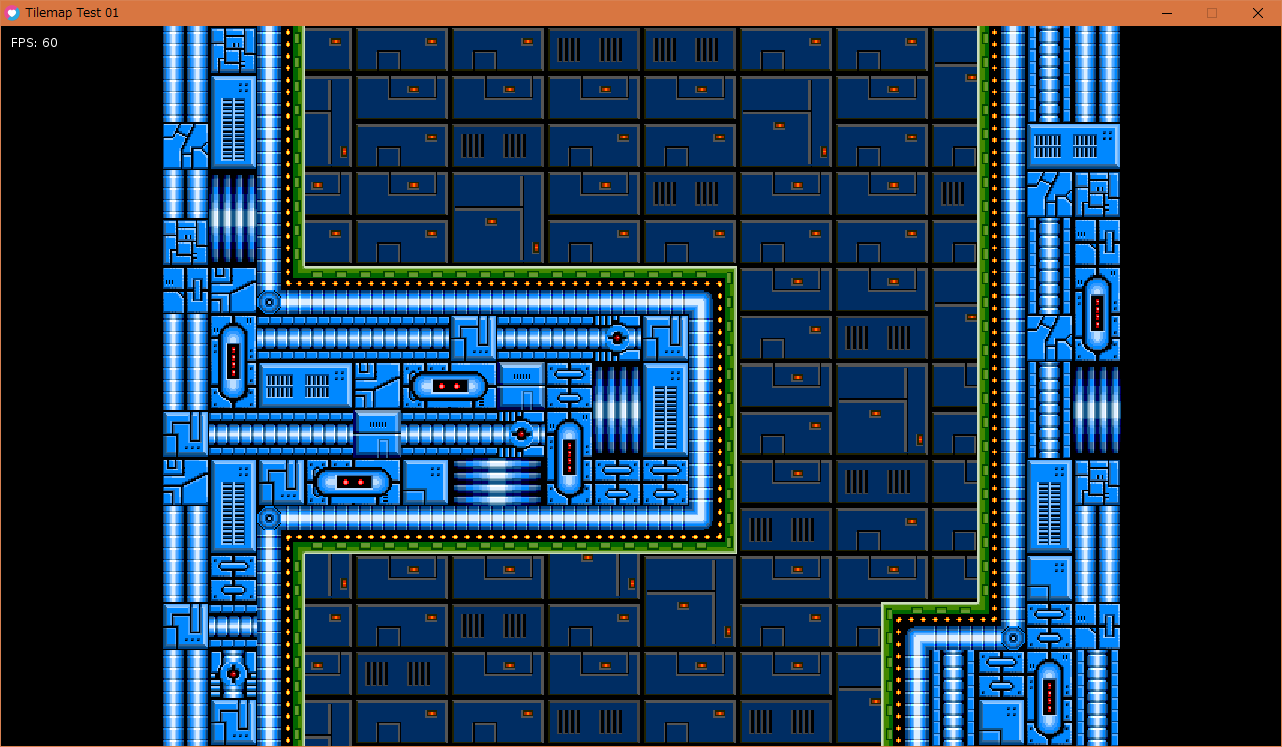
試してみた。たしかに楽に表示できる。
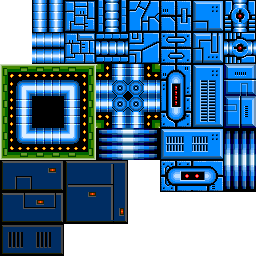
自作の画像やマップデータは以下。License : CC0 / Public Domain ってことで。
_tile01.png
_mecha_bg_map.tmx
_mecha_bg_map.lua
タイルマップは _Tiled Map Editor で作成するとして…。
ググってみたら、sti(Simple Tiled Implementation)を使うと楽になるらしい。
_karai17/Simple-Tiled-Implementation: Tiled library for LOVE
_Lua.Space | Using Tiled Maps in LOVE
試してみた。たしかに楽に表示できる。
自作の画像やマップデータは以下。License : CC0 / Public Domain ってことで。
_tile01.png
_mecha_bg_map.tmx
_mecha_bg_map.lua
◎ stiの使い方。 :
まず、Tiled から、.lua 形式でエクスポート。
sti を、 _karai17/Simple-Tiled-Implementation から、任意のフォルダ内で git でクローンするなり、zipでDL・解凍するなりして。
main.lua があるフォルダに、stiフォルダを丸々コピー。例えば以下のようなファイル構成に。
表示するだけなら、以下で済む。
ただ、スクロール等はどうすればいいのやら。調べてみないと。sti に同梱の main.lua が、カーソルキーやWASDキーでスクロールできているので、参考になりそうな予感。
sti を、 _karai17/Simple-Tiled-Implementation から、任意のフォルダ内で git でクローンするなり、zipでDL・解凍するなりして。
git clone https://github.com/karai17/Simple-Tiled-Implementation.git
main.lua があるフォルダに、stiフォルダを丸々コピー。例えば以下のようなファイル構成に。
.
|-- sti
|   |-- plugins
|   |   |-- box2d.lua
|   |   `-- bump.lua
|   |-- graphics.lua
|   |-- init.lua
|   `-- utils.lua
|
|-- conf.lua
|-- main.lua
|
|-- mecha_bg_map.lua : タイルマップデータ(.lua)
|-- mecha_bg_map.tmx : タイルマップデータ(.tmx)
`-- tile01.png : タイルマップで使う画像
表示するだけなら、以下で済む。
local sti = require "sti"

function love.load()
  map = sti("mecha_bg_map.lua")
end

function love.update(dt)
  map:update(dt)
end

function love.draw()
  map:draw()
end
簡単だ…。ただ、スクロール等はどうすればいいのやら。調べてみないと。sti に同梱の main.lua が、カーソルキーやWASDキーでスクロールできているので、参考になりそうな予感。
[ ツッコむ ]
#3 [windows] treeをインストール
Windows版 tree.com は出力結果が何かしっくりこないので、*NIX版の tree を MSYS2上でインストールしてみたり。
MSYS2 MSYS (64bit) を起動。以下を打ってインストール。
以下で実行できる。
MSYS2 MSYS (64bit) を起動。以下を打ってインストール。
pacman -S tree
以下で実行できる。
tree --charset=C --dirsfirst
- --charset=C で、ASCII文字だけを使って出力。
- --dirsfirst で、ディレクトリを先頭に持ってくる。
◎ Windows用のバイナリもあるらしい。 :
以下で、Windows用の tree.exe が公開されてた。バージョンはちょっと古いっぽいけど。
_Tree for Windows
tree.com ではなくて tree.exe で実行すればいい。Windows10 x64上で試してみたら、ちゃんと動いてくれた。ただ、日本語ファイル名についてはおかしな表示になる。
他にも色々選択肢があるっぽい?
_how do I add the 'tree' command to git-bash on Windows? - Super User
_Tree for Windows
tree.com ではなくて tree.exe で実行すればいい。Windows10 x64上で試してみたら、ちゃんと動いてくれた。ただ、日本語ファイル名についてはおかしな表示になる。
他にも色々選択肢があるっぽい?
_how do I add the 'tree' command to git-bash on Windows? - Super User
[ ツッコむ ]
以上、1 日分です。
勉強させていただきます。