2017/11/01(水) [n年前の日記]
#1 [love2d][lua][raspberrypi] love2dでフルスクリーン表示のテスト
love2dでフルスクリーン表示ができそうか動作確認中。
まずは、Windows10 x64 + love2d 0.10.2上で実験。
まずは、Windows10 x64 + love2d 0.10.2上で実験。
◎ フルスクリーン表示の標準的な指定の仕方について。 :
love2d は、フルスクリーン表示を指定できる。まずは、標準的な指定方法を試してみる。
使用した画像は以下。License : CC0 ってことで。
_bg_640x480.png
_spaceship_001_64x64.png
ソースは以下。
_conf.lua
_main.lua
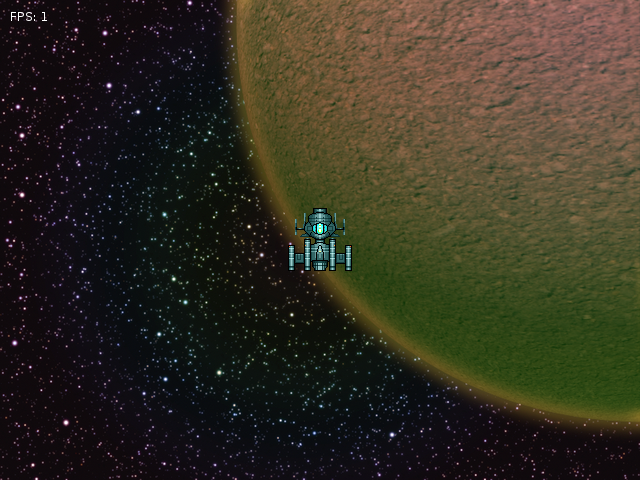
結果はこんな感じに。予想通りの表示になった。
使用した画像は以下。License : CC0 ってことで。
_bg_640x480.png
_spaceship_001_64x64.png
ソースは以下。
_conf.lua
function love.conf(t)
  t.window.width = 640
  t.window.height = 480
  t.window.title = "Move Sprite Example 02"
  t.window.vsync = true

  t.window.fullscreen = true
  t.window.fullscreentype = "exclusive"
end
conf.lua の中で以下を指定してるので…。
- t.window.fullscreen = true
- t.window.fullscreentype = "exclusive"
_main.lua
-- sprite move example 02

function love.load()
  -- init

  -- get window width and height
  scrw = love.graphics.getWidth()
  scrh = love.graphics.getHeight()

  -- load image
  bgimg = love.graphics.newImage("bg_640x480.png")
  playerimg = love.graphics.newImage("spaceship_001_64x64.png")

  -- player work
  player = {}
  player.x = scrw / 2
  player.y = scrh / 2
  player.speed = 250
  player.imgw = playerimg:getWidth()
  player.imgh = playerimg:getHeight()
end

function love.update(dt)
  -- update

  -- key check
  local ang = -1
  if love.keyboard.isDown("left") then ang = 180
  elseif love.keyboard.isDown("right") then ang = 0
  end
  if love.keyboard.isDown("up") then
    if ang < 0 then ang = 270
    elseif ang == 0 then ang = 270 + 45
    else ang = 180 + 45
    end
  elseif love.keyboard.isDown("down") then
    if ang < 0 then ang = 90
    elseif ang == 0 then ang = 45
    else ang = 180 - 45
    end
  end
  if ang >= 0 then
    local spd = player.speed * dt
    local ra = math.rad(ang)
    player.x = player.x + (spd * math.cos(ra))
    player.y = player.y + (spd * math.sin(ra))
  end

  -- move area check
  local wh = player.imgw / 2
  local hh = player.imgh / 2
  local xmin = wh
  local ymin = hh
  local xmax = scrw - wh
  local ymax = scrh - hh
  player.x = math.min(math.max(player.x, xmin), xmax)
  player.y = math.min(math.max(player.y, ymin), ymax)
end

function love.draw()
  -- draw BG
  love.graphics.setColor(255, 255, 255, 255)
  love.graphics.draw(bgimg, 0, 0)
  -- love.graphics.rectangle("fill", 0, 465, scrw, 150)
  love.graphics.setColor(255, 255, 255, 255)

  -- draw player
  ofsx = player.imgw / 2
  ofsy = player.imgh / 2
  love.graphics.draw(playerimg, player.x - ofsx, player.y - ofsy)

  love.graphics.print("FPS: "..tostring(love.timer.getFPS()), 10, 10)
end

function love.keypressed(key, isrepeat)
  -- ESC to exit
  if key == "escape" then
    love.event.quit()
  end
end
結果はこんな感じに。予想通りの表示になった。
◎ Raspberry Pi Zero W上で動かすと上手く行かない。 :
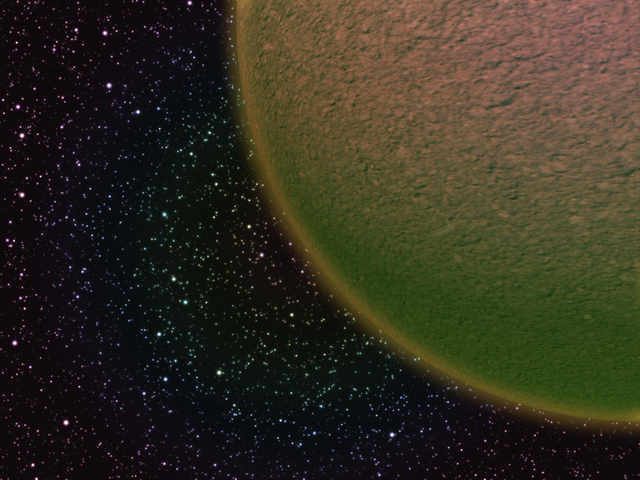
上記のソースを、Raspberry Pi Zero W + raspbian stretch + OpenGL ESを使うSDL2 + love2d 0.10.2 で動かしてみる。画面解像度は、1280x720。
酷い結果になった。conf.lua 内で指定したウインドウサイズは無視されて、画面解像度(=1280x720)がウインドウサイズとして取得されてしまっている模様。
酷い結果になった。conf.lua 内で指定したウインドウサイズは無視されて、画面解像度(=1280x720)がウインドウサイズとして取得されてしまっている模様。
◎ 解決策。 :
解決策をググってたら、以下の記事に遭遇した。
_Love2D - Raspberry Pi Forums
_Canvas - LOVE
_love.graphics.setCanvas - LOVE
_Canvas:renderTo - LOVE
_love.graphics.draw - LOVE
ということで、その方法を試してみる。
_conf.lua
_main.lua
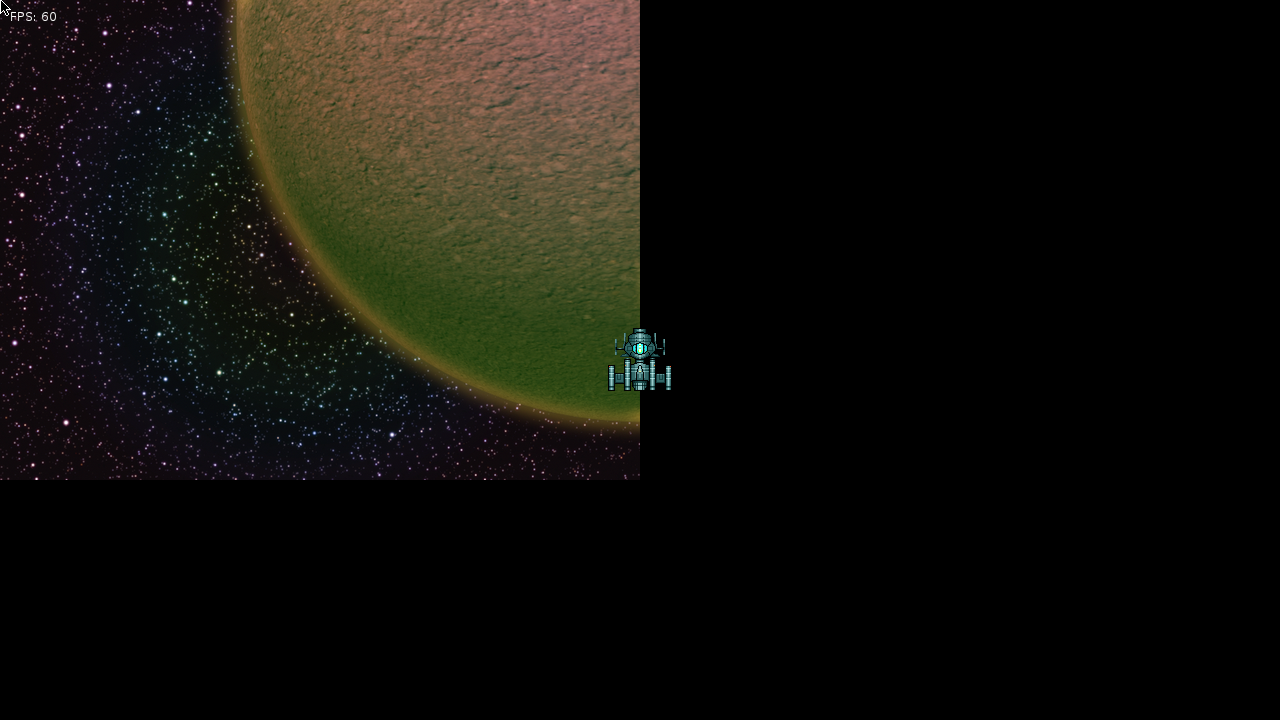
結果はこうなった。
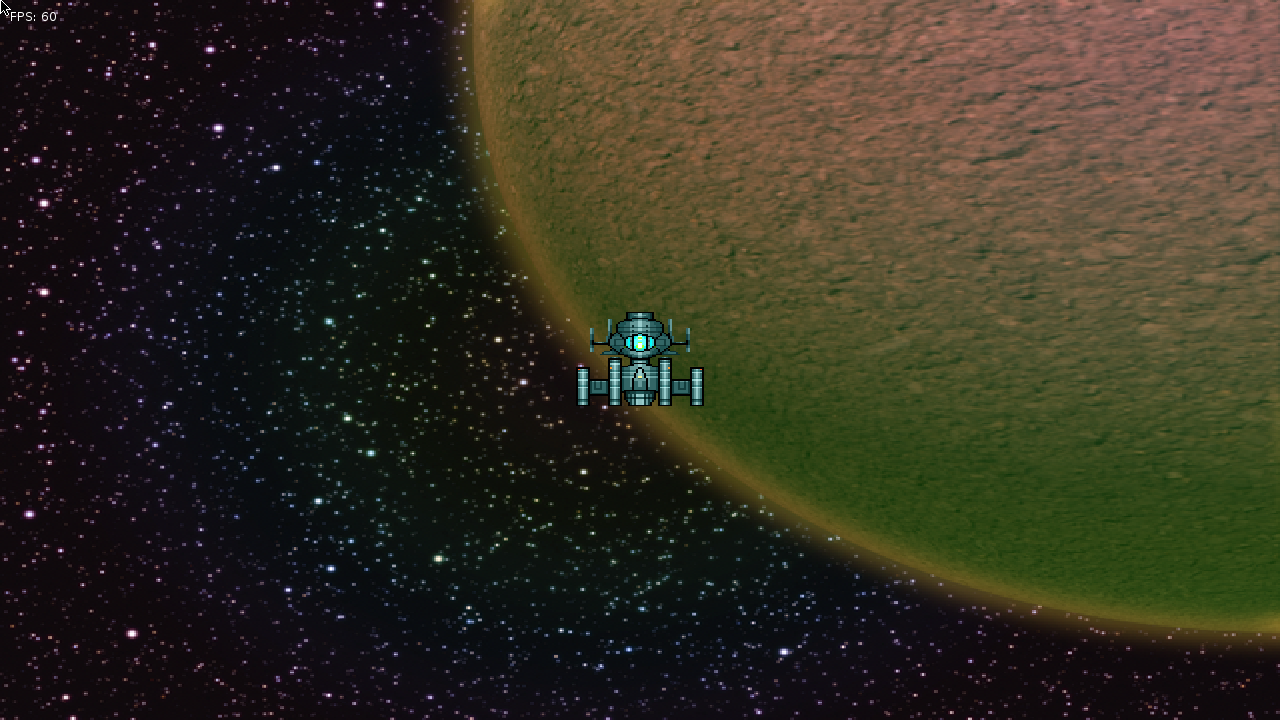
アスペクト比の計算をサボってるので、4:3の画面が16:9で引き延ばされて、横に長い見た目になってしまっているけど…。少なくとも、画面一杯に引き延ばして描画することは可能っぽい。
_Love2D - Raspberry Pi Forums
(edit- nevermind, created a workaround!)「仮想スクリーンとして canvas を用意して、そこに描画してから canvas を拡大描画したらそれらしくなった」と言ってるのかな…?
create a low res 'virtual' screen with a canvas.
set its filtering mode to 'nearest' draw all game stuff to there at the end, draw that canvas (scaled up) to the actual high res screen.
result = low res sharp fat pixels on a high res screen.
_Canvas - LOVE
_love.graphics.setCanvas - LOVE
_Canvas:renderTo - LOVE
_love.graphics.draw - LOVE
ということで、その方法を試してみる。
_conf.lua
function love.conf(t)
  -- t.window.width = 1280
  -- t.window.height = 720
  t.window.vsync = true

  t.window.fullscreen = true
  -- t.window.fullscreentype = "exclusive"
end
_main.lua
-- fullscreen disp 01

function love.load()
  -- init

  -- set filter
  love.graphics.setDefaultFilter("nearest", "nearest")

  scr_w = 640
  scr_h = 480
  canvas = love.graphics.newCanvas(scr_w, scr_h)

  -- get window width and height
  wdw_w = love.graphics.getWidth()
  wdw_h = love.graphics.getHeight()

  -- load image
  bgimg = love.graphics.newImage("bg_640x480.png")
  playerimg = love.graphics.newImage("spaceship_001_64x64.png")

  -- player work
  player = {}
  player.x = scr_w / 2
  player.y = scr_h / 2
  player.speed = 250
  player.imgw = playerimg:getWidth()
  player.imgh = playerimg:getHeight()
end

function love.update(dt)
  -- update

  -- key check
  local ang = -1
  if love.keyboard.isDown("left") then ang = 180
  elseif love.keyboard.isDown("right") then ang = 0
  end
  if love.keyboard.isDown("up") then
    if ang < 0 then ang = 270
    elseif ang == 0 then ang = 270 + 45
    else ang = 180 + 45
    end
  elseif love.keyboard.isDown("down") then
    if ang < 0 then ang = 90
    elseif ang == 0 then ang = 45
    else ang = 180 - 45
    end
  end
  if ang >= 0 then
    local spd = player.speed * dt
    local ra = math.rad(ang)
    player.x = player.x + (spd * math.cos(ra))
    player.y = player.y + (spd * math.sin(ra))
  end

  -- move area check
  local wh = player.imgw / 2
  local hh = player.imgh / 2
  local xmin = wh
  local ymin = hh
  local xmax = scr_w - wh
  local ymax = scr_h - hh
  player.x = math.min(math.max(player.x, xmin), xmax)
  player.y = math.min(math.max(player.y, ymin), ymax)
end

function love.draw()

  -- set canvas
  love.graphics.setCanvas(canvas)

  -- draw BG
  love.graphics.setColor(255, 255, 255)
  love.graphics.draw(bgimg, 0, 0)
  -- love.graphics.rectangle("fill", 0, 465, scr_w, 150)
  love.graphics.setColor(255, 255, 255)

  -- draw player
  ofsx = player.imgw / 2
  ofsy = player.imgh / 2
  love.graphics.draw(playerimg, player.x - ofsx, player.y - ofsy)

  -- unset canvas
  love.graphics.setCanvas()

  -- draw canvas to window
  love.graphics.setColor(255, 255, 255)
  love.graphics.draw(canvas, 0, 0, 0, wdw_w / scr_w, wdw_h / scr_h)

  love.graphics.print("FPS: "..tostring(love.timer.getFPS()), 10, 10)
end

function love.keypressed(key, isrepeat)
  -- ESC to exit
  if key == "escape" then
    love.event.quit()
  end
end
結果はこうなった。
アスペクト比の計算をサボってるので、4:3の画面が16:9で引き延ばされて、横に長い見た目になってしまっているけど…。少なくとも、画面一杯に引き延ばして描画することは可能っぽい。
◎ 少し説明。 :
conf.lua 内では…。
この、conf.lua の内容で…。
main.lua 内では…。
canvas への描画は、以下でできるらしい。
ウインドウへのcanvasの描画は、love.graphics.draw() を使う。
- ウインドウサイズの指定をコメントアウト。
- フルスクリーン表示の種類の指定をコメントアウト。
この、conf.lua の内容で…。
- Raspberry Pi Zeor W 上では「とにかくフルスクリーン表示しろ」という指定になる。ウインドウサイズ = 画面解像度。
- Windows10 x64上では、ウインドウサイズはデフォルトの800x600になり、その800x600の画面がフルスクリーン表示される。
main.lua 内では…。
- 初期化処理(love.load()内)で canvas を作成。
- 描画処理(love.draw()内)では、canvas にゲーム画面を描いてから、その canvas をウインドウに拡大しつつ描画。
- 拡大縮小描画はクッキリした見た目にしたかったので、love.graphics.setDefaultFilter("nearest", "nearest") を記述して、nearestフィルタで拡大縮小するように指定。
canvas への描画は、以下でできるらしい。
  love.graphics.setCanvas(canvas)
  (描画処理)
  love.graphics.setCanvas()
ウインドウへのcanvasの描画は、love.graphics.draw() を使う。
love.graphics.draw(描画したい画像・キャンバス等,
                   描画位置x, 描画位置y,
                   描画方向 ,
                   横方向の拡大縮小率, 縦方向の拡大縮小率)
◎ もう少し説明。 :
luaでローカル変数を使いたい時は、local と頭につけるらしい。
三角関数は以下。
最大値、最小値を取り出すなら以下。
Luaは初めて触ってるわけだけど、このあたりは比較的素直な仕様だなと…。
local ang = 0
三角関数は以下。
- math.sin(ラジアン値)
- math.cos(ラジアン値)
- 度からラジアンの変換は、math.rad(角度)
- ラジアンから度への変換は、math.deg(ラジアン値)
最大値、最小値を取り出すなら以下。
- math.min(値1, 値2) : 最小値を返す。
- math.max(値1, 値2) : 最大値を返す。
Luaは初めて触ってるわけだけど、このあたりは比較的素直な仕様だなと…。
[ ツッコむ ]
#2 [love2d][lua][raspberrypi] 「jack server is not running or cannot be started」について
Raspberry Pi Zero W 上でSDL2関係のアレコレを動かそうとすると、「jack server is not running or cannot be started」と言われてしまう時があるのだけど。解決策をググってみて分かった点をメモ。
どうやら、コレって別にエラーが出てるわけではなくて、サウンドを鳴らす何かしらが「音を出す色んな仕組みにとりあえず打診してみたんだけど、jack君は無反応だったよ」と調査結果を報告してるだけ、らしい…。
回避策としては、jackd -d dummy とやらを実行しておけばメッセージは出なくなる模様。何をやってるのかさっぱり分からんけど。
以下、そのあたりの話について目についた記事をメモ。
_sound - Problem starting JACK server "Jack Server is not running or cannot be started" - Ask Ubuntu
_python - Raspberry Pi Radio Script Stopped Working "jack server is not running or cannot be started" - Stack Overflow
_python - PyAudio trying to use JACK - Stack Overflow
_python - jack server is not running or cannot be started - Stack Overflow
_[SOLVED] ALSA complaining about Jack Server
_Complains about jack server not running on Raspbian - Issue #10 - shichao-an/soundmeter
_Rassberry Pi and Jack audio - Raspberry Pi Forums
[ ツッコむ ]
#3 [hns] この日記ページでLua言語の色分け表示ができるように指定
この日記ページにプログラムソースを貼り付けて表示する際は、SyntaxHighlighter を使わせてもらっているのだけど。
_SyntaxHighlighter
Lua言語には対応してないわけで。対応させる方法はないのかなと。
色々ググってみたら、以下の記事で公開されてるファイルを使えば対応できるらしいと知り、試しに導入。
_SyntaxHighlighter Evolved Brush for other languages - mikrom
syntaxhighlighter-evolved-lua-brush.zip をDLして解凍。中に shBrushLua.js が入ってるので、scripts ディレクトにコピー。
hns の theme.ph を編集。以下を追加。
以下で公開されてる版でも動いてくれた。おそらく韓国の方が公開してるのかな…。
_SyntaxHighlighter 3.0.xx , lua brush shBrushLua.js
他にも色んな版を見かけたけど、どうも SyntaxHighlighter のバージョンによって使えるファイルが違うようで。他の scripts/shBrush*.js の中身を眺めて、似たような記述がされてるファイルを探さないといかんらしい。
_SyntaxHighlighter
Lua言語には対応してないわけで。対応させる方法はないのかなと。
色々ググってみたら、以下の記事で公開されてるファイルを使えば対応できるらしいと知り、試しに導入。
_SyntaxHighlighter Evolved Brush for other languages - mikrom
syntaxhighlighter-evolved-lua-brush.zip をDLして解凍。中に shBrushLua.js が入ってるので、scripts ディレクトにコピー。
hns の theme.ph を編集。以下を追加。
<script type="text/javascript" src="scripts/shBrushLua.js"></script>
以下で公開されてる版でも動いてくれた。おそらく韓国の方が公開してるのかな…。
_SyntaxHighlighter 3.0.xx , lua brush shBrushLua.js
他にも色んな版を見かけたけど、どうも SyntaxHighlighter のバージョンによって使えるファイルが違うようで。他の scripts/shBrush*.js の中身を眺めて、似たような記述がされてるファイルを探さないといかんらしい。
◎ Autoloaderが動かない。 :
以下によると、Autolaoder なる機能があるらしいけど。
_【Javascript】SyntaxHighlighter 3.0 の新機能と注意点 | blog.remora.cx
ローカルで試してみたけど、動かない…。
ググってみたら、以下の記事で説明が。
_SyntaxHighlighter(Ver3.x)の導入方法 | Sabakura Blog
そういうことだったのか…。window.onload を使う形に書き換えてみたら動いてくれた。助かった。
_【Javascript】SyntaxHighlighter 3.0 の新機能と注意点 | blog.remora.cx
ローカルで試してみたけど、動かない…。
ググってみたら、以下の記事で説明が。
_SyntaxHighlighter(Ver3.x)の導入方法 | Sabakura Blog
SyntaxHighlighterは、ページ読み込み後に動作させないと上手く機能しません。そのため、フッター部で読み込ませるか、もしくはヘッダ部に記述する場合は、window.onloadを使う必要があります。
そういうことだったのか…。window.onload を使う形に書き換えてみたら動いてくれた。助かった。
[ ツッコむ ]
以上、1 日分です。