2017/11/06(月) [n年前の日記]
#1 [lua][love2d] love2dでタイルマップの表示その2
love2dでタイルマップBGを表示できるかどうか実験中。昨日は表示までできたけど、スクロールはどうするのかなと。
色々試して、こんな感じに。Windows10 x64 と Raspberry Pi Zero W、love2d 0.10.2上で動作確認した。
色々試して、こんな感じに。Windows10 x64 と Raspberry Pi Zero W、love2d 0.10.2上で動作確認した。
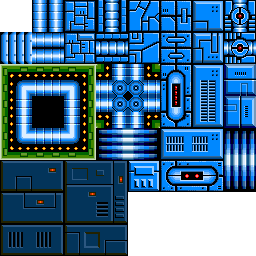
◎ 使用画像とマップデータ。 :
自作した、
_Tiled Map Editor
用のデータは以下。License : CC0 / Public Domain ってことで。
_tile01.png
_mecha_bg_map.tmx
love2d + _sti (Simple-Tiled-Implementation) で読み込むためのデータは以下。
_mecha_bg_map.lua
_tile01.png
_mecha_bg_map.tmx
love2d + _sti (Simple-Tiled-Implementation) で読み込むためのデータは以下。
_mecha_bg_map.lua
◎ ソース。 :
ソースは以下。動作には、
_sti(Simple-Tiled-Implementation)
が必要。
_conf.lua
_main.lua
実行の仕方は、テキトーなフォルダを作成して、conf.lua、main.lua、mecha_bg_map.lua、tile01.png と、stiフォルダを入れて、「love フォルダ名」で実行。
_conf.lua
function love.conf(t)
  t.window.title = "Tilemap Test 03"
  t.window.width = 1280
  t.window.height = 720
  t.window.vsync = true
  t.console = true
  -- t.window.fullscreen = true
  -- t.window.fullscreentype = "exclusive"
end
_main.lua
-- tilemap test 03

local sti = require "sti"

local scroll_type

function love.load()
  -- init

  -- set filter
  love.graphics.setDefaultFilter("nearest", "nearest")

  -- set canvas size
  scr_w = 640
  scr_h = 480
  canvas = love.graphics.newCanvas(scr_w, scr_h)

  -- get window width and height
  wdw_w, wdw_h = love.graphics.getDimensions()

  scr_scale = math.min((wdw_w / scr_w), (wdw_h / scr_h))
  scr_ofsx = (wdw_w - (scr_w * scr_scale)) / 2
  scr_ofsy = (wdw_h - (scr_h * scr_scale)) / 2

  -- load tilemap
  map = sti("mecha_bg_map.lua")

  map.getGidByPixel = function(self, x, y, layerindex)
    local tilex, tiley = self:convertPixelToTile(math.floor(x), math.floor(y))
    tilex = math.floor(tilex)
    tiley = math.floor(tiley)
    local layer = map.layers[layerindex]
    local tilew = layer.width
    local tileh = layer.height
    local gid = -2
    if tilex >= 0 and tiley >= 0 and tilex < tilew and tiley < tileh then
      local tile = layer.data[tiley + 1][tilex + 1]
      if tile == nil then
        gid = -1
      else
        gid = tile.gid
      end
    end
    return gid
  end

  scroll_type = 2

  layers = {}
  for i,layer in ipairs(map.layers) do
    -- print(i, layer.name)
    layers[i] = layer
  end

  -- init bg position
  tx_start = 0
  ty_start = 0
  tx = tx_start
  ty = ty_start

  gid = 0

  -- framerate steady
  min_dt = 1 / 60
  next_time = love.timer.getTime()
end

function love.update(dt)
  -- update
  next_time = next_time + min_dt

  map:update(dt)

  -- keyboard check
  local speed = 160 * dt
  local kd = love.keyboard.isDown
  if kd("left") or kd("a") then
    tx = tx - speed
  elseif kd("right") or kd("d") then
    tx = tx + speed
  end
  if kd("up") or kd("w") then
    ty = ty - speed
  elseif kd("down") or kd("s") then
    ty = ty + speed
  end
  if kd("r") then
    tx = tx_start
    ty = ty_start
  end

  if scroll_type == 0 then
    map.layers["bg_a"].x = 0
    map.layers["bg_a"].y = 0
    map.layers["bg_b"].x = 0
    map.layers["bg_b"].y = 0
  elseif scroll_type == 1 then
    layers[2].x = -tx
    layers[2].y = -ty
    layers[1].x = -tx / 2
    layers[1].y = -ty / 2
  elseif scroll_type == 2 then
    map.layers["bg_a"].x = -tx
    map.layers["bg_a"].y = -ty
    map.layers["bg_b"].x = -tx / 4
    map.layers["bg_b"].y = -ty / 4
  end

  -- get mouse position
  local mx, my = love.mouse.getPosition()
  mx = (mx - scr_ofsx) / scr_scale
  my = (my - scr_ofsy) / scr_scale

  -- get tile gid
  mx = mx + tx
  my = my + ty
  gid = map:getGidByPixel(mx, my, "bg_a")
end

function love.draw()

  -- set canvas
  love.graphics.setCanvas(canvas)

  -- draw BG color
  love.graphics.setColor(0, 0, 0)
  love.graphics.rectangle("fill", 0, 0, scr_w, scr_h)

  -- draw tilemap BG
  love.graphics.setColor(255, 255, 255)
  if scroll_type == 0 then
    map:draw(-tx, -ty)
  elseif scroll_type == 1 then
    for i, layer in ipairs(layers) do
      map:drawLayer(layer)
    end
  elseif scroll_type == 2 then
    map:draw()
  end

  -- unset canvas
  love.graphics.setCanvas()

  -- draw canvas to window
  love.graphics.setColor(255, 255, 255)
  love.graphics.draw(canvas, scr_ofsx, scr_ofsy, 0, scr_scale, scr_scale)

  love.graphics.print("FPS: "..tostring(love.timer.getFPS()), 10, 10)
  love.graphics.print("tx = "..tostring(tx), 10, 40)
  love.graphics.print("ty = "..tostring(ty), 10, 60)
  love.graphics.print("C : scroll type = "..tostring(scroll_type), 10, 80)
  love.graphics.print("R : reset", 10, 100)
  love.graphics.print("ESC : exit", 10, 120)
  love.graphics.print("gid = "..tostring(gid), 10, 160, 0, 2.0, 2.0)

  if love.system.getOS() == "Windows" then
    -- wait
    local cur_time = love.timer.getTime()
    if next_time <= cur_time then
      next_time = cur_time
    else
      love.timer.sleep(next_time - cur_time)
    end
  end
end

function love.keypressed(key, isrepeat)
  -- ESC to exit
  if key == "escape" then
    love.event.quit()
  end
  if key == "c" then
    scroll_type = (scroll_type + 1) % 3
  end
end
- カーソルキー or WASDキーでスクロール。
- Rキーで座標を初期化。
- Cキーで、パララックスの有無の切り替え。
- マウスカーソル位置のタイル番号が表示される。
実行の仕方は、テキトーなフォルダを作成して、conf.lua、main.lua、mecha_bg_map.lua、tile01.png と、stiフォルダを入れて、「love フォルダ名」で実行。
◎ 少し解説。 :
Tiled マップエディタで作成するマップデータには、複数のレイヤーを含めることができる。
全レイヤーを同じ表示位置でスクロールさせてもいいのなら、描画時に以下を指定するだけで済む。
各レイヤーの情報にアクセスしたいなら、map.layers["レイヤー名"] でアクセスできる。
各レイヤー(タイルレイヤー)は、以下のような値を持ってる。
例えば、各レイヤーの表示位置を別々にして、パララックス(視差効果。いわゆる多重スクロール)をしたいなら、以下のように書ける。
local tilex, tiley = map:convertPixelToTile(x, y) を呼べば、x,yのピクセル座標から、タイル位置を求めることができる。戻り値は小数点以下の値も含んでいるので、math.floor() を使って小数点以下切り捨てをしてから値を使うことになると思う。
タイルマップレイヤーのデータ部分(タイル番号がずらずら並んでる部分)にアクセスしたいなら、以下のような記述になる。
例えば、
タイルレイヤー上の空白部分は、nil で示されているので、
上記のソースでは、以下の部分がタイル番号を取得するメソッドになってる。
全レイヤーを同じ表示位置でスクロールさせてもいいのなら、描画時に以下を指定するだけで済む。
local sti = require "sti"

function love.load()
  map = sti("mecha_bg_map.lua")
end

function love.update(dt)
  map:update(dt)
end

function love.draw()
  map:draw(表示位置x, 表示位置y)
end
各レイヤーの情報にアクセスしたいなら、map.layers["レイヤー名"] でアクセスできる。
各レイヤー(タイルレイヤー)は、以下のような値を持ってる。
- name : レイヤー名
- x : 表示位置 x
- y : 表示位置 y
- width : 横方向のタイル個数
- height : 縦方向のタイル個数
例えば、各レイヤーの表示位置を別々にして、パララックス(視差効果。いわゆる多重スクロール)をしたいなら、以下のように書ける。
map.layers["hoge"].x = -200
map.layers["hoge"].y = -400

map.layers["fuga"].x = -100
map.layers["fuga"].y = -200
このように各レイヤーの表示位置を変更しておけば、描画時は map:draw() を呼ぶだけで済む。map:draw(x, y) のように書かなくていい。
local tilex, tiley = map:convertPixelToTile(x, y) を呼べば、x,yのピクセル座標から、タイル位置を求めることができる。戻り値は小数点以下の値も含んでいるので、math.floor() を使って小数点以下切り捨てをしてから値を使うことになると思う。
タイルマップレイヤーのデータ部分(タイル番号がずらずら並んでる部分)にアクセスしたいなら、以下のような記述になる。
map.layers["レイヤー名"].data[tiley+1][tilex+1]
例えば、
local gid = map.layers["hoge"].data[1][1].gidと書けば、「hogeという名前のレイヤーの、タイル位置 (0, 0) のタイル番号」を取得できる。Luaの配列は、えてして0ではなく1から始まる点に注意。
タイルレイヤー上の空白部分は、nil で示されているので、
map.layers["hoge"].data[1][1].gidでタイル番号を取得しようとして、そこが空白だったりすると、nil から .gid を取得しようとしてエラーになってしまう。なので、一旦 map.layers["hoge"].data[1][1] が nil かどうかを調べて、nil なら空白扱いに、nil じゃなければ .gid で取得、といった処理を書かないといけない。
上記のソースでは、以下の部分がタイル番号を取得するメソッドになってる。
  map.getGidByPixel = function(self, x, y, layerindex)
    local tilex, tiley = self:convertPixelToTile(math.floor(x), math.floor(y))
    tilex = math.floor(tilex)
    tiley = math.floor(tiley)
    local layer = map.layers[layerindex]
    local tilew = layer.width
    local tileh = layer.height
    local gid = -2
    if tilex >= 0 and tiley >= 0 and tilex < tilew and tiley < tileh then
      local tile = layer.data[tiley + 1][tilex + 1]
      if tile == nil then
        gid = -1
      else
        gid = tile.gid
      end
    end
    return gid
  end
◎ 参考ページ。 :
[ ツッコむ ]
以上、1 日分です。