2017/11/06(∑Ó) [n«ĮŃį§ő∆ŁĶ≠]
#1 [lua][love2d] love2d§«•Ņ•§•Ž•ř•√•◊§ő…Ĺľ®§Ĺ§ő2
love2d§«•Ņ•§•Ž•ř•√•◊BG§Ú…Ĺľ®§«§≠§Ž§ę§…§¶§ęľ¬ł≥√ś°£ļÚ∆Ł§Ō…Ĺľ®§ř§«§«§≠§Ņ§Ī§…°Ę•Ļ•Į•Ū°ľ•Ž§Ō§…§¶§Ļ§Ž§ő§ę§ §»°£
Ņß°ĻĽÓ§∑§∆°Ę§≥§ů§ ī∂§ł§ň°£Windows10 x64 §» Raspberry Pi Zero W°Ęlove2d 0.10.2匧«∆įļÓ≥ő«ß§∑§Ņ°£
Ņß°ĻĽÓ§∑§∆°Ę§≥§ů§ ī∂§ł§ň°£Windows10 x64 §» Raspberry Pi Zero W°Ęlove2d 0.10.2匧«∆įļÓ≥ő«ß§∑§Ņ°£
°ż Ľ»Õ—≤ŤŃŁ§»•ř•√•◊•«°ľ•Ņ°£ :
ľęļÓ§∑§Ņ°Ę
_Tiled Map Editor
Õ—§ő•«°ľ•Ņ§Ōį ≤ľ°£License : CC0 / Public Domain §√§∆§≥§»§«°£
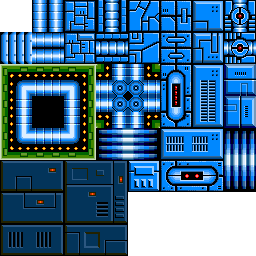
_tile01.png
_mecha_bg_map.tmx
love2d + _sti (Simple-Tiled-Implementation) §«∆…§ŖĻĢ§ŗ§Ņ§Š§ő•«°ľ•Ņ§Ōį ≤ľ°£
_mecha_bg_map.lua
_tile01.png
_mecha_bg_map.tmx
love2d + _sti (Simple-Tiled-Implementation) §«∆…§ŖĻĢ§ŗ§Ņ§Š§ő•«°ľ•Ņ§Ōį ≤ľ°£
_mecha_bg_map.lua
°ż •Ĺ°ľ•Ļ°£ :
•Ĺ°ľ•Ļ§Ōį ≤ľ°£∆įļÓ§ň§Ō°Ę
_sti(Simple-Tiled-Implementation)
§¨…¨Õ◊°£
_conf.lua
_main.lua
ľ¬Ļ‘§őĽŇ ż§Ō°Ę•∆•≠•»°ľ§ •’•©•Ž•ņ§ÚļÓņģ§∑§∆°Ęconf.lua°Ęmain.lua°Ęmecha_bg_map.lua°Ętile01.png §»°Ęsti•’•©•Ž•ņ§Ú∆Ģ§ž§∆°Ę°÷love •’•©•Ž•ņŐĺ°◊§«ľ¬Ļ‘°£
_conf.lua
function love.conf(t)
  t.window.title = "Tilemap Test 03"
  t.window.width = 1280
  t.window.height = 720
  t.window.vsync = true
  t.console = true
  -- t.window.fullscreen = true
  -- t.window.fullscreentype = "exclusive"
end
_main.lua
-- tilemap test 03

local sti = require "sti"

local scroll_type

function love.load()
  -- init

  -- set filter
  love.graphics.setDefaultFilter("nearest", "nearest")

  -- set canvas size
  scr_w = 640
  scr_h = 480
  canvas = love.graphics.newCanvas(scr_w, scr_h)

  -- get window width and height
  wdw_w, wdw_h = love.graphics.getDimensions()

  scr_scale = math.min((wdw_w / scr_w), (wdw_h / scr_h))
  scr_ofsx = (wdw_w - (scr_w * scr_scale)) / 2
  scr_ofsy = (wdw_h - (scr_h * scr_scale)) / 2

  -- load tilemap
  map = sti("mecha_bg_map.lua")

  map.getGidByPixel = function(self, x, y, layerindex)
    local tilex, tiley = self:convertPixelToTile(math.floor(x), math.floor(y))
    tilex = math.floor(tilex)
    tiley = math.floor(tiley)
    local layer = map.layers[layerindex]
    local tilew = layer.width
    local tileh = layer.height
    local gid = -2
    if tilex >= 0 and tiley >= 0 and tilex < tilew and tiley < tileh then
      local tile = layer.data[tiley + 1][tilex + 1]
      if tile == nil then
        gid = -1
      else
        gid = tile.gid
      end
    end
    return gid
  end

  scroll_type = 2

  layers = {}
  for i,layer in ipairs(map.layers) do
    -- print(i, layer.name)
    layers[i] = layer
  end

  -- init bg position
  tx_start = 0
  ty_start = 0
  tx = tx_start
  ty = ty_start

  gid = 0

  -- framerate steady
  min_dt = 1 / 60
  next_time = love.timer.getTime()
end

function love.update(dt)
  -- update
  next_time = next_time + min_dt

  map:update(dt)

  -- keyboard check
  local speed = 160 * dt
  local kd = love.keyboard.isDown
  if kd("left") or kd("a") then
    tx = tx - speed
  elseif kd("right") or kd("d") then
    tx = tx + speed
  end
  if kd("up") or kd("w") then
    ty = ty - speed
  elseif kd("down") or kd("s") then
    ty = ty + speed
  end
  if kd("r") then
    tx = tx_start
    ty = ty_start
  end

  if scroll_type == 0 then
    map.layers["bg_a"].x = 0
    map.layers["bg_a"].y = 0
    map.layers["bg_b"].x = 0
    map.layers["bg_b"].y = 0
  elseif scroll_type == 1 then
    layers[2].x = -tx
    layers[2].y = -ty
    layers[1].x = -tx / 2
    layers[1].y = -ty / 2
  elseif scroll_type == 2 then
    map.layers["bg_a"].x = -tx
    map.layers["bg_a"].y = -ty
    map.layers["bg_b"].x = -tx / 4
    map.layers["bg_b"].y = -ty / 4
  end

  -- get mouse position
  local mx, my = love.mouse.getPosition()
  mx = (mx - scr_ofsx) / scr_scale
  my = (my - scr_ofsy) / scr_scale

  -- get tile gid
  mx = mx + tx
  my = my + ty
  gid = map:getGidByPixel(mx, my, "bg_a")
end

function love.draw()

  -- set canvas
  love.graphics.setCanvas(canvas)

  -- draw BG color
  love.graphics.setColor(0, 0, 0)
  love.graphics.rectangle("fill", 0, 0, scr_w, scr_h)

  -- draw tilemap BG
  love.graphics.setColor(255, 255, 255)
  if scroll_type == 0 then
    map:draw(-tx, -ty)
  elseif scroll_type == 1 then
    for i, layer in ipairs(layers) do
      map:drawLayer(layer)
    end
  elseif scroll_type == 2 then
    map:draw()
  end

  -- unset canvas
  love.graphics.setCanvas()

  -- draw canvas to window
  love.graphics.setColor(255, 255, 255)
  love.graphics.draw(canvas, scr_ofsx, scr_ofsy, 0, scr_scale, scr_scale)

  love.graphics.print("FPS: "..tostring(love.timer.getFPS()), 10, 10)
  love.graphics.print("tx = "..tostring(tx), 10, 40)
  love.graphics.print("ty = "..tostring(ty), 10, 60)
  love.graphics.print("C : scroll type = "..tostring(scroll_type), 10, 80)
  love.graphics.print("R : reset", 10, 100)
  love.graphics.print("ESC : exit", 10, 120)
  love.graphics.print("gid = "..tostring(gid), 10, 160, 0, 2.0, 2.0)

  if love.system.getOS() == "Windows" then
    -- wait
    local cur_time = love.timer.getTime()
    if next_time <= cur_time then
      next_time = cur_time
    else
      love.timer.sleep(next_time - cur_time)
    end
  end
end

function love.keypressed(key, isrepeat)
  -- ESC to exit
  if key == "escape" then
    love.event.quit()
  end
  if key == "c" then
    scroll_type = (scroll_type + 1) % 3
  end
end
- •ę°ľ•Ĺ•Ž•≠°ľ or WASD•≠°ľ§«•Ļ•Į•Ū°ľ•Ž°£
- R•≠°ľ§«ļ¬…ł§ÚĹťīŁ≤Ĺ°£
- C•≠°ľ§«°Ę•—•ť•ť•√•Į•Ļ§őÕ≠ŐĶ§őņŕ§Í¬ō§®°£
- •ř•¶•Ļ•ę°ľ•Ĺ•ŽįŐ√÷§ő•Ņ•§•Ž»÷Ļś§¨…Ĺľ®§Ķ§ž§Ž°£
ľ¬Ļ‘§őĽŇ ż§Ō°Ę•∆•≠•»°ľ§ •’•©•Ž•ņ§ÚļÓņģ§∑§∆°Ęconf.lua°Ęmain.lua°Ęmecha_bg_map.lua°Ętile01.png §»°Ęsti•’•©•Ž•ņ§Ú∆Ģ§ž§∆°Ę°÷love •’•©•Ž•ņŐĺ°◊§«ľ¬Ļ‘°£
°ż ĺĮ§∑≤Úņ‚°£ :
Tiled •ř•√•◊•®•«•£•Ņ§«ļÓņģ§Ļ§Ž•ř•√•◊•«°ľ•Ņ§ň§Ō°Ę £Ņۧő•ž•§•š°ľ§Úīř§Š§Ž§≥§»§¨§«§≠§Ž°£
Ńī•ž•§•š°ľ§Ú∆Ī§ł…Ĺľ®įŐ√÷§«•Ļ•Į•Ū°ľ•Ž§Ķ§Ľ§∆§‚§§§§§ő§ §ť°Ę…Ń≤ŤĽĢ§ňį ≤ľ§ÚĽōńͧĻ§Ž§ņ§Ī§«ļ—§ŗ°£
≥∆•ž•§•š°ľ§őĺū ů§ň•Ę•Į•Ľ•Ļ§∑§Ņ§§§ §ť°Ęmap.layers["•ž•§•š°ľŐĺ"] §«•Ę•Į•Ľ•Ļ§«§≠§Ž°£
≥∆•ž•§•š°ľ(•Ņ•§•Ž•ž•§•š°ľ)§Ō°Ęį ≤ľ§ő§Ť§¶§ √Õ§ÚĽż§√§∆§Ž°£
ő„§®§–°Ę≥∆•ž•§•š°ľ§ő…Ĺľ®įŐ√÷§Ú Ő°Ļ§ň§∑§∆°Ę•—•ť•ť•√•Į•Ļ(ĽŽļĻłķ≤Ő°£§§§Ô§ś§Ž¬ŅĹŇ•Ļ•Į•Ū°ľ•Ž)§Ú§∑§Ņ§§§ §ť°Ęį ≤ľ§ő§Ť§¶§ňĹ٧Ī§Ž°£
local tilex, tiley = map:convertPixelToTile(x, y) §Úł∆§Ŕ§–°Ęx,y§ő•‘•Į•Ľ•Žļ¬…ł§ę§ť°Ę•Ņ•§•ŽįŐ√÷§ÚĶŠ§Š§Ž§≥§»§¨§«§≠§Ž°£ŐŠ§Í√Õ§ŌĺģŅŰŇņį ≤ľ§ő√Õ§‚īř§ů§«§§§Ž§ő§«°Ęmath.floor() §ÚĽ»§√§∆ĺģŅŰŇņį ≤ľņŕ§Íľő§∆§Ú§∑§∆§ę§ť√Õ§ÚĽ»§¶§≥§»§ň§ §Ž§»Ľ◊§¶°£
•Ņ•§•Ž•ř•√•◊•ž•§•š°ľ§ő•«°ľ•Ņ…Ű ¨(•Ņ•§•Ž»÷Ļś§¨§ļ§ť§ļ§ť ¬§ů§«§Ž…Ű ¨)§ň•Ę•Į•Ľ•Ļ§∑§Ņ§§§ §ť°Ęį ≤ľ§ő§Ť§¶§ Ķ≠Ĺ“§ň§ §Ž°£
ő„§®§–°Ę
•Ņ•§•Ž•ž•§•š°ľĺŚ§ő∂ű«Ú…Ű ¨§Ō°Ęnil §«ľ®§Ķ§ž§∆§§§Ž§ő§«°Ę
ĺŚĶ≠§ő•Ĺ°ľ•Ļ§«§Ō°Ęį ≤ľ§ő…Ű ¨§¨•Ņ•§•Ž»÷Ļś§ÚľŤ∆ņ§Ļ§Ž•Š•Ĺ•√•…§ň§ §√§∆§Ž°£
Ńī•ž•§•š°ľ§Ú∆Ī§ł…Ĺľ®įŐ√÷§«•Ļ•Į•Ū°ľ•Ž§Ķ§Ľ§∆§‚§§§§§ő§ §ť°Ę…Ń≤ŤĽĢ§ňį ≤ľ§ÚĽōńͧĻ§Ž§ņ§Ī§«ļ—§ŗ°£
local sti = require "sti"
function love.load()
map = sti("mecha_bg_map.lua")
end
function love.update(dt)
map:update(dt)
end
function love.draw()
map:draw(…Ĺľ®įŐ√÷x, …Ĺľ®įŐ√÷y)
end
≥∆•ž•§•š°ľ§őĺū ů§ň•Ę•Į•Ľ•Ļ§∑§Ņ§§§ §ť°Ęmap.layers["•ž•§•š°ľŐĺ"] §«•Ę•Į•Ľ•Ļ§«§≠§Ž°£
≥∆•ž•§•š°ľ(•Ņ•§•Ž•ž•§•š°ľ)§Ō°Ęį ≤ľ§ő§Ť§¶§ √Õ§ÚĽż§√§∆§Ž°£
- name : •ž•§•š°ľŐĺ
- x : …Ĺľ®įŐ√÷ x
- y : …Ĺľ®įŐ√÷ y
- width : ≤£ żłĢ§ő•Ņ•§•ŽłńŅŰ
- height : Ĺń żłĢ§ő•Ņ•§•ŽłńŅŰ
ő„§®§–°Ę≥∆•ž•§•š°ľ§ő…Ĺľ®įŐ√÷§Ú Ő°Ļ§ň§∑§∆°Ę•—•ť•ť•√•Į•Ļ(ĽŽļĻłķ≤Ő°£§§§Ô§ś§Ž¬ŅĹŇ•Ļ•Į•Ū°ľ•Ž)§Ú§∑§Ņ§§§ §ť°Ęį ≤ľ§ő§Ť§¶§ňĹ٧Ī§Ž°£
map.layers["hoge"].x = -200 map.layers["hoge"].y = -400 map.layers["fuga"].x = -100 map.layers["fuga"].y = -200§≥§ő§Ť§¶§ň≥∆•ž•§•š°ľ§ő…Ĺľ®įŐ√÷§Ú —ĻĻ§∑§∆§™§Ī§–°Ę…Ń≤ŤĽĢ§Ō map:draw() §Úł∆§÷§ņ§Ī§«ļ—§ŗ°£map:draw(x, y) §ő§Ť§¶§ňĹŮ§ę§ §Į§∆§§§§°£
local tilex, tiley = map:convertPixelToTile(x, y) §Úł∆§Ŕ§–°Ęx,y§ő•‘•Į•Ľ•Žļ¬…ł§ę§ť°Ę•Ņ•§•ŽįŐ√÷§ÚĶŠ§Š§Ž§≥§»§¨§«§≠§Ž°£ŐŠ§Í√Õ§ŌĺģŅŰŇņį ≤ľ§ő√Õ§‚īř§ů§«§§§Ž§ő§«°Ęmath.floor() §ÚĽ»§√§∆ĺģŅŰŇņį ≤ľņŕ§Íľő§∆§Ú§∑§∆§ę§ť√Õ§ÚĽ»§¶§≥§»§ň§ §Ž§»Ľ◊§¶°£
•Ņ•§•Ž•ř•√•◊•ž•§•š°ľ§ő•«°ľ•Ņ…Ű ¨(•Ņ•§•Ž»÷Ļś§¨§ļ§ť§ļ§ť ¬§ů§«§Ž…Ű ¨)§ň•Ę•Į•Ľ•Ļ§∑§Ņ§§§ §ť°Ęį ≤ľ§ő§Ť§¶§ Ķ≠Ĺ“§ň§ §Ž°£
map.layers["•ž•§•š°ľŐĺ"].data[tiley+1][tilex+1]
ő„§®§–°Ę
local gid = map.layers["hoge"].data[1][1].gid§»Ĺ٧Ī§–°Ę°÷hoge§»§§§¶ŐĺŃį§ő•ž•§•š°ľ§ő°Ę•Ņ•§•ŽįŐ√÷ (0, 0) §ő•Ņ•§•Ž»÷Ļś°◊§ÚľŤ∆ņ§«§≠§Ž°£Lua§ő«Řőů§Ō°Ę§®§∆§∑§∆0§«§Ō§ §Į1§ę§ťĽŌ§ř§ŽŇņ§ň√Ūį’°£
•Ņ•§•Ž•ž•§•š°ľĺŚ§ő∂ű«Ú…Ű ¨§Ō°Ęnil §«ľ®§Ķ§ž§∆§§§Ž§ő§«°Ę
map.layers["hoge"].data[1][1].gid§«•Ņ•§•Ž»÷Ļś§ÚľŤ∆ņ§∑§Ť§¶§»§∑§∆°Ę§Ĺ§≥§¨∂ű«Ú§ņ§√§Ņ§Í§Ļ§Ž§»°Ęnil §ę§ť .gid §ÚľŤ∆ņ§∑§Ť§¶§»§∑§∆•®•ť°ľ§ň§ §√§∆§∑§ř§¶°£§ §ő§«°Ęįž√∂ map.layers["hoge"].data[1][1] §¨ nil §ę§…§¶§ę§Úńī§Ŕ§∆°Ęnil § §ť∂ű«Úį∑§§§ň°Ęnil §ł§„§ §Ī§ž§– .gid §«ľŤ∆ņ°Ę§»§§§√§ŅĹŤÕż§ÚĹŮ§ę§ §§§»§§§Ī§ §§°£
ĺŚĶ≠§ő•Ĺ°ľ•Ļ§«§Ō°Ęį ≤ľ§ő…Ű ¨§¨•Ņ•§•Ž»÷Ļś§ÚľŤ∆ņ§Ļ§Ž•Š•Ĺ•√•…§ň§ §√§∆§Ž°£
  map.getGidByPixel = function(self, x, y, layerindex)
    local tilex, tiley = self:convertPixelToTile(math.floor(x), math.floor(y))
    tilex = math.floor(tilex)
    tiley = math.floor(tiley)
    local layer = map.layers[layerindex]
    local tilew = layer.width
    local tileh = layer.height
    local gid = -2
    if tilex >= 0 and tiley >= 0 and tilex < tilew and tiley < tileh then
      local tile = layer.data[tiley + 1][tilex + 1]
      if tile == nil then
        gid = -1
      else
        gid = tile.gid
      end
    end
    return gid
  end
°ż Ľ≤ĻÕ•ŕ°ľ•ł°£ :
[ •ń•√•≥§ŗ ]
į 匧«§Ļ°£