2021/10/02(ÅŚ) [nĒÆĮ°¤ĪĘüµ]
#1 [cg_tools][python] æō»ś¤¬½ń¤«¤ģ¤æ²čĮü¤ņ¤æ¤Æ¤µ¤óŗī¤ź¤æ¤¤
æō»ś¤¬½ń¤«¤ģ¤æ²čĮü¤ņ ”½”½ ”Ö0000”פ«¤é”Ö00xx”פŽ¤ĒĻ¢ČÖ¤¬½ń¤«¤ģ¤æ“¶¤ø¤Ī²čĮü¤ņŹ£æōŗī¤ź¤æ¤¤”£ImageMagick ¤ņ»Č¤Ø¤Š¤Ē¤¤ė¤ó¤ø¤ć¤Ź¤¤¤«¤Č»×¤Ø¤Ę¤¤æ¤Ī¤Ē»ī¤·¤Ę¤ß¤æ”£
“Ķ¤Ļ”¢Windows10 x64 21H1 + Python 3.9.5 64bit + ImageMagick 7.1.0-5 Q16 x64”£
“Ķ¤Ļ”¢Windows10 x64 21H1 + Python 3.9.5 64bit + ImageMagick 7.1.0-5 Q16 x64”£
”ż æō»ś¤ņÉĮ²č”£ :
°Ź²¼¤Ī„Ś”¼„ø¤Ē”¢ImageMagick ¤ņ»Č¤Ć¤Ę²čĮü¤ĖŹø»ś¤ņÉĮ²č¤¹¤ėŹżĖ”¤¬ĄāĢĄ¤µ¤ģ¤Ę¤æ¤Ī¤Ē»²¹Ķ¤Ė¤·¤Ęŗī¶Č”£¤¢¤ź¤¬¤æ¤ä”£
_ImageMagick¤Ē²čĮü¤ĖŹø»ś¤ņÉĮ²č - „؄锼¤Īøž¤³¤¦¤Ų
¤Ž¤ŗ”¢»ŲÄź¤Ē¤¤ė„Õ„©„ó„ȤĪ¼ļĪą¤ņĒÄ°®¤·¤Ź¤¤¤Č¤¤¤±¤Ź¤¤”£.ttf ¤ņ»ŲÄź¤¹¤ė¤³¤Č¤Ē¤ā¤¤¤¤¤é¤·¤¤¤±¤É”Ä”£¤Č¤ź¤¢¤Ø¤ŗ”¢°Ź²¼¤ņĀĒ¤Ę¤ŠĶųĶѤĒ¤¤ė„Õ„©„ó„ȤĪ°ģĶ÷¤ņɽ¼Ø¤Ē¤¤ė¤é¤·¤¤”£ĀēĪĢ¤Ė¤ŗ¤é¤ŗ¤é¤Č½Š¤Ę¤¤æ¤Ī¤Ē„Ę„„¹„Č„Õ„”„¤„ė¤Ė½ń¤¹ž¤ó¤Ē„Ø„Ē„£„æ¤Ē»²¾Č”£
¼ĀŗŻ¤ĖŹø»ś¤ņÉĮ²č¤·¤Ę¤ß¤ė”£°Ź²¼¤Ī»ŲÄź¤Ē”¢96x96 ¤Ī²čĮü„µ„¤„ŗ¤Īææ¤óĆę¤Ė”¢”ÖSample”פȤ¤¤¦Źø»ś¤ņÉĮ²č¤Ē¤¤ė”£
ĒŲ·Ź¤ņĘ©ĢĄ¤Ė¤·¤ĘÉĮ²č¤·¤æ¤¤¾ģ¹ē¤Ļ°Ź²¼”£
¤³¤ģ¤Ē”¢°ģĖē¤Ą¤±ŗī¤ė¤ä¤źŹż¤ĻŹ¬¤Ć¤æ¤Ī¤Ē”¢„¹„Æ„ź„ׄȤņ½ń¤¤¤ĘĀēĪĢ¤ĖĄøĄ®¤·¤Ę¤ß¤æ¤¤”£
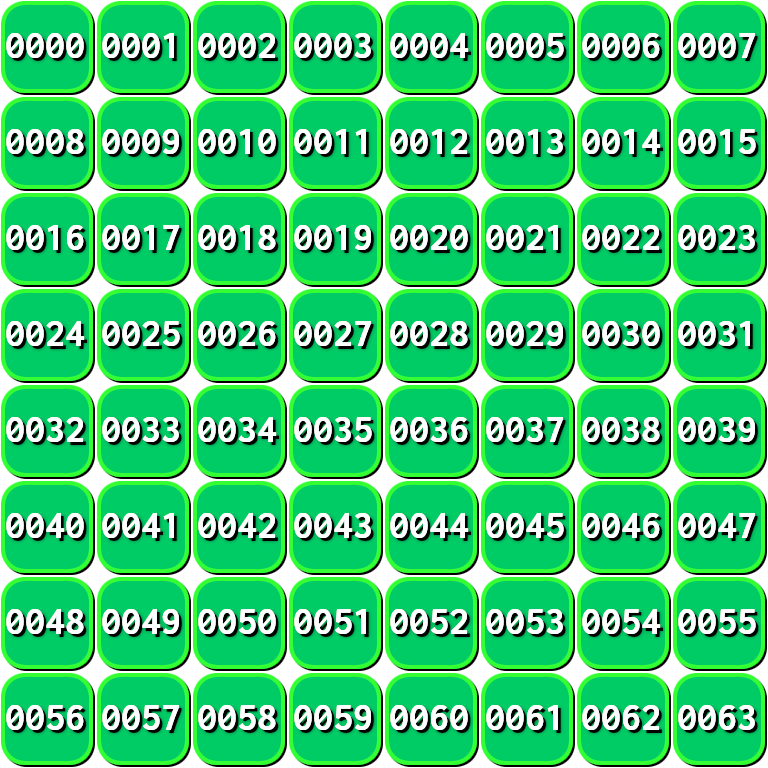
ŗ£²ó¤Ļ”¢make_seq_img.py ¤Č¤¤¤¦Python„¹„Æ„ź„ׄȤņ½ń¤¤¤Ę”¢0000 - 0063 ¤Ž¤Ē¤Īæō»ś¤¬½ń¤«¤ģ¤æ64Ėē¤Ī²čĮü¤ņ out/ „Ē„£„ģ„Æ„Č„ź¤Ė½ŠĪĻ¤¹¤ė¤č¤¦¤Ė¤·¤Ę¤ß¤æ”£
_make_seq_img.py
Python ¤Ē¤Ļ”¢subprocess.call(Źø»śĪó) ¤Ē³°Éō„ׄķ„°„é„ą¤ņ¼Ā¹Ō¤¹¤ė¤³¤Č¤¬¤Ē¤¤ė¤é¤·¤¤”£
°Ź²¼¤Ē¼Ā¹Ō”£
_ImageMagick¤Ē²čĮü¤ĖŹø»ś¤ņÉĮ²č - „؄锼¤Īøž¤³¤¦¤Ų
¤Ž¤ŗ”¢»ŲÄź¤Ē¤¤ė„Õ„©„ó„ȤĪ¼ļĪą¤ņĒÄ°®¤·¤Ź¤¤¤Č¤¤¤±¤Ź¤¤”£.ttf ¤ņ»ŲÄź¤¹¤ė¤³¤Č¤Ē¤ā¤¤¤¤¤é¤·¤¤¤±¤É”Ä”£¤Č¤ź¤¢¤Ø¤ŗ”¢°Ź²¼¤ņĀĒ¤Ę¤ŠĶųĶѤĒ¤¤ė„Õ„©„ó„ȤĪ°ģĶ÷¤ņɽ¼Ø¤Ē¤¤ė¤é¤·¤¤”£ĀēĪĢ¤Ė¤ŗ¤é¤ŗ¤é¤Č½Š¤Ę¤¤æ¤Ī¤Ē„Ę„„¹„Č„Õ„”„¤„ė¤Ė½ń¤¹ž¤ó¤Ē„Ø„Ē„£„æ¤Ē»²¾Č”£
magick convert -list font

magick convert -list font > fontlist.txt
¼ĀŗŻ¤ĖŹø»ś¤ņÉĮ²č¤·¤Ę¤ß¤ė”£°Ź²¼¤Ī»ŲÄź¤Ē”¢96x96 ¤Ī²čĮü„µ„¤„ŗ¤Īææ¤óĆę¤Ė”¢”ÖSample”פȤ¤¤¦Źø»ś¤ņÉĮ²č¤Ē¤¤ė”£
magick convert -size 96x96 -gravity center -font Arial-Black -fill white -background gray -pointsize 32 label:Sample output.png
- -size 96x96 : ²čĮü„µ„¤„ŗ¤ņ»ŲÄź”£
- -gravity center : ²čĮü¤Īææ¤óĆę¤Ī°ĢĆÖ¤ņ»ŲÄź”£
- -font Arial-Black : Arial-Black„Õ„©„ó„Ȥņ»ŲÄź”£
- -fill white : 槤ĻĒņ¤ĒÉĮ²č”£
- -background gray : ĒŲ·Źæ§¤ņ³„槤Ė”£
- -pointsize 32 : „Õ„©„ó„ȤĪŹø»ś„µ„¤„ŗ¤ņ»ŲÄź”£
- label:Sample : ”ÖSample”פȤ¤¤¦Źø»śĪó¤ņÉĮ²č¤µ¤»¤ė”£
ĒŲ·Ź¤ņĘ©ĢĄ¤Ė¤·¤ĘÉĮ²č¤·¤æ¤¤¾ģ¹ē¤Ļ°Ź²¼”£
magick convert -size 96x96 -gravity center -font Inconsolata-Bold -fill black -background rgba(0,0,0,0) -pointsize 32 label:0000 png32:output.png
- -background rgba(0,0,0,0) : ĒŲ·Ź¤ņĘ©ĢĄ²½”£¤ā¤·¤«¤¹¤ė¤Č -background none ¤Ē¤ā¤¤¤¤¤Ī¤Ą¤ķ¤¦¤«”£
- png32:output.png : ½ŠĪĻ„Õ„”„¤„ėĢ¾¤ĪĄčʬ¤Ė png32: ¤ņÄÉ²Ć¤·¤Ę„¢„ė„Õ„”„Į„ć„ó„Ķ„ė¤ņ“Ž¤ąpng²čĮü¤Č¤·¤Ę½ŠĪĻ¤¹¤ė¤³¤Č¤ņĢĄ¼Ø”£
¤³¤ģ¤Ē”¢°ģĖē¤Ą¤±ŗī¤ė¤ä¤źŹż¤ĻŹ¬¤Ć¤æ¤Ī¤Ē”¢„¹„Æ„ź„ׄȤņ½ń¤¤¤ĘĀēĪĢ¤ĖĄøĄ®¤·¤Ę¤ß¤æ¤¤”£
ŗ£²ó¤Ļ”¢make_seq_img.py ¤Č¤¤¤¦Python„¹„Æ„ź„ׄȤņ½ń¤¤¤Ę”¢0000 - 0063 ¤Ž¤Ē¤Īæō»ś¤¬½ń¤«¤ģ¤æ64Ėē¤Ī²čĮü¤ņ out/ „Ē„£„ģ„Æ„Č„ź¤Ė½ŠĪĻ¤¹¤ė¤č¤¦¤Ė¤·¤Ę¤ß¤æ”£
_make_seq_img.py
import os
import subprocess

mgk = "magick convert"

size = "-size 96x96"
pos = "-gravity center"
font = "-font Inconsolata-Bold"
col = "-fill black"
bg = "-background rgba(0,0,0,0)"
pt = "-pointsize 40"

for i in range(8 * 8):
    lbl = "%04d" % i
    fn = "png32:out/%04d.png" % i
    cmd = f"{mgk} {size} {pos} {font} {col} {bg} {pt} label:{lbl} {fn}"
    subprocess.call(cmd)
    print("Output: %s" % fn)
Python ¤Ē¤Ļ”¢subprocess.call(Źø»śĪó) ¤Ē³°Éō„ׄķ„°„é„ą¤ņ¼Ā¹Ō¤¹¤ė¤³¤Č¤¬¤Ē¤¤ė¤é¤·¤¤”£
°Ź²¼¤Ē¼Ā¹Ō”£
mkdir out
python make_seq_img.py
”ż „愤„ė¾õ¤ĖŹĀ¤Ł¤Ę·ė¹ē¤·¤æ¤¤¤¬¾å¼ź¤Æ¹Ō¤«¤Ź¤¤”£ :
¤³¤ģ¤ĒĀēĪĢ¤Ī²čĮü¤¬ĄøĄ®¤Ē¤¤æ¤Ī¤Ē”¢„愤„ė¾õ¤ĖŹĀ¤Ł¤Ę·ė¹ē¤·¤Ę„¹„ׄ鄤„Č„·”¼„ȤƤŻ¤Æ¤·¤Ę¤ß¤æ¤¤”£
¤½¤¦¤¤¤Ć¤æ½čĶż¤ā ImageMagick ¤Ē½ŠĶč¤æ¤Ļ¤ŗ”¢¤Ź¤Ī¤Ą¤±¤É”Ä”£
¤³¤ģ¤¬¾å¼ź¤Æ¹Ō¤«¤Ź¤¤”£³Ę²čĮü¤Ī²¼¤Ė”¢²æøĪ¤«„Õ„”„¤„ėĢ¾¤Ć¤Ż¤¤¤ā¤Ī¤¬ÉĮ¤¹ž¤Ž¤ģ¤Ę¤·¤Ž¤¦”£²æ¤Ą„³„ģ”£

¤É¤¦¤ä¤é label ¤Ź¤ė¤ā¤Ī¤¬ÉĮ¤¹ž¤Ž¤ģ¤Ę¤·¤Ž¤Ć¤Ę¤¤¤ė¤é¤·¤¤”Ä”£
-label "" (*NIX ¤Ī¾ģ¹ē¤Ļ -label '' ¤Ą¤ķ¤¦¤«)¤ņ¤Ä¤±¤ė¤³¤Č¤Ē”¢label ¤ņÉĮ¤«¤Ź¤¤»ŲÄź¤¬¤Ē¤¤ė¤é¤·¤¤¤Ī¤Ą¤±¤É”Ä”£

¤æ¤·¤«¤Ė label ¤ĻĢµ¤Æ¤Ź¤Ć¤æ¤±¤É”¢¤³¤ģ¤Ē¤ā¤Ž¤Ą·ė²Ģ¤Č¤·¤Ę¤Ļ¤č¤ķ¤·¤Æ¤Ź¤¤”£96 x 96„ɄƄȤĪ²čĮü¤ņ 8 x 8øÄŹĀ¤Ł¤Ę¤ė¤«¤é”¢768 x 768„ɄƄȤĪ²čĮü¤Ė¤Ź¤ė¤Ļ¤ŗ¤Ą¤±¤É”¢¼ĀŗŻ¤Ļ 768 x 912„ɄƄȤĖ¤Ź¤Ć¤Ę¤·¤Ž¤Ć¤Ę¤¤¤ė”£½ÄŹżøž¤ĖĶ¾·×¤Ź·ä“Ö¤¬Ęž¤Ć¤Ę¤ė¤ļ¤±¤Ē”£²æ¤Ą„³„ģ”£
°Ź²¼¤Ī„Ś”¼„ø¤ņÄƤį¤Ę¤ß¤æ¤±¤É”¢²ņ·čŹżĖ”¤Ļø«¤Ä¤«¤é¤ŗ”£
_Montage -- IM v6 Examples
°Ź²¼¤Ī¤ä¤ź¤Č¤ź¤ņÄƤį¤Ę”¢¾õ¶·¤¬Ź¬¤«¤Ć¤Ę¤¤æ”£æō»ś²čĮü¤ņŗīĄ®¤¹¤ėŗŻ¤Ė label ¤ņ»ŲÄź¤·¤æ¤ā¤Ī¤Ą¤«¤é”¢ĄøĄ®¤µ¤ģ¤æ²čĮü¤Ī„į„æ„Ē”¼„æ¤Ė¤ā label ¾šŹó¤¬»Ä¤Ć¤Ę¤¤¤Ę”¢”Ö¤³¤Ī²čĮü¤Ļ label ¤ņ»ż¤Ć¤Ę¤¤¤ė²čĮü¤Ą¤Ź”£¤Ē¤Ļ label ¤āÉĮ¤¹ž¤Ž¤Ķ¤Š”×¤Č½čĶż¤µ¤ģ¤Ę¤·¤Ž¤¦¤č¤¦¤Ē”£label ¤ņ»ż¤Ć¤æ²čĮü¤ņ°·¤¦¤Č”¢-label "" ¤ä -set label "" ¤ņ»ŲÄź¤·¤Ę¤ā label ĶѤĪÉĮ²čĪĪ°č¤¬“Ž¤Ž¤ģ¤Ę¤·¤Ž¤¦¤Ī¤Ą¤Č¤«”£¤·¤«¤ā”¢“ŹĆ±¤Ź²ņ·čŗö¤ĻĢµ¤¤¤é¤·¤¤”£
_ImageMagick montage always includes labels - Stack Overflow
¤½¤¦¤¤¤Ć¤æ½čĶż¤ā ImageMagick ¤Ē½ŠĶč¤æ¤Ļ¤ŗ”¢¤Ź¤Ī¤Ą¤±¤É”Ä”£
magick montage -geometry +0+0 -background none out/*.png spritesheet.png
¤³¤ģ¤¬¾å¼ź¤Æ¹Ō¤«¤Ź¤¤”£³Ę²čĮü¤Ī²¼¤Ė”¢²æøĪ¤«„Õ„”„¤„ėĢ¾¤Ć¤Ż¤¤¤ā¤Ī¤¬ÉĮ¤¹ž¤Ž¤ģ¤Ę¤·¤Ž¤¦”£²æ¤Ą„³„ģ”£
¤É¤¦¤ä¤é label ¤Ź¤ė¤ā¤Ī¤¬ÉĮ¤¹ž¤Ž¤ģ¤Ę¤·¤Ž¤Ć¤Ę¤¤¤ė¤é¤·¤¤”Ä”£
-label "" (*NIX ¤Ī¾ģ¹ē¤Ļ -label '' ¤Ą¤ķ¤¦¤«)¤ņ¤Ä¤±¤ė¤³¤Č¤Ē”¢label ¤ņÉĮ¤«¤Ź¤¤»ŲÄź¤¬¤Ē¤¤ė¤é¤·¤¤¤Ī¤Ą¤±¤É”Ä”£
magick montage -geometry +0+0 -background none -label "" out/*.png spritesheet.png
¤æ¤·¤«¤Ė label ¤ĻĢµ¤Æ¤Ź¤Ć¤æ¤±¤É”¢¤³¤ģ¤Ē¤ā¤Ž¤Ą·ė²Ģ¤Č¤·¤Ę¤Ļ¤č¤ķ¤·¤Æ¤Ź¤¤”£96 x 96„ɄƄȤĪ²čĮü¤ņ 8 x 8øÄŹĀ¤Ł¤Ę¤ė¤«¤é”¢768 x 768„ɄƄȤĪ²čĮü¤Ė¤Ź¤ė¤Ļ¤ŗ¤Ą¤±¤É”¢¼ĀŗŻ¤Ļ 768 x 912„ɄƄȤĖ¤Ź¤Ć¤Ę¤·¤Ž¤Ć¤Ę¤¤¤ė”£½ÄŹżøž¤ĖĶ¾·×¤Ź·ä“Ö¤¬Ęž¤Ć¤Ę¤ė¤ļ¤±¤Ē”£²æ¤Ą„³„ģ”£
°Ź²¼¤Ī„Ś”¼„ø¤ņÄƤį¤Ę¤ß¤æ¤±¤É”¢²ņ·čŹżĖ”¤Ļø«¤Ä¤«¤é¤ŗ”£
_Montage -- IM v6 Examples
°Ź²¼¤Ī¤ä¤ź¤Č¤ź¤ņÄƤį¤Ę”¢¾õ¶·¤¬Ź¬¤«¤Ć¤Ę¤¤æ”£æō»ś²čĮü¤ņŗīĄ®¤¹¤ėŗŻ¤Ė label ¤ņ»ŲÄź¤·¤æ¤ā¤Ī¤Ą¤«¤é”¢ĄøĄ®¤µ¤ģ¤æ²čĮü¤Ī„į„æ„Ē”¼„æ¤Ė¤ā label ¾šŹó¤¬»Ä¤Ć¤Ę¤¤¤Ę”¢”Ö¤³¤Ī²čĮü¤Ļ label ¤ņ»ż¤Ć¤Ę¤¤¤ė²čĮü¤Ą¤Ź”£¤Ē¤Ļ label ¤āÉĮ¤¹ž¤Ž¤Ķ¤Š”×¤Č½čĶż¤µ¤ģ¤Ę¤·¤Ž¤¦¤č¤¦¤Ē”£label ¤ņ»ż¤Ć¤æ²čĮü¤ņ°·¤¦¤Č”¢-label "" ¤ä -set label "" ¤ņ»ŲÄź¤·¤Ę¤ā label ĶѤĪÉĮ²čĪĪ°č¤¬“Ž¤Ž¤ģ¤Ę¤·¤Ž¤¦¤Ī¤Ą¤Č¤«”£¤·¤«¤ā”¢“ŹĆ±¤Ź²ņ·čŗö¤ĻĢµ¤¤¤é¤·¤¤”£
_ImageMagick montage always includes labels - Stack Overflow
”ż Python + Pillow ¤Ē„愤„ė¾õ¤ĖŹĀ¤Ł¤Ę·ė¹ē”£ :
»ÅŹż¤Ź¤¤¤Ī¤Ē”¢ImageMagick ¤Ē·ė¹ē¤¹¤ė¤Ī¤ĻÄü¤į¤Ę”¢Python 3.9.5 64bit + Pillow 8.3.2 ¤Ē²čĮü·ė¹ē¤¹¤ė„¹„Æ„ź„ׄȤņ½ń¤¤¤æ”£„¹„Æ„ź„ׄČĘā¤Ė„Ž„ø„Ć„Æ„Ź„ó„Š”¼¤¬¤½¤ĪĀ¾¤¬Īóµó¤µ¤ģ¤Į¤ć¤Ć¤Ę¤ė¤±¤É”Ä”£¤Ž¤¢”¢½čĶż¤¬¤Ē¤¤ģ¤Š¤¤¤¤¤«”Ä”£
_joint_image.py

_output.png
°ģ±ž¤³¤ģ¤Ē”¢æō»ś¤¬½ń¤«¤ģ¤Ę¤¤¤ė²čĮü¤ņ„愤„ė¾õ¤ĖŹĀ¤Ł¤ė¤³¤Č¤¬¤Ē¤¤æ”£
GIMP 2.10.22 x64 Portable samjČĒ¤ņ»Č¤Ć¤Ę”¢ĒŲ·Ź¤Ė¾Æ¤·ĢĻĶĶ¤Ć¤Ż¤¤¤ā¤Ī¤āÄÉ²Ć¤·¤Ę¤ß¤æ”£96 x 96 „ɄƄȤĪ²čĮü¤ņŗī¤Ć¤Ę¤«¤é”¢„Õ„£„ė„æ ¢Ŗ „«„锼„Ž„Ć„Ō„ó„° ¢Ŗ ŹĀ¤Ł¤ė”¢¤Ē”¢800% x 800% ¤Ė¤·¤ĘŹĀ¤Ł¤Ę”¢Į°½Ņ¤Ī²čĮü¤Č½Å¤Ķ¹ē¤ļ¤»¤æ”£
°Ź²¼¤¬“°Ą®²čĮü”£CC0 / Public Domain ¤Ć¤Ę¤³¤Č¤Ē”£¤Ž¤¢”¢¤É¤³¤Ē¤³¤ó¤Ź¤Ī»Č¤¦¤ó¤Ą¤č¤Ć¤Ę“¶¤ø¤Ą¤±¤É”Ä”£
_spritesheet_number.png
¤Č¤¤¤¦¤³¤Č¤Ē”¢ImageMagick ¤ĪµóĘ°¤Ē„Ļ„Ž¤Ć¤æ¤ā¤Ī¤Ī”¢¤Ź¤ó¤Č¤«ĢÜÅŖ¤Ļ²Ģ¤æ¤»¤æ”£
¤½¤ģ¤Ė¤·¤Ę¤ā”¢·ė¶É Python „¹„Æ„ź„ׄȤņ½ń¤¤¤ĘĀŠ±ž¤·¤æ¤ļ¤±¤Ą¤«¤é”Ä”£¤Ą¤Ć¤æ¤éŗĒ½é¤«¤é”¢æō»ś¤ņÉĮ¤¹ž¤ą½čĶż¤ā“Ž¤į¤Ę”¢Į“Éō Python + Pillow ¤Ē½čĶż¤·¤Ę¤·¤Ž¤Ø¤Š¤č¤«¤Ć¤æ¤Ī¤Ē¤Ļ¤Ź¤¤¤«”ĤŹ”Ä”£
_joint_image.py
from PIL import Image, ImageFilter
import glob

inputfiles = "out/*.png"
output = "output.png"
xloop = 8

l = sorted(glob.glob(inputfiles))

w, h = 0, 0
imgs = []
for s in l:
    im = Image.open(s)
    if im.size[0] > w:
        w = im.size[0]
    if im.size[1] > h:
        h = im.size[1]
    imgs.append(im)

yloop = len(l) // xloop
if len(l) % xloop != 0:
    yloop += 1

tw = w * xloop
th = h * yloop
nim = Image.new("RGBA", (tw, th), (0, 0, 0, 0))

xi, yi = 0, 0
idx = 0
while yi < yloop:
    x, y = xi * w, yi * h
    nim.paste(imgs[idx].copy(), (x, y))
    idx += 1
    if idx >= len(l):
        break

    xi += 1
    if xi >= xloop:
        xi = 0
        yi += 1

nim.save(output)
°ģ±ž¤³¤ģ¤Ē”¢æō»ś¤¬½ń¤«¤ģ¤Ę¤¤¤ė²čĮü¤ņ„愤„ė¾õ¤ĖŹĀ¤Ł¤ė¤³¤Č¤¬¤Ē¤¤æ”£
GIMP 2.10.22 x64 Portable samjČĒ¤ņ»Č¤Ć¤Ę”¢ĒŲ·Ź¤Ė¾Æ¤·ĢĻĶĶ¤Ć¤Ż¤¤¤ā¤Ī¤āÄÉ²Ć¤·¤Ę¤ß¤æ”£96 x 96 „ɄƄȤĪ²čĮü¤ņŗī¤Ć¤Ę¤«¤é”¢„Õ„£„ė„æ ¢Ŗ „«„锼„Ž„Ć„Ō„ó„° ¢Ŗ ŹĀ¤Ł¤ė”¢¤Ē”¢800% x 800% ¤Ė¤·¤ĘŹĀ¤Ł¤Ę”¢Į°½Ņ¤Ī²čĮü¤Č½Å¤Ķ¹ē¤ļ¤»¤æ”£
°Ź²¼¤¬“°Ą®²čĮü”£CC0 / Public Domain ¤Ć¤Ę¤³¤Č¤Ē”£¤Ž¤¢”¢¤É¤³¤Ē¤³¤ó¤Ź¤Ī»Č¤¦¤ó¤Ą¤č¤Ć¤Ę“¶¤ø¤Ą¤±¤É”Ä”£
¤Č¤¤¤¦¤³¤Č¤Ē”¢ImageMagick ¤ĪµóĘ°¤Ē„Ļ„Ž¤Ć¤æ¤ā¤Ī¤Ī”¢¤Ź¤ó¤Č¤«ĢÜÅŖ¤Ļ²Ģ¤æ¤»¤æ”£
¤½¤ģ¤Ė¤·¤Ę¤ā”¢·ė¶É Python „¹„Æ„ź„ׄȤņ½ń¤¤¤ĘĀŠ±ž¤·¤æ¤ļ¤±¤Ą¤«¤é”Ä”£¤Ą¤Ć¤æ¤éŗĒ½é¤«¤é”¢æō»ś¤ņÉĮ¤¹ž¤ą½čĶż¤ā“Ž¤į¤Ę”¢Į“Éō Python + Pillow ¤Ē½čĶż¤·¤Ę¤·¤Ž¤Ø¤Š¤č¤«¤Ć¤æ¤Ī¤Ē¤Ļ¤Ź¤¤¤«”ĤŹ”Ä”£
[ „Ä„Ć„³¤ą ]
#2 [pygame] Pyagme¤Ē²čĮü¤ņŹ¬³ä¤·¤ĘÉĮ²č
Python + Pygame ¤Ē”¢„¹„ׄ鄤„Č„·”¼„Č²čĮü¤ņĘɤ߹ž¤ó¤Ē”¢³Ę„Ń”¼„ĤĖŹ¬³ä¤·¤Ę„¦„¤„ó„É„¦Ęā¤ĖÉĮ²č¤·¤æ¤¤”£¹Ķ¤Ø¤Ę¤ß¤æ¤é”¢ŗ£¤Ž¤Ē¤½¤¦¤¤¤¦½čĶż¤Ļ»ī¤·¤Ę¤Ź¤«¤Ć¤æ¤Ź”Ä”£¤µ¤Ę”¢¤É¤¦¤¹¤ģ¤Š”Ä”£
“Ķ¤Ļ”¢Windows10 x64 21H1 + Python 3.9.5 64bit + pygame 2.0.1”£
»ČĶŃ²čĮü¤Ļ°Ź²¼”£
_spritesheet_number.png
“Ķ¤Ļ”¢Windows10 x64 21H1 + Python 3.9.5 64bit + pygame 2.0.1”£
»ČĶŃ²čĮü¤Ļ°Ź²¼”£
_spritesheet_number.png
”ż blit()¤ņ»Č¤¦ŹżĖ””£ :
Pygame ¤Ļ”¢Surface.blit() ¤ņ»Č¤¦¤³¤Č¤Ē”¢Surface ¤«¤é Surface ¤Ų¤Č²čĮü¤ņžĮ÷¤¹¤ė¤³¤Č¤¬¤Ē¤¤ė”£¤³¤Ī blit() ¤Ė pygame.Rect ¤Č¤¤¤¦¶ė·ĮČĻ°Ļ¤ņÅĻ¤¹¤³¤Č¤Ē”¢øµ²čĮü¤ĪĒ¤°Õ¤ĪČĻ°Ļ¤Ą¤±¤ņžĮ÷”¢¤Č¤¤¤¦¤³¤Č¤¬¤Ē¤¤ė¤é¤·¤¤”£
¤³¤ģ¤ņ»Č¤Ø¤Š„¹„ׄ鄤„Č„·”¼„Č²čĮü¤Ī°ģÉō¤Ą¤±¤ņČ“¤½Š¤·¤ĘÉĮ²č¤Ē¤¤ė¤ó¤ø¤ć¤Ź¤¤¤«¤Ź”Ä”£¤Č¤¤¤¦¤³¤Č¤Ē”¢»ī¤·¤Ę¤ß¤æ”£
_02_blit_mn.py
pygame.Rect(x, y, width, height) ¤Ē¶ė·ĮČĻ°Ļ¤ņ»ŲÄź¤Ē¤¤ė”£¤½¤ģ¤ņĒŪĪó rects ¤ĖĆß¤Ø¤Ę¤Ŗ¤¤¤Ę”Ä”£„¹„Æ„ź”¼„ó¤ĖĮźÅö¤¹¤ė Surface”¢¤ņ³ŹĒ¼¤·¤Ę¤¤¤ė screen ¤Ė blit() ¤ĒÉĮ²č¤¹¤ėŗŻ¤Ė”¢area=rects[index] ¤Č¤¤¤¦·Į¤ĒÅĻ¤·¤Ę”¢”Öøµ²čĮü¤Ī”¢¤³¤ĪČĻ°Ļ¤Ą¤±¤ņČ“¤½Š¤·¤ĘÉĮ²č¤»¤č”×ÅŖ¤Ź½čĶż¤ņ¤·¤Ę¤¤¤ė”£
¼Ā¹Ō¤·¤æ¤é”¢¤³¤¦¤Ź¤Ć¤æ”£
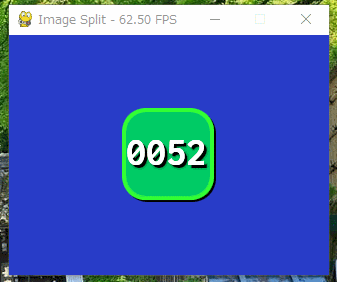
øµ²čĮü¤Ī°ģÉō¤Ą¤±¤ņÉĮ²č¤Ē¤¤Ę¤¤¤ė”£
¤Č¤¤¤¦¤³¤Č¤Ē”¢blit() ¤Ė pygame.Rect ¤ņÅĻ¤»¤Š”¢ĢÜÅŖ¤Ļ²Ģ¤æ¤»¤ė¤ČŹ¬¤«¤Ć¤æ”£
¤Į¤Ź¤ß¤Ė”¢¾åµ¤Ī„¹„Æ„ź„ׄȤĒ¤Ļ pygame.Rect() ¤ņ»Č¤Ć¤Ę¤ė¤±¤É”¢¤½¤Īøå„°„°¤Ć¤Ę¤ß¤æ¤é”¢blit(img, (px, py), (x, y, w, h)) ¤Č¤¤¤¦½ń¤Źż¤ā¤Ē¤¤ė¤ČĆĪ¤Ć¤æ”£
½čĶżĀ®ÅŁ¤Ē°ć¤¤¤Ļ¤¢¤Ć¤æ¤ź¤¹¤ė¤Ī¤«¤Ź”Ä”£¤É¤¦¤Ź¤ó¤Ą¤ķ¤¦”£
¤³¤ģ¤ņ»Č¤Ø¤Š„¹„ׄ鄤„Č„·”¼„Č²čĮü¤Ī°ģÉō¤Ą¤±¤ņČ“¤½Š¤·¤ĘÉĮ²č¤Ē¤¤ė¤ó¤ø¤ć¤Ź¤¤¤«¤Ź”Ä”£¤Č¤¤¤¦¤³¤Č¤Ē”¢»ī¤·¤Ę¤ß¤æ”£
_02_blit_mn.py
import pygame
import sys

SCRW, SCRH = 320, 240

pygame.init()
screen = pygame.display.set_mode((SCRW, SCRH), pygame.DOUBLEBUF)

imgname = "spritesheet_number.png"
img = pygame.image.load(imgname).convert_alpha()

# make split area list
rects = []
w, h = 96, 96
for y in range(8):
    for x in range(8):
        rects.append(pygame.Rect(x * w, y * h, w, h))

index = 0
running = True

clock = pygame.time.Clock()

# Main loop
while running:

    # check event
    for ev in pygame.event.get():
        if ev.type == pygame.QUIT:
            running = False
        if ev.type == pygame.KEYDOWN:
            if ev.key == pygame.K_ESCAPE or ev.key == pygame.K_q:
                # Push ESC or Q key
                running = False

    screen.fill((40, 60, 200))   # clear screen

    # draw image
    x = 160 - 96 / 2
    y = 120 - 96 / 2
    screen.blit(img, (x, y), area=rects[index])

    index = (index + 1) % len(rects)

    pygame.display.flip()
    clock.tick_busy_loop(60)

    cap = "Image Split - %5.2f FPS" % (clock.get_fps())
    pygame.display.set_caption(cap)

pygame.quit()
sys.exit()
pygame.Rect(x, y, width, height) ¤Ē¶ė·ĮČĻ°Ļ¤ņ»ŲÄź¤Ē¤¤ė”£¤½¤ģ¤ņĒŪĪó rects ¤ĖĆß¤Ø¤Ę¤Ŗ¤¤¤Ę”Ä”£„¹„Æ„ź”¼„ó¤ĖĮźÅö¤¹¤ė Surface”¢¤ņ³ŹĒ¼¤·¤Ę¤¤¤ė screen ¤Ė blit() ¤ĒÉĮ²č¤¹¤ėŗŻ¤Ė”¢area=rects[index] ¤Č¤¤¤¦·Į¤ĒÅĻ¤·¤Ę”¢”Öøµ²čĮü¤Ī”¢¤³¤ĪČĻ°Ļ¤Ą¤±¤ņČ“¤½Š¤·¤ĘÉĮ²č¤»¤č”×ÅŖ¤Ź½čĶż¤ņ¤·¤Ę¤¤¤ė”£
¼Ā¹Ō¤·¤æ¤é”¢¤³¤¦¤Ź¤Ć¤æ”£
øµ²čĮü¤Ī°ģÉō¤Ą¤±¤ņÉĮ²č¤Ē¤¤Ę¤¤¤ė”£
¤Č¤¤¤¦¤³¤Č¤Ē”¢blit() ¤Ė pygame.Rect ¤ņÅĻ¤»¤Š”¢ĢÜÅŖ¤Ļ²Ģ¤æ¤»¤ė¤ČŹ¬¤«¤Ć¤æ”£
¤Į¤Ź¤ß¤Ė”¢¾åµ¤Ī„¹„Æ„ź„ׄȤĒ¤Ļ pygame.Rect() ¤ņ»Č¤Ć¤Ę¤ė¤±¤É”¢¤½¤Īøå„°„°¤Ć¤Ę¤ß¤æ¤é”¢blit(img, (px, py), (x, y, w, h)) ¤Č¤¤¤¦½ń¤Źż¤ā¤Ē¤¤ė¤ČĆĪ¤Ć¤æ”£
# make split area list
rects = []
w, h = 96, 96
for y in range(8):
    for x in range(8):
        rects.append((x * w, y * h, w, h))
# ...

    # draw image
    x = 160 - 96 / 2
    y = 120 - 96 / 2
    screen.blit(img, (x, y), rects[index])
½čĶżĀ®ÅŁ¤Ē°ć¤¤¤Ļ¤¢¤Ć¤æ¤ź¤¹¤ė¤Ī¤«¤Ź”Ä”£¤É¤¦¤Ź¤ó¤Ą¤ķ¤¦”£
”ż subsurface() ¤ņ»Č¤¦ŹżĖ””£ :
Pygame ¤Ī Surface ¤Ė¤Ļ”¢subsurface() ¤Č¤¤¤¦„į„½„Ƅɤ¬¤¢¤Ć¤Ę”¢„³„ģ¤ņ»Č¤¦¤Č”¢øµ²čĮü¤Ī°ģÉō¤ņæ·¤æ¤Ź Surface ¤Č¤·¤ĘĘĄ¤ė¤³¤Č¤¬¤Ē¤¤ė¤é¤·¤¤”£°śæō¤Č¤·¤Ę”¢¤ä¤Ļ¤ź pygame.Rect ¤ņÅĻ¤¹ĢĻĶĶ”£
¤Č¤¤¤¦¤³¤Č¤Ē»ī¤·¤Ę¤ß¤æ”£
_03_subsurface.py
Rect ¤ņĒŪĪó¤ĖĆߤؤėĀå¤ļ¤ź¤Ė”¢subsurface ¤ņĒŪĪó imgs ¤ĖĆß¤Ø¤Ę¤¤¤ė”£¤Ž¤æ”¢screen ¤Ė blit() ¤ĒÉĮ²č¤¹¤ėŗŻ”¢øµ²čĮü¤Č¤·¤Ę subsurface ¤ņÅĻ¤·¤Ę¤¤¤ė”£
¼Ā¹Ō¤·¤æ¤é”¢¤³¤¦¤Ź¤Ć¤æ”£
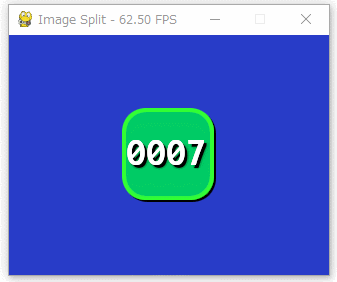
¤Č¤¤¤¦¤³¤Č¤Ē”¢subsurface ¤ņ»Č¤Ć¤Ę¤ā”¢øµ²čĮü¤Ī°ģÉō¤ņĄŚ¤ź½Š¤·¤æ“¶¤ø¤ĒÉĮ²č¤Ē¤¤ė¤ČŹ¬¤«¤Ć¤æ”£
¤æ¤Ą”¢Surface ¤Ī„É„„å„į„ó„ȤņĘɤą¤Č”¢„Ļ”¼„É„¦„§„¢ÉĮ²č¤¬¤É¤¦¤Ī¤³¤¦¤Ī”¢¤ß¤æ¤¤¤Ź¤³¤Č¤¬½ń¤¤¤Ę¤¢¤ė¤č¤¦¤Ź”Ä”£
_pygame.Surface - pygame v2.0.1.dev1 documentation
„Ē„£„¹„ׄģ„¤„ā”¼„ɤ¬„Ļ”¼„É„¦„§„¢ÉĮ²č¤ø¤ć¤Ź¤¤¾ģ¹ē¤Ļ”¢É½¼Ø¤Ė»Č¤Ć¤Ę¤ė Surface ¤«¤é subsurface ¤ņŗī¤ė¤³¤Č¤ā¤Ē¤¤ė”¢¤ČøĄ¤Ć¤Ę¤ė¤Ī¤«¤Ź”Ä”£µÕ¤ĖøĄ¤¦¤Č”¢„Ļ”¼„É„¦„§„¢ÉĮ²č¤Ī¾ģ¹ē¤Ļɽ¼Ø¤Ė»Č¤Ć¤Ę¤ė Surface ¤«¤é subsurface ¤ņŗī¤ģ¤Ž¤»¤ó¤č”¢¤Č¤¤¤¦¤³¤Č¤Ą¤ķ¤¦¤Ź”Ä”£
¤Č¤¤¤¦¤³¤Č¤Ē»ī¤·¤Ę¤ß¤æ”£
_03_subsurface.py
import pygame
import sys

SCRW, SCRH = 320, 240

pygame.init()
screen = pygame.display.set_mode((SCRW, SCRH), pygame.DOUBLEBUF)

imgname = "spritesheet_number.png"
img = pygame.image.load(imgname).convert_alpha()

# make subsurface
imgs = []
w, h = 96, 96
for y in range(8):
    for x in range(8):
        _rect = pygame.Rect(x * w, y * h, w, h)
        imgs.append(img.subsurface(_rect))

index = 0
running = True

clock = pygame.time.Clock()

# Main loop
while running:

    # check event
    for ev in pygame.event.get():
        if ev.type == pygame.QUIT:
            running = False
        if ev.type == pygame.KEYDOWN:
            if ev.key == pygame.K_ESCAPE or ev.key == pygame.K_q:
                # Push ESC or Q key
                running = False

    screen.fill((40, 60, 200))   # clear screen

    # draw image
    x = 160 - 96 / 2
    y = 120 - 96 / 2
    screen.blit(imgs[index], (x, y))

    index = (index + 1) % len(imgs)

    pygame.display.flip()
    clock.tick_busy_loop(60)

    cap = "Image Split - %5.2f FPS" % (clock.get_fps())
    pygame.display.set_caption(cap)

pygame.quit()
sys.exit()
Rect ¤ņĒŪĪó¤ĖĆߤؤėĀå¤ļ¤ź¤Ė”¢subsurface ¤ņĒŪĪó imgs ¤ĖĆß¤Ø¤Ę¤¤¤ė”£¤Ž¤æ”¢screen ¤Ė blit() ¤ĒÉĮ²č¤¹¤ėŗŻ”¢øµ²čĮü¤Č¤·¤Ę subsurface ¤ņÅĻ¤·¤Ę¤¤¤ė”£
¼Ā¹Ō¤·¤æ¤é”¢¤³¤¦¤Ź¤Ć¤æ”£
¤Č¤¤¤¦¤³¤Č¤Ē”¢subsurface ¤ņ»Č¤Ć¤Ę¤ā”¢øµ²čĮü¤Ī°ģÉō¤ņĄŚ¤ź½Š¤·¤æ“¶¤ø¤ĒÉĮ²č¤Ē¤¤ė¤ČŹ¬¤«¤Ć¤æ”£
¤æ¤Ą”¢Surface ¤Ī„É„„å„į„ó„ȤņĘɤą¤Č”¢„Ļ”¼„É„¦„§„¢ÉĮ²č¤¬¤É¤¦¤Ī¤³¤¦¤Ī”¢¤ß¤æ¤¤¤Ź¤³¤Č¤¬½ń¤¤¤Ę¤¢¤ė¤č¤¦¤Ź”Ä”£
_pygame.Surface - pygame v2.0.1.dev1 documentation
„Ē„£„¹„ׄģ„¤„ā”¼„ɤ¬„Ļ”¼„É„¦„§„¢ÉĮ²č¤ø¤ć¤Ź¤¤¾ģ¹ē¤Ļ”¢É½¼Ø¤Ė»Č¤Ć¤Ę¤ė Surface ¤«¤é subsurface ¤ņŗī¤ė¤³¤Č¤ā¤Ē¤¤ė”¢¤ČøĄ¤Ć¤Ę¤ė¤Ī¤«¤Ź”Ä”£µÕ¤ĖøĄ¤¦¤Č”¢„Ļ”¼„É„¦„§„¢ÉĮ²č¤Ī¾ģ¹ē¤Ļɽ¼Ø¤Ė»Č¤Ć¤Ę¤ė Surface ¤«¤é subsurface ¤ņŗī¤ģ¤Ž¤»¤ó¤č”¢¤Č¤¤¤¦¤³¤Č¤Ą¤ķ¤¦¤Ź”Ä”£
[ „Ä„Ć„³¤ą ]
°Ź¾å”¢1 ĘüŹ¬¤Ē¤¹”£