2016/11/27(日) [n年前の日記]
#2 [python] PySide + Pillow(PIL) で塗り潰し
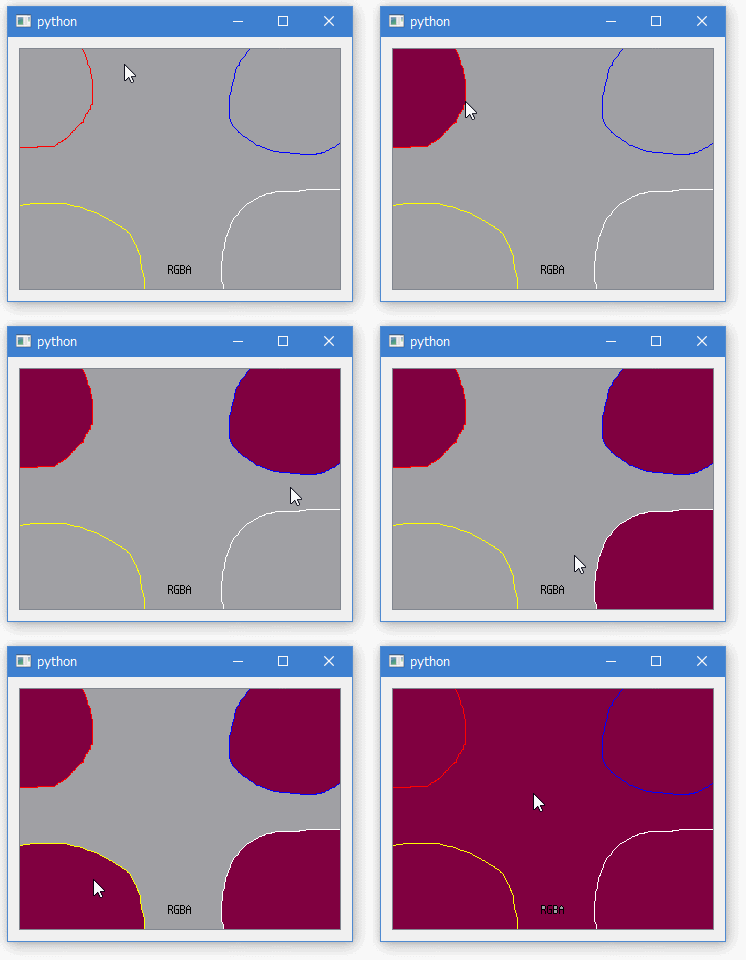
Pillow(PIL)の、ImageDraw.floodfill(PILImage, (x, y), (r, g, b, a)) を利用して、PySideのウインドウ上で塗り潰し処理を試したり。
_qimage2pil_test2.py

クリックすると、クリックした位置から塗り潰しができる。今回は只の動作確認なので、塗り潰し色は固定。
現状、PySide 1.2.4 と Pillow(PIL) 3.4.2 の組み合わせでは、ImageQt を使って PIL Image から QImage へ変換すると Python が死んでしまう不具合が発生する時があるけど。RGBA しか使わないという前提にすれば、処理内容が数行で済むので、各スクリプト内に処理を書けそうだな、と思えてきたので上記のスクリプトではそのように書いてみたり。
_qimage2pil_test2.py
u"""
QPixmap → QImage → PIL Image に変換して塗り潰しの処理をしてみる.

ImageQtに相当するクラスをスクリプト内に置いてみた版。
Pillow のバージョンが上がれば、このクラスは不要になるかもしれない。

動作確認環境 : Windows10 x64 + Python 2.7.12 + PySide 1.2.4 + Pillow 3.4.2
"""

import cStringIO
import sys

# ここでPyQt4を使わないようにしているはず…なのだが…
from PySide import QtGui
from PySide import QtCore
sys.modules['PyQt4.QtGui'] = QtGui
sys.modules['PyQt4.QtCore'] = QtCore

from PySide.QtCore import *  # NOQA
from PySide.QtGui import *   # NOQA

from PIL import Image
from PIL import ImageDraw
# from PIL import ImageQt


class ImageQtPoor(QImage):

    u"""ImageQt substitute. Supports only RGBA image."""

    def __init__(self, im):
        """convert PIL Image to PySide QImage."""
        self.org_mode = im.mode
        if im.mode != "RGBA":
            im = im.convert("RGBA")
        w, h = im.size
        fmt = QImage.Format_ARGB32
        self.__data = im.tobytes("raw", "BGRA")
        super(ImageQtPoor, self).__init__(self.__data, w, h, fmt)

    @staticmethod
    def fromqimage(qim):
        """convert PySide QImage ro PIL Image."""
        buf = QBuffer()
        buf.open(QIODevice.ReadWrite)
        qim.save(buf, "PNG")
        fp = cStringIO.StringIO()
        fp.write(buf.data())
        buf.close()
        fp.seek(0)
        return Image.open(fp)

    @staticmethod
    def toqimage(pim):
        """convert PIL Image to PySide QImage."""
        fp = cStringIO.StringIO()
        pim.save(fp, "PNG")
        qim = QImage()
        qim.loadFromData(fp.getvalue(), "PNG")
        return qim


class GView(QGraphicsView):

    u"""画像アイテム表示用."""

    def __init__(self, *argv, **keywords):
        """init."""
        super(GView, self).__init__(*argv, **keywords)
        self.setBackgroundBrush(Qt.gray)
        scene = QGraphicsScene(self)
        self.setScene(scene)

        pm = QPixmap("./tmp_rgba.png")
        self.pm_item = QGraphicsPixmapItem(pm)
        scene.addItem(self.pm_item)

    def mousePressEvent(self, event):
        u"""マウスクリックした際に呼ばれる処理."""
        p = self.mapToScene(event.pos())
        x, y = int(p.x()), int(p.y())

        pm = self.pm_item.pixmap()         # QPixmapを取得
        qim = pm.toImage()                 # QImageに変換
        pim = ImageQtPoor.fromqimage(qim)  # PIL Imageに変換
        if pim.mode != "RGBA":
            pim = pim.convert("RGBA")

        # 塗り潰し(Flood Fill)をする
        ImageDraw.floodfill(pim, (x, y), (128, 0, 64, 255))

        qim2 = ImageQtPoor(pim)            # PIL Image → QImageに変換
        # qim2 = ImageQtPoor.toqimage(pim)

        pm2 = QPixmap.fromImage(qim2)      # QPixmapに変換
        self.pm_item.setPixmap(pm2)


class MyWidget(QWidget):

    u"""メインウインドウ相当."""

    def __init__(self, *argv, **keywords):
        """init."""
        super(MyWidget, self).__init__(*argv, **keywords)
        gv = GView(self)
        l = QVBoxLayout()
        l.addWidget(gv)
        self.setLayout(l)


if __name__ == '__main__':
    app = QApplication(sys.argv)
    w = MyWidget()
    w.show()
    sys.exit(app.exec_())

クリックすると、クリックした位置から塗り潰しができる。今回は只の動作確認なので、塗り潰し色は固定。
現状、PySide 1.2.4 と Pillow(PIL) 3.4.2 の組み合わせでは、ImageQt を使って PIL Image から QImage へ変換すると Python が死んでしまう不具合が発生する時があるけど。RGBA しか使わないという前提にすれば、処理内容が数行で済むので、各スクリプト内に処理を書けそうだな、と思えてきたので上記のスクリプトではそのように書いてみたり。
[ ツッコむ ]
以上です。